Introduction
1. ZetaPush Celtia
ZetaPush accelerates the creation of connected applications by providing turnkey services. The developer consumes the services needed to run his application using development kits ready to be integrated into his front end code.
ZetaPush Celtia represents a major version of ZetaPush with a major change: the developer can write business code in languages such as JavaScript and TypeScript.
The developer will focus on his business code and ZetaPush will make his life easier by providing him with all the common components such as user management, data storage, etc.
In addition, ZetaPush hosts business code and front-end code.
2. Sections
If you want to start using ZetaPush quickly |
If you want to learn how to use ZetaPush Celtia main features, you can begin here |
If you want to go into some topics in depth |
If you want to cover completely each topic |
If you want to search for a particular piece of information |
3. Terms and concepts
| Word | Definition | ||
|---|---|---|---|
ZetaPush Account |
A developer account on the ZetaPush platform to create and manage applications. |
||
Credentials |
A Login/Password pair of the developer ZetaPush account. |
||
Cloud function |
A single operation that has a name, well-defined behavior, that can accept parameters and can produce an output. This is equivalent to a function in any language except that it is run remotely. |
||
Cloud service |
Several Cloud functions that are grouped together to cover a coherent set of features. You can consider this as a class (custom cloud service) with methods (cloud functions).
|
||
Custom Cloud Service |
A set of features similar to ZetaPush Cloud Services but developed by you. The usage of your custom cloud services is exactly the same as ZetaPush cloud services. |
||
Front |
Web pages developed by you (HTML / CSS / JS). |
||
Worker |
A set of Custom cloud services that you have developed to mutualize your business logic. |
||
Organization |
A group of ZetaPush accounts. Each organization may have several managers and several developers. Each person uses his own credentials to interact with ZetaPush but actions are shared among the organization. |
||
Application |
A logical container designed to perform a group of coordinated tasks or activities for the benefit of the user. An application may have a front part and a worker. An application has at least one environment. |
||
Environment |
Your application may be deployed and executed in separate zones called Environments. Each environment is a particular zone that you can organize as you wish.
For example, you can have |
||
CLI |
Command Line Interface: utility scripts that are usable in a terminal to run your code or deploy your application, for example. |
||
Console |
The main website used to manage your ZetaPush account and applications, read the documentation, monitor your applications… |
Getting Started
4. System requirements
To create a ZetaPush application you only need the Node.js ecosystem:
|
Install Node.js and npm
Go to Node.js Downloads and follow the installation instructions.
You also need to install additional tools for Node.js:
Additional tools
Windows
You must install development tools on Windows (Visual Studio Build Tools and Python). Fortunately, there is a npm tool that helps you to install all required dependencies. You must run this command line using PowerShell as Administrator:
npm install --global --production windows-build-toolsBe patient! It may take a while.
Debian/Ubuntu
Install build tools:
sudo apt-get install -y build-essentialEnterprise Linux and Fedora
Install build tools:
sudo yum install gcc-c++ make
# or: sudo yum groupinstall 'Development Tools'
-
5. Create your first application
5.1. From the command line
$ npm init @zetapush hello-world (1)| 1 | hello-world is the name of the folder that will be created with all the generated files |
You will be prompted for a developer login and a developer password in order to communicate with the platform.
The developer login and the developer password will be stored in the .zetarc file.
By default, the .gitignore file is configured to not deploy this file.
|
|
Manage account and applications
See ZetaPush account management to learn how to manage your account and your applications. |
5.2. Generated application
|
Using web frameworks
The project |
5.2.1. What it does ?
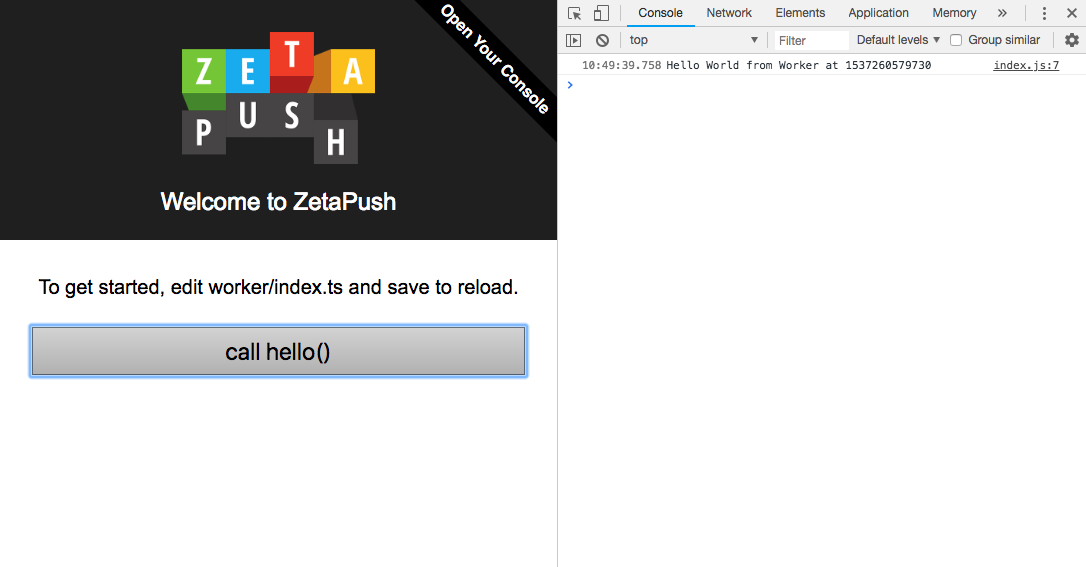
The generated project is really simple. It is just a web page that uses some JavaScript to call a cloud function named hello when button is clicked.
The cloud function is a custom cloud function that simply returns a message with the current date.
The result is retrieved by the JavaScript code and displayed in the browser console (using console.log).
5.2.2. Structure of generated project
The files of the generated project are structured as followed:
hello-world
├── .zetarc
├── .gitignore
├── front
│   ├── index.css
│   ├── index.html
│   ├── index.js
│   └── logo.png
├── worker
│   └── index.ts
├── package.json
├── README.md
└── tsconfig.json| File / Folder | Definition |
|---|---|
|
Contains the developer’s credentials. Useful to deploy or run your code. The content is auto generated if the file is empty. |
|
Standard file used by Git to prevent commiting some files. It is preconfigured to prevent publication of your developer credentials (on GitHub for example). |
|
Standard file for NPM to handle a module. It contains the dependencies, the name of your application, the entry point of your custom cloud services ( |
|
Gives you some information about how to use your application. |
|
By convention, the front end code of your application is in this folder. You can change it by editing |
|
By convention, the back end code of your application is in this folder. You can change it by editing |
6. Run locally your first application
6.1. What is run ?
Run is used in development phase. You run your code locally on your development machine. You can then iterate on your code to provide new features quickly or even debug your code.
6.2. From your terminal
Go into the generated folder (hello-world):
$ cd hello-worldThen run the following command:
$ npm run start -- --serve-front|
|
This command launches both a local web server on localhost:3000 and the custom cloud services.
You can open a web browser on localhost:3000 and open the browser console.
You can click on the button and see the result of the custom cloud service call in the browser console.
6.3. How it works
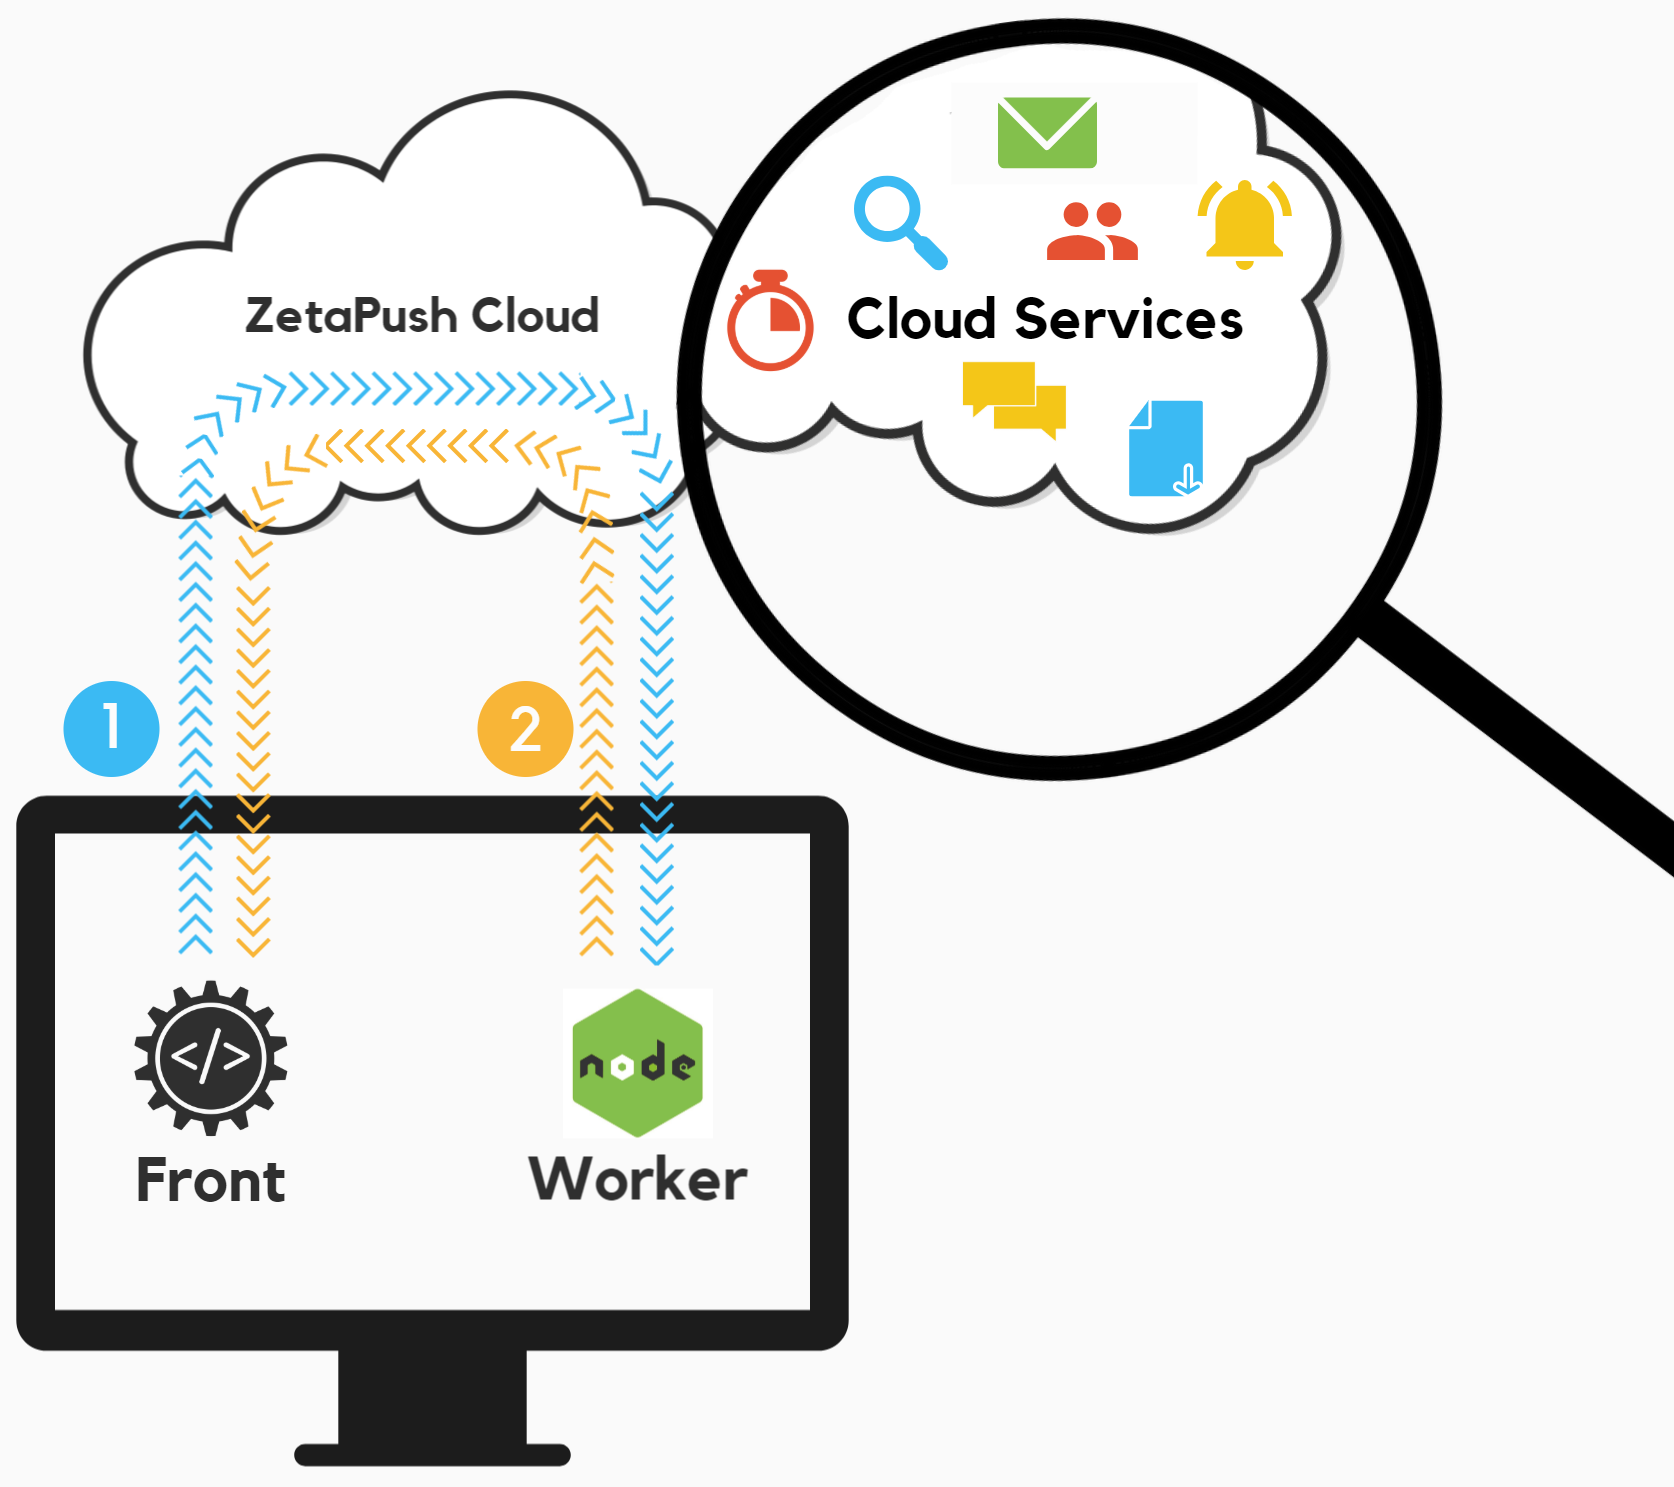
➊ Clicking on the button triggers a call to the ZetaPush cloud. ZetaPush routes the call to the local Node.js (the Node.js has been registered automatically by the CLI)
➋ The custom cloud service does its job and provides a response. ZetaPush routes the response to the connected web page
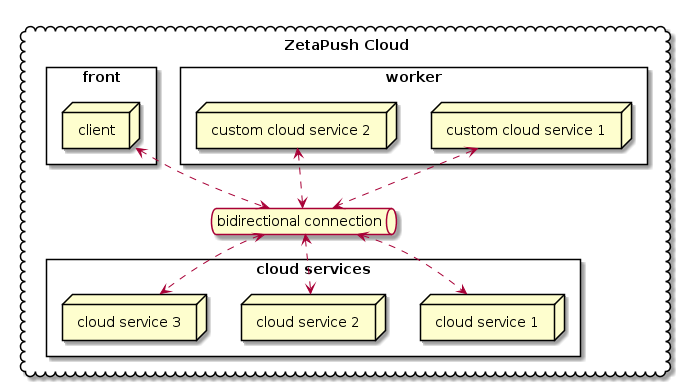
There are 3 parts that are working together:
-
The web page that initiates a connection to the ZetaPush cloud
-
The ZetaPush cloud
-
The worker that provides the custom cloud function implementation
Firstly, the web page is loaded in the browser and a JavaScript code automatically connects the ZetaPush client to the ZetaPush cloud.
|
Client connection
The connection is requested with |
|
Bidirectional connection
The connection between ZetaPush client and the ZetaPush cloud is established and is bi-directional. Any message sent by ZetaPush client will go through this opened connection. The ZetaPush cloud can also send messages to the ZetaPush client through this opened connection. |
Then, when the user clicks on the button, a message is sent to the ZetaPush cloud in order to execute some code. The ZetaPush cloud routes the message to the worker to call the custom cloud function.
|
Code to handle clicks on the button
The button is defined in The action of the button is done in |
The custom cloud function is simply a JavaScript or TypeScript function. This function is called and it generates a result that is returned to ZetaPush cloud. ZetaPush cloud routes the response message to the ZetaPush client to send the result.
|
Code of the cloud function
The code of the cloud function is available in |
Finally, the ZetaPush client receives the result and the JavaScript code of the web page displays it in the browser console (using console.log).
|
Code to handle the result
The result is handled in |
|
Everything goes through the Internet
Even if you run locally, the cloud functions defined by your worker are available on the Internet through ZetaPush cloud. |
7. Push your first application in the Cloud
7.1. What is push ?
Push is used to make your code "public". It will publish your web page(s) and also upload the code of your worker on ZetaPush cloud. You can push when you think that your code is ready to be used by your end-users.
7.2. From your terminal
$ npm run deploy|
|
This command uploads your code (front and worker) to the ZetaPush cloud. ZetaPush then handles the deployment by publishing your front and your custom cloud services.
The CLI displays the URL to access the published web page.
7.3. How it works
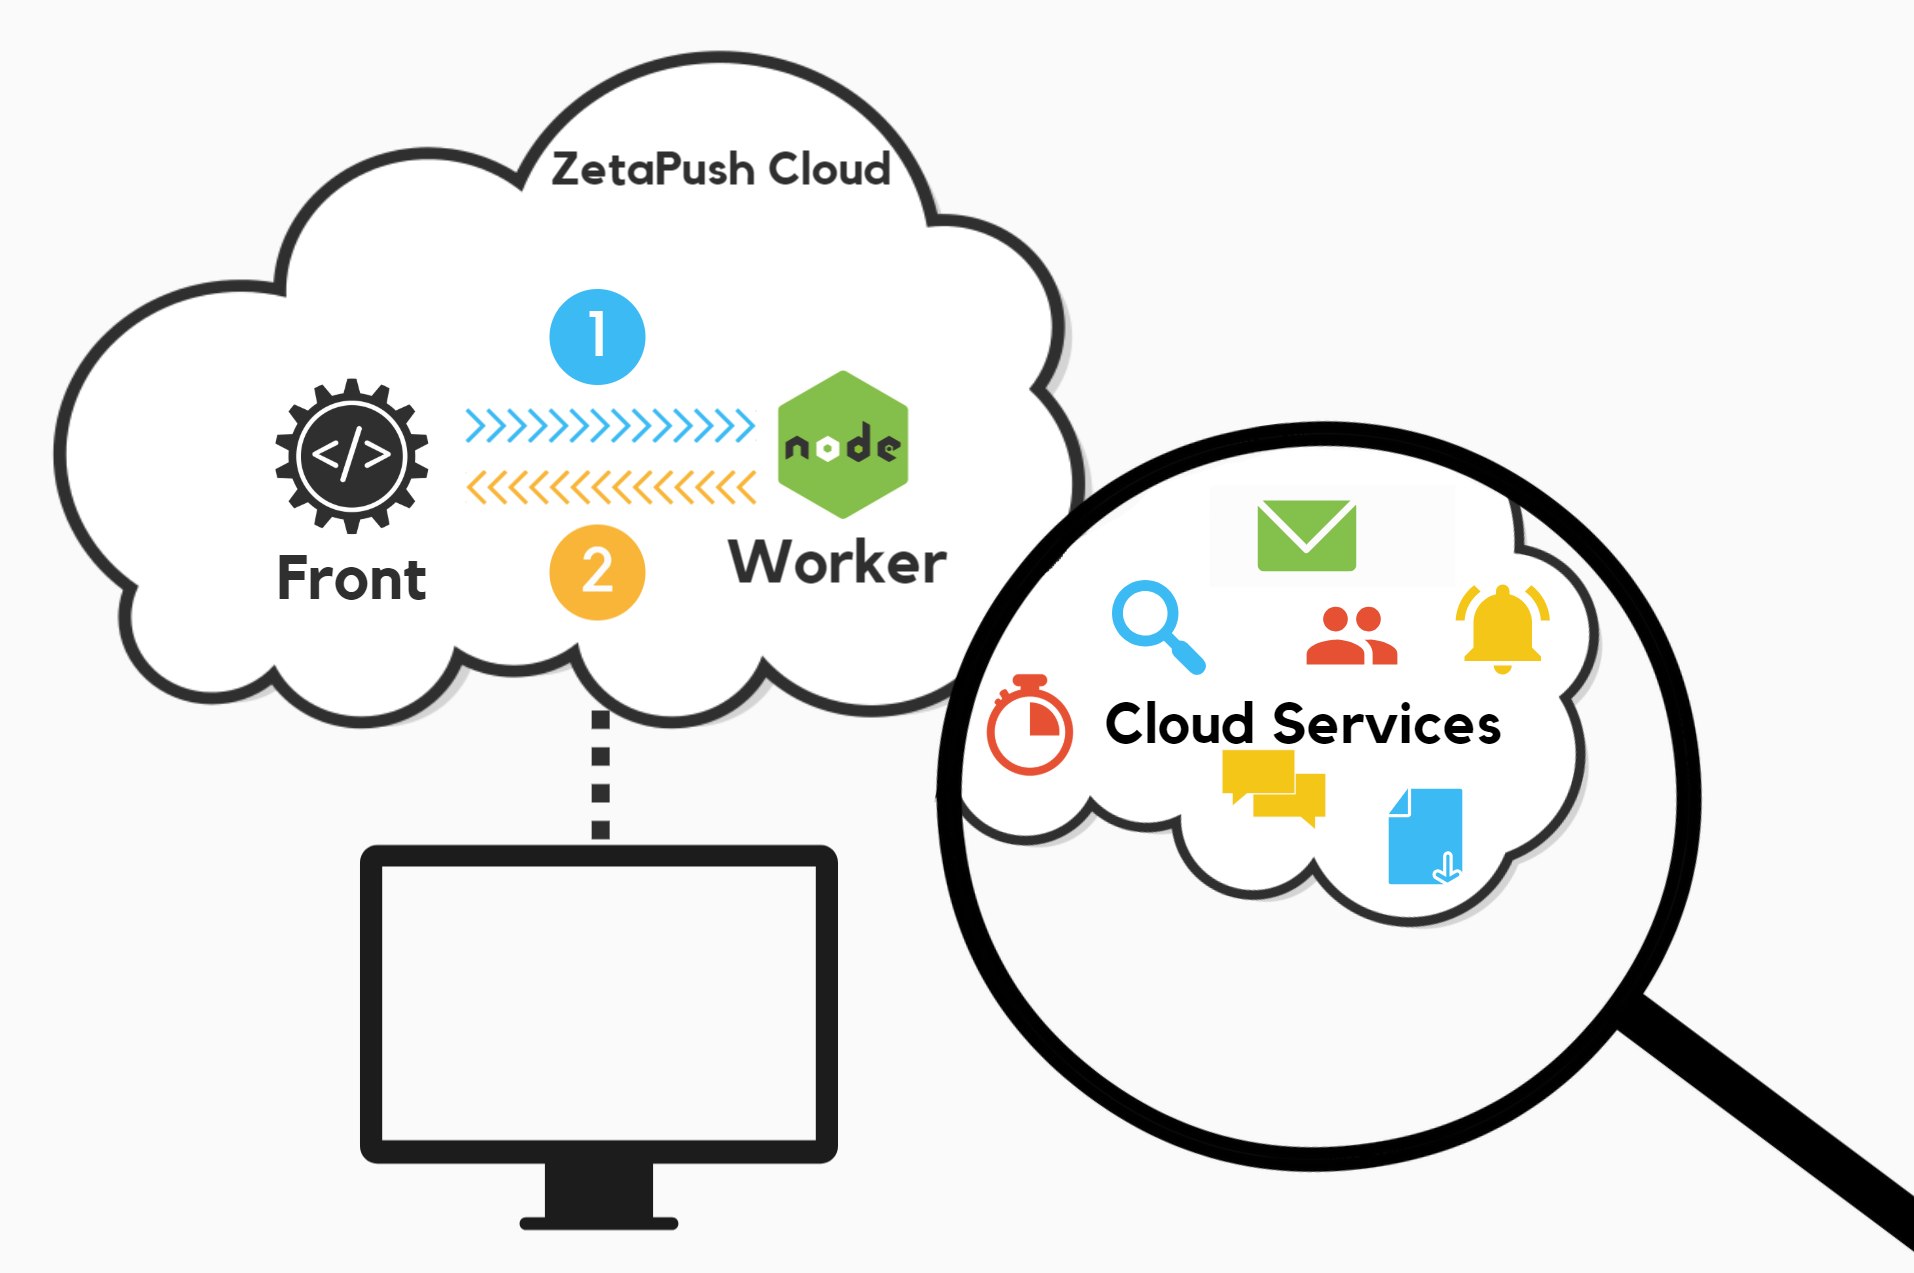
➊ Clicking on the button triggers a call to the ZetaPush cloud which in turn routes directly the call to the hosted Node.js
➋ The custom cloud service does its job and provides a response that ZetaPush routes back to the hosted web page
Now, the web page (front) and the custom cloud functions (defined in a worker) are hosted directly on ZetaPush cloud. The behavior remains the same as when code is executed local machine:
-
There are still the same 3 parts working together (web page, ZetaPush cloud and custom cloud function)
-
There is still a connection established by the client from the web page
-
There is still a message sent by the client to ZetaPush cloud that is routed to call the custom cloud function
-
There is still a message sent by the ZetaPush cloud that is routed to the client with the result of the custom cloud function
8. What’s next
You have created a new application, executed it locally and then published it.
Now, you are ready to code your own application:
Developer manual
9. Requirements
|
If you already prepared your environment, you can skip this section. |
9.1. System requirements
To create a ZetaPush application you only need the Node.js ecosystem:
|
Install Node.js and npm
Go to Node.js Downloads and follow the installation instructions.
You also need to install additional tools for Node.js:
Additional tools
Windows
You must install development tools on Windows (Visual Studio Build Tools and Python). Fortunately, there is a npm tool that helps you to install all required dependencies. You must run this command line using PowerShell as Administrator:
npm install --global --production windows-build-toolsBe patient! It may take a while.
Debian/Ubuntu
Install build tools:
sudo apt-get install -y build-essentialEnterprise Linux and Fedora
Install build tools:
sudo yum install gcc-c++ make
# or: sudo yum groupinstall 'Development Tools'
-
9.2. Using CLI
Once your have your application ready (see Quick start if you don’t have created an application) you can:
-
Run the backend code (Worker) locally
-
Deploy your application
To do this we provide a CLI (Command Line Interface) to help you focus on your code and not spend time on writing commands or scripts.
The CLI module is declared in the package.json of the project so it is installed by npm when you create your project
(see how to create an application using npm if you haven’t created a project).
When the project is created, we configure the package.json with a scripts section to make aliases that work
directly with npm.
9.2.1. Use npm script aliases to run the CLI
$ npm run <alias>If you want to run your worker locally using script alias, you can execute:
$ npm run start|
The The |
If you want to deploy your application using script alias, you can execute:
$ npm run deploy|
The |
9.2.2. Use CLI directly
With the CLI, you can run your worker with:
  1

  $ zeta run
Or deploy your application with:
  1

  $ zeta push
There are 3 ways to use directly zeta commands provided by the CLI:
-
Set an environment variable that points to your local
node_modules/.bin(recommended) -
Use
npxtool -
Install CLI as global (not recommended)
9.2.2.1. Update your PATH environment variable (recommended)
In order to be able to run zeta commands directly, you need to update your PATH.
Update environement variables
Debian/Ubuntu/MacOSX
You need to add it to your shell config file ~/.zshrc, ~/.profile or ~/.bashrc.
$ export PATH=./node_modules/.bin:$PATHNote that this will not automatically update your path for the remainder of the session. To do this, you should run:
$ source ~/.zshrc
$ source ~/.profile
$ source ~/.bashrc
Windows 10 and Windows 8
-
In Search, search for and then select: System (Control Panel)
-
Click the Advanced system settings link.
-
Click Environment Variables. In the section System Variables, find the PATH environment variable and select it. Click Edit. If the PATH environment variable does not exist, click New.
-
In the Edit System Variable (or New System Variable) window, specify the value of the PATH environment variable. Click OK. Close all remaining windows by clicking OK.
-
Reopen Command prompt window, and run zeta command.
Windows 7
-
From the desktop, right click the Computer icon.
-
Choose Properties from the context menu.
-
Click the Advanced system settings link.
-
Click Environment Variables. In the section System Variables, find the PATH environment variable and select it. Click Edit. If the PATH environment variable does not exist, click New.
-
In the Edit System Variable (or New System Variable) window, specify the value of the PATH environment variable. Click OK. Close all remaining windows by clicking OK.
-
Reopen Command prompt window, and run zeta command.
Windows Vista
-
From the desktop, right click the My Computer icon.
-
Choose Properties from the context menu.
-
Click the Advanced tab (Advanced system settings link in Vista).
-
Click Environment Variables. In the section System Variables, find the PATH environment variable and select it. Click Edit. If the PATH environment variable does not exist, click New.
-
In the Edit System Variable (or New System Variable) window, specify the value of the PATH environment variable. Click OK. Close all remaining windows by clicking OK.
-
Reopen Command prompt window, and run zeta command.
Windows XP
-
Select Start, select Control Panel. double click System, and select the Advanced tab.
-
Click Environment Variables. In the section System Variables, find the PATH environment variable and select it. Click Edit. If the PATH environment variable does not exist, click New.
-
In the Edit System Variable (or New System Variable) window, specify the value of the PATH environment variable. Click OK. Close all remaining windows by clicking OK.
-
Reopen Command prompt window, and run zeta command.
-
9.2.2.3. Install @zetapush/cli as a global command (not recommended)
$ npm i -g @zetapush/cli10. ZetaPush concepts
In order to be able to use ZetaPush, you need a ZetaPush account. Your account is used when you develop to run your project locally or to deploy it on ZetaPush cloud.
The code you produce is bound to an application.
An account belongs to an organization. An organization is useful to work in team. You can have several applications for your organization. You can manage access rights on applications according to members of your team.
As usual in development, you may need to run your application in different contexts (dev, continuous integration, prod…). Each application may have several environments. You can also manage access rights on environments according to members of your team.
|
Learn how to add an application to your organization. Learn how to add an environment to your application. Learn how to control access for an application. Learn how to control access for a particular environment. |
|
For now, environments are not fully supported but this feature will be available soon. |
10.1. Create your account
Currently, the only way to get a ZetaPush account is by contacting us. The aim is to understand your needs and to advise you even if you just want to test it:
Your account will be created soon after the first contact and an application that fits your needs will be available. Then you are ready to start working with ZetaPush.
|
Soon we will open access to everyone for free trial. Account creation will be available through our CLI tool, from the main site and the web console. |
11. Develop your front with ZetaPush
You may want to quickly provide a web application by just focusing on the visible part and the user experience instead of wasting time on technical concerns.
ZetaPush provides built-in cloud services to increase your productivity:
| Cloud service | Description | ||
|---|---|---|---|
The
|
|||
This section describes several services that provide basic user management functions:
|
|||
This section describes several services that provide basic data management functions: |
|||
It is possible to interact with your end-users using these services: |
|||
ZetaPush cloud services need to be "created" before being able to use them. This way, you can choose which services are part of your application instead of having them all.
|
Currently, using a front to interact with ZetaPush cloud services directly is not really possible due to this "creation" phase. For security reasons, service creation and configuration can’t be done via a client. When the web console will be fully ready, ZetaPush cloud services "creation" will be available through the web console. Hopefully, you can use a worker to declare the use of a ZetaPush cloud service and even configure it. The "creation" process is automatically handled by the worker. See the next section to know how to develop custom cloud services and use ZetaPush cloud services. |
12. Develop your business logic
Even if ZetaPush provides ready to use cloud services, we know that any application needs some specific behaviors. Instead of limiting your possibilities, we provide a way to help you develop quickly your own business logic.
12.1. What is a custom cloud service
A custom cloud service combines many cloud functions like the cloud services exposed by ZetaPush. The only difference is that you create the cloud functions. Generally, you will want to put the business logic of your application in the custom cloud services.
12.1.1. Architecture
You develop cloud services that are contained in a concept named worker. In your code it is
materialized by a folder named worker. The worker is the ZetaPush handler that starts your code (your custom cloud services).
Your application is composed of a logic part (the worker) and a UI part (the front).
There are two ways of running an application (worker and front):
-
You develop on your machine and iterate to provide features. Your application runs locally and interacts with ZetaPush Cloud.
-
Once you are ready to make the developed features available to your end-users, you publish your application. Your application runs directly in ZetaPush Cloud.
12.1.1.1. Run on your machine
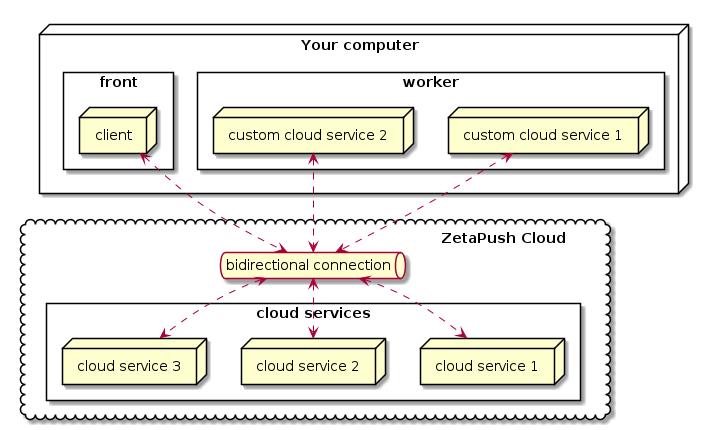
Both front and worker are running locally. The front interacts with custom cloud services contained in the worker through ZetaPush Cloud. As ZetaPush Cloud provides bidirectional connection, the custom cloud services can also interact with the front through ZetaPush Cloud too.
A custom cloud service can interact with built-in cloud services provided by ZetaPush.
|
When you start using ZetaPush, you only develop locally so from your point of vue, your front seems to directly interact with your custom cloud services. In fact, all messages go through the Internet and ZetaPush Cloud. It means that a published front can interact with a worker that is running locally and vice versa. |
12.1.1.2. Run in cloud
Once published, everything runs in the ZetaPush Cloud. However the behavior is the same. Every interaction between the front and custom cloud services goes through the ZetaPush Cloud.
The only main difference is that ZetaPush Cloud manages the hosting, the scalability and the high availability for you.
12.2. Develop a custom cloud services
12.2.1. Define a custom cloud service
As a reminder worker is the ZetaPush container that will handle your code that defines custom cloud services.
By convention, the code of your custom cloud services is placed in files under worker directory:
hello-world
├── .zetarc
├── .gitignore
├── front
│   ├── ...
│   └── ...
├── worker
│   ├── file1.ts
│   ├── file2.ts
│   ├── ...
│   ├── fileN.ts
│   └── index.ts
├── package.json
├── README.md
└── tsconfig.json|
Change directory structure
See more information about directory structure convention and how to adapt the structure. |
Translated into code, a custom cloud service is just a class and its methods are the cloud functions.
The code is written in any ts file defined in worker directory. For small application like a "hello world",
write your code directly in index.ts file.
So the most basic example of a custom cloud service is below:
  1
2
3
4
5
6
7
8

  class HelloWorldAsCustomCloudService {     (1)

    constructor() {}                       (2)

    helloWorld() {                         (3)
        return "Hello World";
    }
}
| 1 | A custom cloud service is encapsulated in a JavaScript/TypeScript class. HelloWorldAsCustomCloudService is your first custom cloud service. |
| 2 | A class can define a constructor. We will see later why it is important |
| 3 | helloWorld is your first custom cloud function |
| A cloud function is always asynchronous (with the async keyword or not) |
|
Change entry point
By default, the code above is directly written in You can write code of your custom cloud services in any other file named as you want. You will see in the reference part how to indicate to ZetaPush worker how to find your files if you don’t want to follow convention. |
12.2.1.1. Define a cloud function
Each cloud function in a custom cloud service is a standard JavaScript/TypeScript method. For example, if you want a cloud function that receives two parameters you write:
  1
2
3
4
5
6
7
8
9
10
11
12
13
14
15

  class HelloWorldAsCustomCloudService {                            (1)
    constructor() {}

    helloWorld() {
        return "Hello World";
    }

    saySomething(message: string, times: number) {                (2)
        let fullMessage = '';
        for(let i=0 ; i<times ; i++) {                            (3)
            fullMessage += `${message}\n`
        }
        return fullMessage                                        (4)
    }
}
| 1 | The custom cloud service definition as seen before |
| 2 | Declaration of a cloud function named saySomething. This cloud function accepts
two parameters. As TypeScript is the recommended way, each parameter is typed. |
| 3 | Just for an example, the business logic consists in looping a number of times and concatenating the message. You can obviously write any code you want here. |
| 4 | The custom cloud function simply returns the contactenated string. |
|
Why typing ?
Typing is optional but recommended to have a well defined API. Thanks to typing, ZetaPush is able to generate more accurate documentation based on your code and also generate mobile/web/IoT SDKs from your code with the right types so it makes developing your clients easier (for example, auto-completion can be used). |
|
Tips about cloud functions
A custom cloud service can have as many custom cloud functions as you want. A custom cloud function can have as many parameters as you want. Parameters can be anything: A custom cloud function can return anything including a Promise. You can also write your code using async/await syntax. |
|
Define several custom cloud services
Obviously when your application grows, you need to split your custom cloud service into several classes in order to make your API more understandable and more maintainable. You can learn how to define several custom cloud services. |
You have now a custom cloud service that provides two cloud functions. But until it is exposed, it can’t be called from outside of the worker.
The next section describes how you can expose your custom cloud service.
12.2.2. Expose a custom cloud service
When you define a custom cloud service that you want to expose to the client, you need to declare it. There are 2 cases:
-
Only one custom cloud service exposed
-
Many custom cloud services exposed
In this section we only address one custom cloud service exposed.
|
How to expose several custom cloud services
You can also learn how to expose several custom cloud services in the advanced sections. |
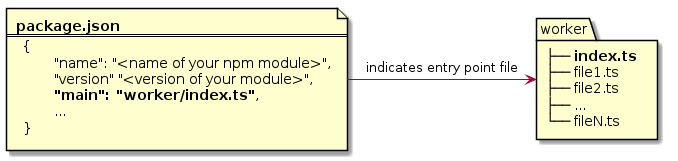
We follow npm conventions to indicate the entry point of your worker. Indeed, the package.json defines a property named main.
We use this property to indicate which file is the main file that declares the exposed custom cloud service.
By default, the main file is named index.ts and this file is placed in worker directory. So the main
property is by default worker/index.ts.
Now that your custom cloud service is marked as the entry point, it can be exposed by ZetaPush. However you still have a little change to make on your code:
  1
2
3
4
5
6
7
8
9
10
11
12
13
14
15

  export default class HelloWorldAsCustomCloudService {                    (1) (2)
    constructor() {}

    helloWorld() {
        return "Hello World";
    }

    saySomething(message: string, times: number) {
        let fullMessage = '';
        for(let i=0 ; i<times ; i++) {
            fullMessage += `${message}\n`
        }
        return fullMessage
    }
}
| 1 | export: this is required by TypeScript.
In fact, declaring a class in a file makes it private.
It means that if you have another .ts file and you want to import HelloWorldAsCustomCloudService declaration,
it won’t be possible without export keyword. This is for code encapsulation. |
| 2 | default: TypeScript provides this keyword.
When exposing only one custom cloud service, default tells the worker that there is only one class (only one
custom cloud service defined in the index.ts). So the worker can directly analyze it and instantiate it. |
|
How to expose several custom cloud services
As seen above, you can also learn how to expose several custom cloud services in the advanced sections. |
Now your custom cloud service can be loaded by the ZetaPush worker and your custom cloud service is automatically exposed. It means that now a client can call the cloud functions defined in your custom cloud service.
The next section shows how to call a cloud function from a web page using pure JavaScript.
12.2.3. Use a custom cloud service in your front
In this chapter we will see how to consume our cloud functions from a web page.
At the end of this example, we will have one button to call helloWorld cloud function and
one section with a message, a number of repetitions and a button to call saySomething cloud function.
|
Mobile applications
Here we show how to create a web page that consumes our custom cloud service. You can also create a mobile application for Android, iOS and Windows Phone as well as code for a device. You can use any language you want for the client part. By default we target web because it is currently the most used technology (even to build some mobile applications using hybrid technologies). |
As a reminder, here is the code of custom cloud service named HelloWorldAsCustomCloudService:
  1
2
3
4
5
6
7
8
9
10
11
12
13
14
15

  export default class HelloWorldAsCustomCloudService {
    constructor() {}

    helloWorld() {
        return "Hello World";
    }

    saySomething(message: string, times: number) {
        let fullMessage = '';
        for(let i=0 ; i<times ; i++) {
            fullMessage += `${message}\n`
        }
        return fullMessage
    }
}
12.2.3.1. Prepare your front for using ZetaPush client
By convention the directory structure of a ZetaPush application is defined below. You place
the code of your web page in the front directory:
hello-world
├── .zetarc
├── .gitignore
├── front
│   ├── ...
│   ├── index.js
│   └── index.html
├── worker
│   ├── ...
│   ├── ...
│   └── index.ts
├── package.json
├── README.md
└── tsconfig.json|
Other front files
For this example, we only need an HTML page and a JavaScript file. Needless to say that you can have CSS files, images and anything you want too. See more information about directory structure convention and how to adapt the structure. Moreover, you are not limited to write pure JavaScript code. You can also use any framework you want: |
For the example, we create an HTML page with a button to display the HelloWorld message in the page each time the button is clicked:
  1
2
3
4
5
6
7
8
9
10
11
12
13
14
15
16
17
18

  <!DOCTYPE html>
<html lang="en">

<head>
    <meta charset="UTF-8" />
    <meta name="viewport" content="width=device-width, initial-scale=1.0" />
    <title>Celtia</title>
</head>

<body>
    <button onclick="hello()">hello</button>                    (1)
    <ul id="result-container"></ul>                             (2)

    <script src="https://unpkg.com/@zetapush/client"></script>  (2)
    <script src="./index.js"></script>                          (3)
</body>

</html>
| 1 | We call hello() function that is defined later in index.js |
| 2 | Define a node that will display received messages |
| 3 | We include the client module provided by ZetaPush |
| 4 | We include a JavaScript file to distinguish HTML code from JavaScript code. All could be written in the HTML |
Then, in order to interact with ZetaPush cloud, we need to create a client instance and to connect to the cloud:
  1
2
3
4
5
6
7
8
9

  // Create new ZetaPush Client
const client = new ZetaPushClient.WeakClient();     (1)
// Create a proxy to invoked worker methods
const api = client.createProxyTaskService();        (2)
// Handle connection
client.connect()                                    (3)
  .then(() => {                                     (4)
    console.debug('onConnectionEstablished');
  });
| 1 | Use ZetaPushClient factory to instantiate a client. In this example, we ask for an anonymous connection (it means that actions are not bound to a particular user of your application) |
| 2 | Custom cloud service provides some functions that can be called from a client. For example, the custom cloud service exposes helloWorld and saySomething cloud functions.
Instead of having to write the signature of these functions in the client too, we simply use a JavaScript Proxy.
Therefore, you can directly interact with your custom cloud service without writing any pass-through code on the client side. |
| 3 | The client is ready, now connects it to the ZetaPush cloud. |
| 4 | Once the connection is established, the Promise is resolved and you can write some code in then callback. |
|
Available client types
|
12.2.3.2. Call hello cloud function
Our client is ready and now we want to call cloud function named helloWorld, we add the following code:
  1
2
3
4
5
6
7
8
9
10
11
12
13
14

  // Create new ZetaPush Client
const client = new ZetaPushClient.WeakClient();
// Create a proxy to invoked worker methods
const api = client.createProxyTaskService();
// Handle connection
client.connect()
  .then(() => {
    console.debug('onConnectionEstablished');
  });
// Handle DOM events
async function hello() {                                                                          (1)
  const messageFromCloudFunction = await api.helloWorld();                                        (2)
  document.getElementById('result-container').innerHTML += `<li>${messageFromCloudFunction}</li>` (3)
}
| 1 | Each time a user clicks on the button defined in the HTML, this method is called. |
| 2 | Calls the helloWorld cloud function and store the result in a variable. |
| 3 | Add a new list item in the HTML page |
Before running this sample, we improve our front in order to also understand how to call a cloud function that has parameters.
12.2.3.3. Call saySomething cloud function
We add two inputs to be able to send values to the saySomething cloud function.
The first input is a text to repeat. The second input is the number of times to repeat the message.
Here is the updated code:
  1
2
3
4
5
6
7
8
9
10
11
12
13
14
15
16
17
18
19
20
21
22
23

  <!DOCTYPE html>
<html lang="en">

<head>
    <meta charset="UTF-8" />
    <meta name="viewport" content="width=device-width, initial-scale=1.0" />
    <title>Celtia</title>
</head>

<body>
    <button onclick="hello()">hello</button>
    <div style="border: 1px solid #ccc">
      Message: <input type="text" id="message-input" />             (1)
      Repeat: <input type="text" value="1" id="repeat-input" />     (2)
      <button onclick="saySeveralTimes()">say something</button>    (3)
    </div>
    <ul id="result-container"></ul>

    <script src="https://unpkg.com/@zetapush/client"></script>
    <script src="./index.js"></script>
</body>

</html>
| 1 | The first input to enter a message |
| 2 | The second input to enter the number of times to repeat the message |
| 3 | A new button to call saySeveralTimes() function defined in index.js |
  1
2
3
4
5
6
7
8
9
10
11
12
13
14
15
16
17
18
19
20

  // Create new ZetaPush Client
const client = new ZetaPushClient.WeakClient();
// Create a proxy to invoked worker methods
const api = client.createProxyTaskService();
// Handle connection
client.connect()
  .then(() => {
    console.debug('onConnectionEstablished');
  });
// Handle DOM events
async function hello() {
  const messageFromCloudFunction = await api.helloWorld();
  document.getElementById('result-container').innerHTML += `<li>${messageFromCloudFunction}</li>`
}
async function saySeveralTimes() {                                                (1)
  const message = document.getElementById('message-input').value;                 (2)
  const repeat = document.getElementById('repeat-input').value;                   (3)
  const messages = await api.saySomething(message, parseInt(repeat));             (4)
  document.getElementById('result-container').innerHTML += `<li>${messages}</li>` (5)
}
| 1 | Each time a user clicks on the button 'say something' defined in the HTML, this method is called. |
| 2 | Reads the value of the input for getting the message. |
| 3 | Reads the value of the input for getting the number of times to display the message. |
| 4 | Calls saySomething cloud function with parameters. Note that as second parameter is a number, we have to convert the string from
the input to a number using parseInt. |
| 5 | Add a new list item in the HTML page containing the repeated messages |
Now everything is ready to run our application.
| When you call a cloud function from the client, the result is always a Promise even if the custom cloud function is synchronous because everything goes through the network. |
12.2.4. Run application
You have now defined a custom cloud service with one or several cloud function(s). You have also exposed your custom cloud service. So it is ready to be called from a client. Your client is also ready to call the custom cloud service.
The next step is to start the project (both front and worker) using the ZetaPush CLI on your computer.
|
Npm script aliases
Npm provides a handy feature to run scripts provided by dependencies without needing to change your computer settings or install the tool. ZetaPush defines npm script aliases to run the ZetaPush CLI through npm. |
To start your worker and you front using the ZetaPush CLI through npm, you simply run:
$ npm run start -- --serve-front|
|
|
Run only the worker
It is also possible to run only your worker. |
|
Automatic injection of ZetaPush information in your front
If you look closely to the code we have written, there is no information about your application at all in this sample code (the The ZetaPush CLI automatically injects the When you run your project locally, the local HTTP server that exposes the HTML page is lightly modified to include the When your project is run in the cloud, the same principle is applied. This way, you just use |
Now when we click the "hello" button, "Hello World" is displayed on the page.
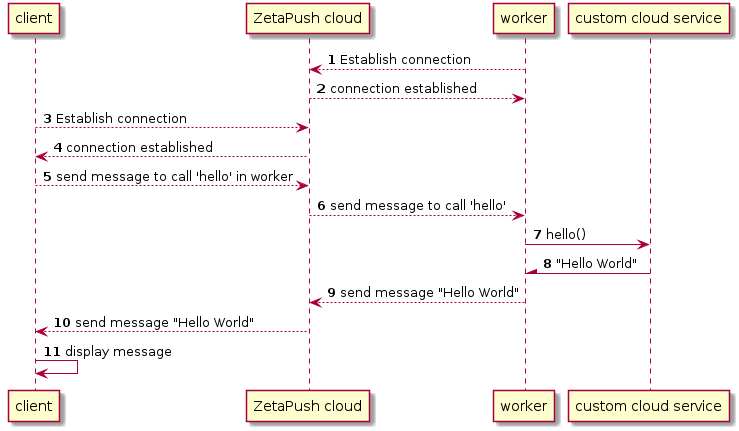
When you start your project locally, the first thing that happens is that your worker connects himself automatically to the ZetaPush cloud 1 2.
Then when you open your web browser, the connection from the client is established between the web page and the ZetaPush cloud 3 4.
When you click on the button, a message is sent through the opened connection in order to tell ZetaPush cloud to execute some
remote code 5. ZetaPush cloud routes the message to your worker 6 (that is running on your machine here). The worker receives the message
and calls the hello cloud function 7.
The cloud function generates a result 8. The worker picks this result and transform it to a message 9. This message is then sent to the ZetaPush cloud 10. The ZetaPush cloud routes the response message to the calling client 11. The client receives the message and the response is parsed 12 and available in your JavaScript.
You can also try to enter a message and a number of repetitions and hit the "say something" button.
The behavior is exactly the same. This time a message is sent to call the cloud function with also the parameters.
|
Serialization/deserailization between client and custom cloud service
When you call a cloud function from the client, under the hood, the values are serialized in JSON. This is understandable because everything goes through the network. On the worker side, everything is deserialized by the worker and your custom cloud service receives the values as they were written in the front side. |
12.2.5. Compose cloud services
You can compose cloud services either by using built-in cloud services provided by ZetaPush or by using another of your custom cloud services.
12.2.5.1. Dependency injection
Dependency injection is a powerful software technique that is totally managed by the worker.
You don’t need to manage the creation of neither built-in cloud services nor your custom cloud services. You just indicate in your code that you need a dependency and ZetaPush instantiates it for you. The instantiated dependency is then injected everywhere the dependency is needed.
| The dependency injection of ZetaPush uses Angular injection-js library. |
To mark a custom cloud service injectable (meaning that can be automatically created by ZetaPush
and then injected everywhere the dependency is aksed),
you need to import the package @zetapush/core in order to use Injectable decorator.
  1

  $ npm install --save @zetapush/core
Once the npm package is installed, you can import Injectable decorator and place it on your custom cloud service:
  1
2
3
4
5
6
7
8
9
10
11
12
13
14
15
16
17
18

  import { Injectable } from '@zetapush/core';            (1)

@Injectable()                                           (2)
export default class HelloWorldAsCustomCloudService {
  constructor() {}

  helloWorld() {
      return "Hello World";
  }

  saySomething(message: string, times: number) {
      let fullMessage = '';
      for(let i=0 ; i<times ; i++) {
          fullMessage += `${message}\n`
      }
      return fullMessage
  }
}
| 1 | Import the ZetaPush module that contains core features for custom cloud services such as injectable |
| 2 | Mark you custom cloud service candidate for dependency injection |
Here we just indicate that this custom cloud service can have dependencies that will be automatically injected and also that this custom cloud service can be injected anywhere it is needed.
In the next sections, we will see in concrete terms how to use it to reuse either a built-in cloud service or one of your custom cloud services.
12.2.5.2. Use built-in cloud service
ZetaPush built-in cloud services are available in @zetapush/platform-legacy module.
Add this module to your package.json by running the following command:
  1

  $ npm install --save @zetapush/platform-legacy
|
List of cloud services provided by ZetaPush
As a reminder, here is the list of built-in cloud services |
In the following example, we will use the Stack cloud service provided by ZetaPush.
In our use-case, we want to put some data associated with the current timestamp and be able to list all stored data.
To do this, the Stack service already provides some methods:
-
push({ stack: string, data: object }); -
list({ stack: string });
  1
2
3
4
5
6
7
8
9
10
11
12
13
14
15
16
17
18
19
20
21
22
23
24
25
26
27
28
29
30
31

  import { Injectable } from '@zetapush/core';
import { Stack } from '@zetapush/platform-legacy';  (1)

@Injectable()
export default class MyStorageService {
  private stackName = 'stack-example';

  constructor(private stack: Stack) {}              (2)

  /**
   *  Store data with associated timestamp
   */
  storeWithTimestamp(value: any) {
    return this.stack.push({                        (3)
      stack: this.stackName,
      data: {
        value,
        timestamp: Date.now()
      }
    });
  }

  /**
   * List all stored data
   */
  getAllData() {
    return this.stack.list({                        (4)
      stack: this.stackName
    });
  }
}
| 1 | We import the Stack service so that TypeScript knows it |
| 2 | We ask ZetaPush to inject a dependency of type Stack (stack is an instance of Stack).
Here we use the shorthand syntax for declaring a constructor parameter as well as a property.
So the property this.stack is defined and is initialized with stack parameter. |
| 3 | Calls the Stack service to store data (method push) |
| 4 | Calls the Stack service to list data (method list) |
The example defines a custom cloud service named MyStorageService that provides two cloud functions:
-
storeWithTimestampthat receives a value from a client and calls theStackservice to store received value (valueparameter) as well as the current timestamp (usingDate.now()) -
getAllDatathat has no parameters and callsStackservice to get all previsouly stored pairs of<value, timestamp>.
The most important part to understand is in the constructor. As described before,
the example uses dependency injection. You simply tell ZetaPush that you need a dependency of type Stack.
You don’t create it in your custom cloud service because it is not the responsibility of
your custom cloud service to create the Stack service. Instead, you let ZetaPush
handle the creation. Thanks to @Injectable decorator, ZetaPush detects that you have
a custom cloud services with needed dependencies. ZetaPush understands that you need a Stack
instance so it instantiates it before instantiating your custom cloud service. Then
ZetaPush instantiates your custom cloud service by providing, as the first argument of your
constructor here, the instance of Stack.
This behavior avoids you to have complex code to instantiate built-in cloud services. Moreover,
if you have several custom cloud services that are using the Stack service, thanks to
dependency injection, there will be only one instance shared between your custom cloud services.
12.2.5.3. Use another custom cloud service
In this example, we will have 2 custom cloud services:
-
Calendar: Utils function to return the current date -
HelloWorldService: Basic example usingCalendarcloud function
The first custom cloud service (Calendar) is defined in the file worker/calendar.js.
  1
2
3
4
5

  export class Calendar {
  getNow() { (1)
    return new Date().toLocalDateString('fr-FR');
  }
}
| 1 | The only cloud function of the Calendar service |
Then, we have the HelloWorldWithDateService that use our Calendar service. It is defined in the file worker/index.ts.
  1
2
3
4
5
6
7
8
9
10
11
12
13
14
15

  import { Injectable } from '@zetapush/core';
import { Calendar } from './calendar';        (1)

@Injectable()
export default class HelloWorldWithDateService {
  constructor(                                (2)
    private calendar: Calendar
  ) {}
  /**
   * Return 'Hello World' with current date
   */
  helloWorldWithDate() {
    return `Hello world at ${this.calendar.getNow()}`;
 }
}
| 1 | We import the Calendar service from the worker/calendar.ts file |
| 2 | calendar is an instance of Calendar and this.calendar is initialized with calendar value |
As for built-in cloud services, dependency injection works for your custom cloud services. Here it was an example
|
Private custom cloud service
In this example, we still have only one custom cloud service exposed. One Sometimes you may want to expose several custom cloud services. |
|
Shared module of custom cloud services
As you can see, a custom cloud service is no more than just a standard class with methods written
in TypeScript. If you want to develop reusable custom cloud services that could be
used in different applications, you can do it easily by following standards.
Actually, you can just create a npm module and import it like we do with You can also import any existing library that is available in the community. |
12.2.6. Add initialization code
ZetaPush manages scalability and redundancy of your workers. So there may have several workers that start at the same time. And if you initialize some data or configure some cloud services at the same time, it may have conflicts or duplicated data. To avoid that ZetaPush provides a way to initialize code that will ensure that is executed by only one worker.
For this, ZetaPush provides the bootstrap feature. To use it you need to implement the method onApplicationBootstrap() in your custom cloud service.
|
Bad practice for initialization code
You may want to put your initialization code in the constructor but this is a bad practice.
Indeed, even if in the most cases, a custom cloud service is a singleton, it may have several instances of your custom cloud service and your initialization code will be called many times. An other drawback is that the constructor is synchronous and the |
In the following example we will create a worker to store data in a database. The initialization code let you create a table in our database. Then we will create methods to add and list our data.
  1
2
3
4
5
6
7
8
9
10
11
12
13
14
15
16
17
18
19
20
21
22
23
24
25
26
27
28
29
30
31
32
33
34
35

  import { Injectable, Bootstrappable } from '@zetapush/core';
import { GdaConfigurer, Gda, GdaDataType } from '@zetapush/platform-legacy';

const NAME_TABLE = 'table';
const NAME_COLUMN = 'column';

@Injectable()
export default class implements Bootstrappable {                              (1)
  constructor(private gdaConfigurer: GdaConfigurer, private gda: Gda) {}

  async onApplicationBootstrap() {                                            (2)
    this.gdaConfigurer.createTable({                                          (3)
      name: NAME_TABLE,
      columns: [{
        name: NAME_COLUMN,
        type: GdaDataType.STRING
      }]
    });
  }

  async addData(data: string) {
    return await this.gda.put({
      table: NAME_TABLE,
      column: NAME_COLUMN,
      data,
      key: Date.now().toString()
    });
  }

  async getData() {
    return await this.gda.list({
      table: NAME_TABLE
    });
  }
}
| 1 | We implement the Bootstrappable interface. This is optional (see below) |
| 2 | The onApplicationBootstrap() method is always asynchronous, the async keyword is optional |
| 3 | In our initialization code we create a table in our database |
|
Bootstrappable interface
The implementation of the |
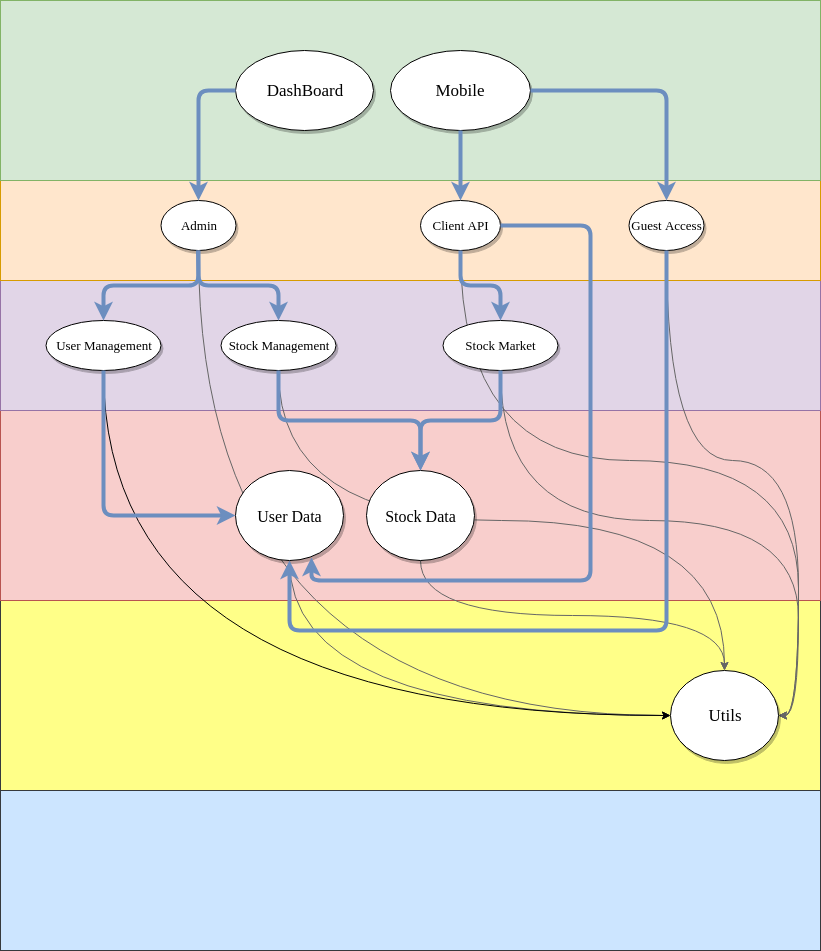
You can implement the onApplicationBootstrap() method in several custom cloud services.
A dependency tree will be created to execute all onApplicationBootstrap() methods in the proper order (regarding of the needed dependencies).
For example in the following scheme, we have 2 exposed API named Dashboard and Mobile. For the case of the Dashboard API, it uses another service named Admin, that uses User Management and Stock Management services and so on.
So the services are initialized in a specific order :
-
Utils
-
User Data / Stock Data
-
User Management / Stock Management / Stock Market
-
Admin / Client API / Guest Access
-
Dashboard / Mobile
12.3. Develop fast
12.3.1. Hot reload
In order to improve productivity, ZetaPush provides hot reload feature. Once you have started your application on your computer, you just focus on writing your code.
Each time you make a change in your custom cloud services code, ZetaPush detects the change and reload your custom cloud services code. The time to wait for code to be ready is drastically reduced so you can develop really faster thanks to this feature.
As front part is simply HTML and JavaScript, the local HTTP server always serves the latest version of your code. The cache is explicitly disabled in local development.
12.3.1.1. Test the feature
To test this feature, we will reuse the HelloWorldAsCustomCloudService sample. As a reminder, here is the code:
HelloWorldAsCustomCloudService
worker/index.ts
  1
2
3
4
5
6
7
8
9
10
11
12
13
14
15
16
17
18

  import { Injectable } from '@zetapush/core';

@Injectable()
export default class HelloWorldAsCustomCloudService {
    constructor() {}

    helloWorld() {
        return "Hello World";
    }

    saySomething(message: string, times: number) {
        let fullMessage = '';
        for(let i=0 ; i<times ; i++) {
            fullMessage += `${message}\n`
        }
        return fullMessage
    }
}
front/index.html
  1
2
3
4
5
6
7
8
9
10
11
12
13
14
15
16
17
18
19
20
21
22
23

  <!DOCTYPE html>
<html lang="en">

<head>
    <meta charset="UTF-8" />
    <meta name="viewport" content="width=device-width, initial-scale=1.0" />
    <title>Celtia</title>
</head>

<body>
    <button onclick="hello()">hello</button>
    <div style="border: 1px solid #ccc">
      Message: <input type="text" id="message-input" />
      Repeat: <input type="text" value="1" id="repeat-input" />
      <button onclick="saySeveralTimes()">say something</button>
    </div>
    <ul id="result-container"></ul>

    <script src="https://unpkg.com/@zetapush/client"></script>
    <script src="./index.js"></script>
</body>

</html>
front/index.js
  1
2
3
4
5
6
7
8
9
10
11
12
13
14
15
16
17
18
19
20

  // Create new ZetaPush Client
const client = new ZetaPushClient.WeakClient();
// Create a proxy to invoked worker methods
const api = client.createProxyTaskService();
// Handle connection
client.connect()
  .then(() => {
    console.debug('onConnectionEstablished');
  });
// Handle DOM events
async function hello() {
  const messageFromCloudFunction = await api.helloWorld();
  document.getElementById('result-container').innerHTML += `<li>${messageFromCloudFunction}</li>`
}
async function saySeveralTimes() {
  const message = document.getElementById('message-input').value;
  const repeat = document.getElementById('repeat-input').value;
  const messages = await api.saySomething(message, parseInt(repeat));
  document.getElementById('result-container').innerHTML += `<li>${messages}</li>`
}
-
Now start your application by running:
$ npm run start -- --serve-frontClick on 'hello' button, the message "Hello World" appears in the web page.
Simple change in code of your custom cloud service
Your application is started locally. Now we will test this feature by updating your code.
Update the worker/index.ts file as following:
  1
2
3
4
5
6
7
8
9
10
11
12
13
14
15
16
17
18

  import { Injectable } from '@zetapush/core';

@Injectable()
export default class HelloWorldAsCustomCloudService {
    constructor() {}

    helloWorld() {
        return "Hello World !!!";                       (1)
    }

    saySomething(message: string, times: number) {
        let fullMessage = '';
        for(let i=0 ; i<times ; i++) {
            fullMessage += `${message}\n`
        }
        return fullMessage
    }
}
| 1 | Add " !!!" at the end of the string |
Save the file and check your terminal. You should see something like this:
⠋ Reloading worker...
[INFO] Worker is up!
You can check that the code is really updated by clicking on the 'hello' button. Now you see that "Hello World !!!" is displayed in the web page.
|
No change is needed on the front
You don’t need to reload the web page or to reconnect the client to the ZetaPush cloud. |
Change code of your front
To demonstrate a change in your front, we will update the code of the
saySeveralTimes function:
  1
2
3
4
5
6
7
8
9
10
11
12
13
14
15
16
17
18
19
20

  // Create new ZetaPush Client
const client = new ZetaPushClient.WeakClient();
// Create a proxy to invoked worker methods
const api = client.createProxyTaskService();
// Handle connection
client.connect()
  .then(() => {
    console.debug('onConnectionEstablished');
  });
// Handle DOM events
async function hello() {
  const messageFromCloudFunction = await api.helloWorld();
  document.getElementById('result-container').innerHTML += `<li>${messageFromCloudFunction}</li>`
}
async function saySeveralTimes() {
  const message = document.getElementById('message-input').value;
  const repeat = document.getElementById('repeat-input').value;
  const messages = await api.saySomething(message + ' - ', parseInt(repeat));               (1)
  document.getElementById('result-container').innerHTML += `<li>${messages}</li>`
}
| 1 | We add ' - ' on the message parameter |
Save your file and reload your web page. Enter a message ("hello" for example) and click on 'say something' button. You should see "hello - hello - " (if you have chosen 2 repetitions).
Use a cloud service on the fly
As your application grows, you will need to use other built-in cloud services or custom cloud services.
We will improve our custom cloud service to use the Stack built-in cloud service to store messages.
First Stack service is provided by @zetapush/platform-legacy module. So you have to install it.
You can keep your application running in your terminal and open another terminal in the same folder.
Execute this command in the new terminal:
$ npm install --save @zetapush/platform-legacyYou can now import Stack service in your code and use it:
  1
2
3
4
5
6
7
8
9
10
11
12
13
14
15
16
17
18
19
20
21
22
23
24
25
26
27
28
29
30
31
32
33
34
35
36
37
38

  import { Injectable } from '@zetapush/core';
import { Stack } from '@zetapush/platform-legacy';          (1)

@Injectable()
export default class HelloWorldAsCustomCloudService {
  constructor(private stack: Stack) {}                      (2)

  helloWorld() {
    return 'Hello World';
  }

  async saySomething(message: string, times: number) {
    let fullMessage = '';
    for (let i = 0; i < times; i++) {
      fullMessage += `${message}\n`;
    }
    // store source information (message and times)
    // and generated information (fullMessage)
    await this.stack.push({                                 (3)
      stack: 'messages',
      data: {
        message,
        times,
        fullMessage
      }
    });
    return fullMessage;
  }

  async getStoredMessages() {                               (4)
    // get all values
    const response = await this.stack.list({
      stack: 'messages'
    });
    // get only useful part (message, times, fullMessage)
    return response.result ? response.result.content.map((item) => item.data) : [];
  }
}
| 1 | Import the module @zetapush/platform-legacy that we just installed with npm |
| 2 | Indicate that we need a dependency of type Stack that will be provided by ZetaPush worker |
| 3 | Add some code to store the messages. Here we store both received parameters and the generated message |
| 4 | A new cloud function in order to display what’s in the database |
You can save your file and if you look in your terminal, you can see something like this:
⠋ Reloading worker...
[INFO] Create services [ [ { itemId: 'stack',
      businessId: 'v79ivn00l',
      deploymentId: 'stack_0',
      description: 'stack',
      options: {},
      forbiddenVerbs: [Array],
⠴ Reloading worker...
[INFO] Worker is up!
To ensure that everything works fine, you need to update your front:
  1
2
3
4
5
6
7
8
9
10
11
12
13
14
15
16
17
18
19
20
21
22
23
24
25

  // Create new ZetaPush Client
const client = new ZetaPushClient.WeakClient();
// Create a proxy to invoked worker methods
const api = client.createProxyTaskService();
// Handle connection
client.connect().then(() => {
  console.debug('onConnectionEstablished');
  return displayAllMessages();                                                                 (1)
});
// Handle DOM events
async function hello() {
  const messageFromCloudFunction = await api.helloWorld();
  document.getElementById('result-container').innerHTML += `<li>${messageFromCloudFunction}</li>`;
}
async function saySeveralTimes() {
  const message = document.getElementById('message-input').value;
  const repeat = document.getElementById('repeat-input').value;
  const messages = await api.saySomething(message + ' - ', parseInt(repeat));
  await displayAllMessages();                                                                  (2)
}
async function displayAllMessages() {                                                          (3)
  const storedMessages = await api.getStoredMessages();                                        (4)
  const messagesAsString = storedMessages.map((msg) => `<li>${JSON.stringify(msg)}</li>`);     (5)
  document.getElementById('result-container').innerHTML = messagesAsString.join('');           (6)
}
| 1 | Load all messages once connected. |
| 2 | Replace code that writes fullMessage in the HTML by a call to the function below. |
| 3 | Define another function to display all messages. |
| 4 | Call the cloud function to retrieve all stored messages in database. This is the important part of the code because it calls a cloud function freshly written. |
| 5 | Convert object of values to a JSON string. |
| 6 | Write all stored messages in the HTML. |
Save your file and reload your web page. You can enter a message ("foo" for example) and a number of repetitions (5 for example). Then hit the 'say something' button. Now you will see something like:
{"message":"foo - ","times":5,"fullMessage":"foo - foo - foo - foo - foo - "}
This means that your custom cloud service has been reloaded and the Stack service
is really used. You can ensure that by reloading the web page, you will see the message
displayed in the web page.
|
Import npm module
As you can see, you can add a npm module even if your application is running and then import it in your code. The hot reload takes effect only when you update the code handled by the ZetaPush worker (i.e. your custom cloud services code). |
|
Hot reload with built-in cloud services
Thanks to dependency injection, ZetaPush worker can detect if a built-in cloud service is newly needed as a dependency. In fact, the worker keeps tracking of all dependencies to built-in cloud services and check if a new service is asked. If so, the worker creates it on ZetaPush cloud, instantiates it, and injects it everywhere it is needed. |
|
Hot reload on other files
Currently, if you update This feature will be supported in a future version. |
12.3.2. Auto-completion
You can use an IDE for speeding up your development:
Thanks to typing provided by TypeScript, these IDE can provide accurate auto-completion when you develop your custom cloud services.
That’s why auto-completion also works with ZetaPush built-in cloud services:
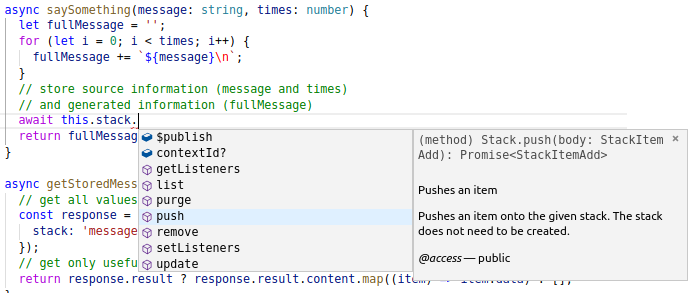
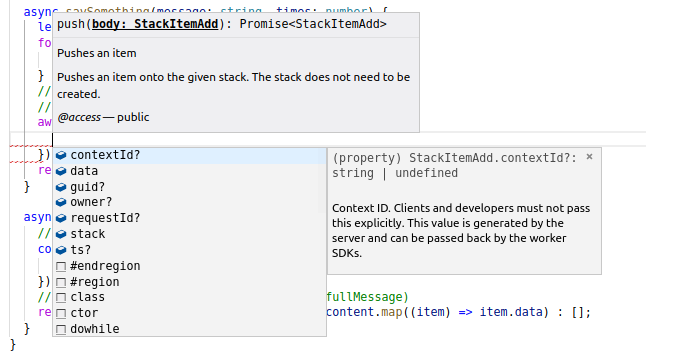
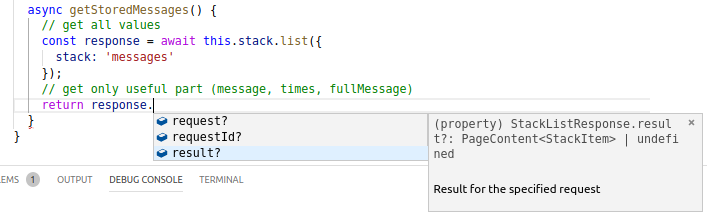
As you can see, in addition to auto-completion, documentation of cloud services is also available.
12.3.3. Log from a custom cloud service
12.3.3.1. Log using local console
NodeJS provides console object that you can use in your code. For example, update
the code of your custom cloud service to add some logs:
  1
2
3
4
5
6
7
8
9
10
11
12
13
14
15
16
17
18
19
20
21
22
23
24
25
26
27
28
29
30
31
32
33
34
35
36
37
38
39
40
41

  import { Injectable } from '@zetapush/core';
import { Stack } from '@zetapush/platform-legacy';

@Injectable()
export default class HelloWorldAsCustomCloudService {
  constructor(private stack: Stack) {}

  helloWorld() {
    return 'Hello World';
  }

  async saySomething(message: string, times: number) {
    console.log('message=', message, 'times=', times);
    let fullMessage = '';
    for (let i = 0; i < times; i++) {
      fullMessage += `${message}\n`;
    }
    console.debug('fullMessage=', fullMessage);
    // store source information (message and times)
    // and generated information (fullMessage)
    const response = await this.stack.push({
      stack: 'messages',
      data: {
        message,
        times,
        fullMessage
      }
    });
    console.debug('stack.push response=', response);
    return fullMessage;
  }

  async getStoredMessages() {
    // get all values
    const response = await this.stack.list({
      stack: 'messages'
    });
    // get only useful part (message, times, fullMessage)
    return response.result ? response.result.content.map((item) => item.data) : [];
  }
}
Running your application and hitting 'say something' button with a "hello" message and 5 repetitions, your terminal will print something like this:
[INFO] Worker is up!
message= hello - times= 5 (1)
fullMessage= hello - (2)
hello -
hello -
hello -
hello -
stack.push response= { contextId: '3303/4rU/4934', (3)
owner: 'v79ivn00l:root',
stack: 'messages',
ts: 1544096927555,
guid: '///+mHymsL1sq8jZZa1F2g==',
data:
{ message: 'hello - ',
times: 5,
fullMessage: 'hello - \nhello - \nhello - \nhello - \nhello - \n' } }| 1 | The first console.log that displays parameters |
| 2 | The first console.debug that displays the generated message |
| 3 | The second console.debug that displays the response of the Stack service |
As you can see, you can have any number of parameters you want and of any type.
For objects, the console will display it as JSON string.
|
Logs in production
Logging using However, when you will later publish your application on the ZetaPush cloud, everything written in standard and error outputs will be available in the ZetaPush web console. |
|
Levels and colors in local console
ZetaPush also provides a logger object that can be useful to distinguish levels.
Levels are explicitly written (for example You can learn how to use the local logger. Moreover, thanks to levels you can start your application with a particular level so levels below the selected level are not displayed at all. |
12.3.3.2. Log using ZetaPush built-in cloud service
In order to provide a logger with more features, ZetaPush provides the Logs cloud service.
Thanks to this service you can provide more context to your log entries (a logger name, levels, tags or an identifier, …).
The service can be used directly but code for logging may be a quite verbose if you provide all information manually.
So ZetaPush also provides an automatic logging feature that magically adds:
-
the name of the called cloud function
-
the parameter values of the called cloud function
-
the returned value of the called cloud function
-
the current date
-
the unique identifier of the request
-
which user has made the call
It also automatically logs all calls to builtin cloud services that could be made in the cloud function.
  1
2
3
4
5
6
7
8
9
10
11
12
13
14
15
16
17
18
19
20
21
22
23
24
25
26
27
28
29
30
31
32
33
34
35
36
37
38
39
40
41
42

  import { Injectable, RequestContextAware, RequestContext } from '@zetapush/core';     (1)
import { Stack } from '@zetapush/platform-legacy';

@Injectable()
export default class HelloWorldAsCustomCloudService implements RequestContextAware {  (2)
  requestContext!: RequestContext;                                                    (3)

  constructor(private stack: Stack) {}

  helloWorld() {
    return 'Hello World';
  }

  async saySomething(message: string, times: number) {
    let fullMessage = '';
    for (let i = 0; i < times; i++) {
      fullMessage += `${message}\n`;
    }
    this.requestContext.logger.debug('fullMessage=', fullMessage);                           (4)
    // store source information (message and times)
    // and generated information (fullMessage)
    const response = await this.stack.push({
      stack: 'messages',
      data: {
        message,
        times,
        fullMessage
      }
    });
    this.requestContext.logger.debug('stack.push response=', response);                      (5)
    return fullMessage;
  }

  async getStoredMessages() {
    // get all values
    const response = await this.stack.list({
      stack: 'messages'
    });
    // get only useful part (message, times, fullMessage)
    return response.result ? response.result.content.map((item) => item.data) : [];
  }
}
| 1 | Import RequestContext and RequestContextAware from @zetapush/core |
| 2 | Implements RequestContextAware to indicate that we use requestContext |
| 3 | requestContext magic property that is automatically provided by the worker. No need to initialize it.
The ! character is here to guide TypeScript otherwise there is a compilation error because
requestContext is not initialized. |
| 4 | Calls logger of requestContext to log fullMessage |
| 5 | Calls logger of requestContext to log response |
|
RequestContextAware
Implementing |
|
Definite Assignment Assertions
TypeScript checks that a class attribute is initialized. As |
Internally, the logger uses the Logs cloud service. The logs are by default sent to ZetaPush cloud and then available in ZetaPush web console. The ZetaPush worker is aware of the current context. So every log entry is enhanced with current context call.
For the example, start your application and hit the 'say something' button. Here is the result of the logs in the web console:
|
Advanced usage
You can find more information about advance usage of the logger provided by You can also learn how to persist logs and how to send logs to a custom log server. You can learn how to use custom tags. |
|
Integration with libraries
Currently, you can use them to log into the local console but as said before, the current context is not automatically provided. In the futur, ZetaPush will provide bridges to fully support those libraries to automatically provide the current context. |
12.3.4. Debug a custom cloud service
12.3.4.1. Debug your application with VSCode
VSCode provide a powerfull debugging feature https://code.visualstudio.com/docs/editor/debugging.
Add a launch configuration with the following structure.
  1
2
3
4
5
6
7
8
9
10
11
12
13
14
15
16
17
18
19

  {
  "version": "0.2.0",
  "configurations": [
    {
      "name": "zeta run",                                       (1)
      "type": "node",
      "request": "launch",
      "program": "${workspaceRoot}/node_modules/.bin/zeta",     (2)
      "stopOnEntry": false,
      "sourceMaps": true,
      "args": [                                                 (3)
        "run",
        "--serve-front"
      ],
      "cwd": "${workspaceRoot}",
      "console": "internalConsole"
    }
  ]
}
| 1 | Launch configuration name (the name you want) |
| 2 | Path to local zeta CLI |
| 3 | zeta command arguments |
|
Under the hood, VSCode runs a NodeJS process that runs It is exactly the same as doing: |
|
VSCode may use a different version of the NodeJS you use in an external terminal. |
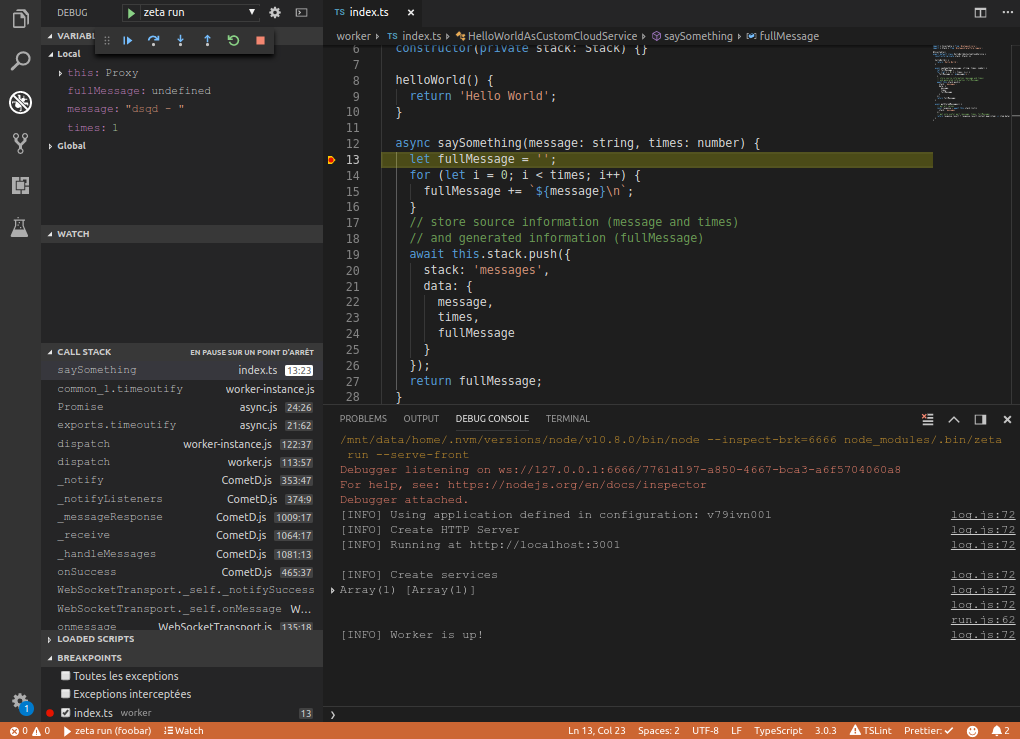
Once the configuration is ready, you can start your application in debug mode as indicated in VSCode documentation.
In the following picture, we show that the debugger stops in the code of your custom cloud service. You can also see the values of the parameters and now you can execute the code step by step.
12.3.4.2. Debug your application with IntelliJ based IDE
Intellij’s WebStorm provides a powerfull debugging feature https://blog.jetbrains.com/webstorm/2018/01/how-to-debug-with-webstorm/.
On the top menu, select Run → Edit Configurations
then select a new NodeJs Template :
-
Node interpreter : path to nodeJS executable.
-
Node parameters : must be "node_modules/.bin/zeta".
-
Working directory : path to your project.
-
Javascript file : should be blank.
-
Application parameters : zeta command to launch, with optionals flags.
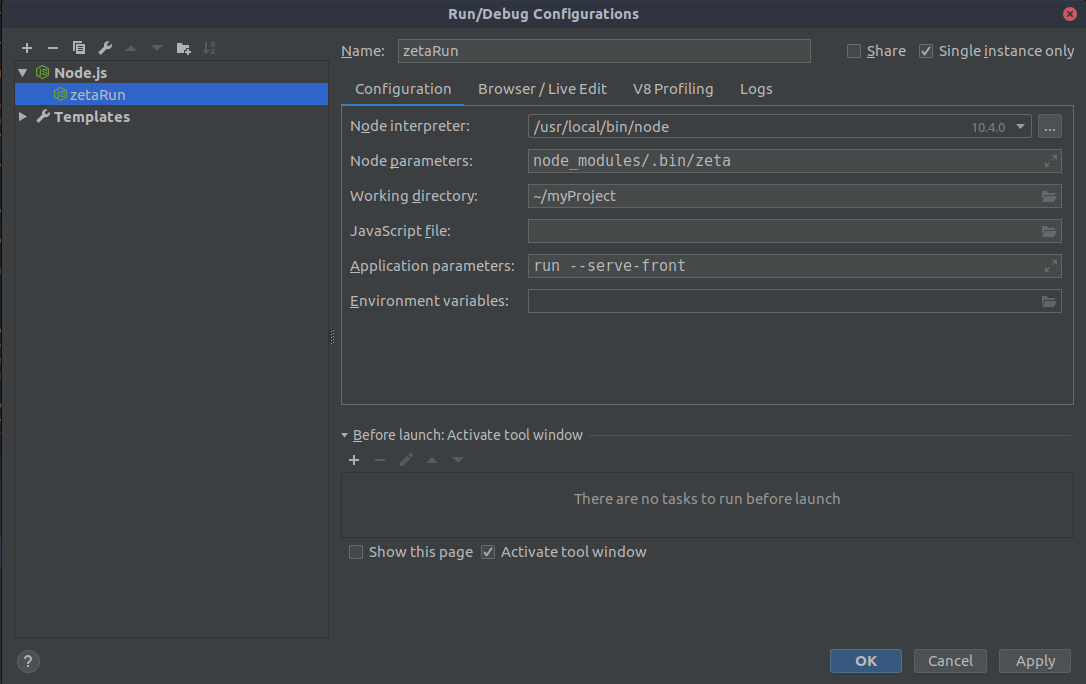
You can now use Intellij in debug mode with breakpoints and all the debugs features.
12.3.5. Test a custom cloud service
12.3.5.1. Test your custom cloud service
Testing not only ensures that you don’t make regression but also can help you code faster.
Unit testing
Unit testing is a great way to provide quickly a feature without losing time
on going back to the right execution context. The component (or class here)
is tested alone (all dependencies are mocked).
This section shows that you don’t need ZetaPush for unit testing and that you can use any testing library you want. For the example, we use jasmine because in addition to testing tools, it also provides basic mocking features. For the example, we will reuse our HelloWorldAsCustomCloudService and we will improve it.
As a reminder, here is the complete code of the custom cloud service and front:
HelloWorldAsCustomCloudService
worker/index.ts
  1
2
3
4
5
6
7
8
9
10
11
12
13
14
15
16
17
18
19
20
21
22
23
24
25
26
27
28
29
30
31
32
33
34
35
36
37
38
39
40
41
42

  import { Injectable, RequestContextAware, RequestContext } from '@zetapush/core';
import { Stack } from '@zetapush/platform-legacy';

@Injectable()
export default class HelloWorldAsCustomCloudService implements RequestContextAware {
  requestContext!: RequestContext;

  constructor(private stack: Stack) {}

  helloWorld() {
    return 'Hello World';
  }

  async saySomething(message: string, times: number) {
    let fullMessage = '';
    for (let i = 0; i < times; i++) {
      fullMessage += `${message}\n`;
    }
    this.requestContext.logger.debug('fullMessage=', fullMessage);
    // store source information (message and times)
    // and generated information (fullMessage)
    const response = await this.stack.push({
      stack: 'messages',
      data: {
        message,
        times,
        fullMessage
      }
    });
    this.requestContext.logger.debug('stack.push response=', response);
    return fullMessage;
  }

  async getStoredMessages() {
    // get all values
    const response = await this.stack.list({
      stack: 'messages'
    });
    // get only useful part (message, times, fullMessage)
    return response.result ? response.result.content.map((item) => item.data) : [];
  }
}
front/index.html
  1
2
3
4
5
6
7
8
9
10
11
12
13
14
15
16
17
18
19
20

  <!DOCTYPE html>
<html lang="en">
  <head>
    <meta charset="UTF-8" />
    <meta name="viewport" content="width=device-width, initial-scale=1.0" />
    <title>Celtia</title>
  </head>

  <body>
    <button onclick="hello()">hello</button>
    <div style="border: 1px solid #ccc">
      Message: <input type="text" id="message-input" /> Repeat: <input type="text" value="1" id="repeat-input" />
      <button onclick="saySeveralTimes()">say something</button>
    </div>
    <ul id="result-container"></ul>

    <script src="https://unpkg.com/@zetapush/client"></script>
    <script src="./index.js"></script>
  </body>
</html>
front/index.js
  1
2
3
4
5
6
7
8
9
10
11
12
13
14
15
16
17
18
19
20
21
22
23
24
25

  // Create new ZetaPush Client
const client = new ZetaPushClient.WeakClient();
// Create a proxy to invoked worker methods
const api = client.createProxyTaskService();
// Handle connection
client.connect().then(() => {
  console.debug('onConnectionEstablished');
  return updateAllMessages();
});
// Handle DOM events
async function hello() {
  const messageFromCloudFunction = await api.helloWorld();
  document.getElementById('result-container').innerHTML += `<li>${messageFromCloudFunction}</li>`;
}
async function saySeveralTimes() {
  const message = document.getElementById('message-input').value;
  const repeat = document.getElementById('repeat-input').value;
  const messages = await api.saySomething(message + ' - ', parseInt(repeat));
  await updateAllMessages();
}
async function updateAllMessages() {
  const storedMessages = await api.getStoredMessages();
  const messagesAsString = storedMessages.map((msg) => `<li>${JSON.stringify(msg)}</li>`);
  document.getElementById('result-container').innerHTML = messagesAsString.join('');
}
-
Firstly, we add jasmine by running:
$ npm install --save-dev jasmine                    (1)
$ node node_modules/jasmine/bin/jasmine init (2)| 1 | Add jasmine module in your project (save it in devDependencies using --save-dev argument) |
| 2 | Add some files required by jasmine to your project (spec folder is created) |
We want to test saySomething cloud function to ensure that the generated message
corresponds to what we really want. Let’s start by writing the skeleton of the tests. Create the file
spec/hello-world-custom-cloud-service/say-something.spec.js with the following content:
  1
2
3
4
5
6
7
8
9
10
11
12
13
14
15
16
17
18
19
20
21
22
23
24
25
26
27
28
29
30
31
32
33
34
35
36
37
38
39
40
41
42
43
44
45
46
47
48
49
50
51
52
53
54
55
56
57
58
59

  describe("HelloWorldCustomCloudService.", () => {
  beforeEach(() => {
    this.helloWorldService = null;                                          (1)
  });

  /**
   * Nominal case with a message repeated 1 time
   */
  describe("saySomething('hello', 1)", () => {
    it("returns the message written 1 time", async () => {
      const result = await this.helloWorldService.saySomething('hello', 1);
      expect(result).toBe('hello');
    });
  });

  /**
   * Nominal case with a message repeated 5 times
   */
  describe("saySomething('hello', 5)", () => {
    it("returns the message written 5 times separated by new lines", async () => {
      const result = await this.helloWorldService.saySomething('hello', 5);
      expect(result).toBe('hello\nhello\nhello\nhello\nhello');
    });
  });

  /**
   * Edge case with a message but nothing written due to no repetition
   */
  describe("saySomething('hello', 0)", () => {
    it("returns empty message", async () => {
      const result = await this.helloWorldService.saySomething('hello', 0);
      expect(result).toBe('');
    });
  });

  /**
   * Edge case with a message that is not a string
   */
  describe("saySomething(5, 2)", () => {
    it("returns the message written 2 times", async () => {
      const result = await this.helloWorldService.saySomething(5, 2);
      expect(result).toBe('5\n5');
    });
  });

  /**
   * Exception case with a string for the number of repetitions
   */
  describe("saySomething('hello', '5')", () => {
    it("returns the message written 5 times separated by new lines", async () => {
      try {
        await this.helloWorldService.saySomething('hello', '5');
        fail('should have failed');
      } catch(e) {
        expect(e.message).toBe('Only integer values are allowed for number of repetitions');
      }
    });
  });
});
| 1 | We need an instance of your custom cloud service here. We will see later how to do that in unit testing |
We have prepared the tests and the expectations. Now we need to instantiate
the HelloWorldCustomCloudService for testing it. However this function has a
dependency to the Stack built-in cloud service.
So normally, to test it we need the ZetaPush worker and the ZetaPush cloud to instantiate
this service. But in unit testing, we mock all dependencies to test only
HelloWorldCustomCloudService:
  1
2
3
4
5
6
7
8
9
10
11
12
13
14
15
16
17
18
19
20
21
22
23
24
25
26
27
28
29
30
31
32
33
34
35
36
37
38
39
40
41
42
43
44
45
46
47
48
49
50
51
52
53
54
55
56
57
58
59
60
61
62
63
64
65
66
67

  const customCloudService = require('../../worker/index');                         (1)
const HelloWorldAsCustomCloudService = customCloudService['default'];             (2)

describe('HelloWorldCustomCloudService.', () => {
  beforeEach(() => {
    const mockedStack = jasmine.createSpyObj('Stack', ['push']);                  (3)
    const mockedRequestContext = {                                                (4)
      logger: jasmine.createSpyObj('RequestContextLogger', ['debug'])
    };
    this.helloWorldService = new HelloWorldAsCustomCloudService(mockedStack);     (5)
    this.helloWorldService.requestContext = mockedRequestContext;                 (6)
  });

  /**
   * Nominal case with a message repeated 1 time
   */
  describe("saySomething('hello', 1)", () => {
    it("returns the message written 1 time", async () => {
      const result = await this.helloWorldService.saySomething('hello', 1);
      expect(result).toBe('hello');
    });
  });

  /**
   * Nominal case with a message repeated 5 times
   */
  describe("saySomething('hello', 5)", () => {
    it("returns the message written 5 times separated by new lines", async () => {
      const result = await this.helloWorldService.saySomething('hello', 5);
      expect(result).toBe('hello\nhello\nhello\nhello\nhello');
    });
  });

  /**
   * Edge case with a message but nothing written due to no repetition
   */
  describe("saySomething('hello', 0)", () => {
    it("returns empty message", async () => {
      const result = await this.helloWorldService.saySomething('hello', 0);
      expect(result).toBe('');
    });
  });

  /**
   * Edge case with a message that is not a string
   */
  describe("saySomething(5, 2)", () => {
    it("returns the message written 2 times", async () => {
      const result = await this.helloWorldService.saySomething(5, 2);
      expect(result).toBe('5\n5');
    });
  });

  /**
   * Exception case with a string for the number of repetitions
   */
  describe("saySomething('hello', '5')", () => {
    it("returns the message written 5 times separated by new lines", async () => {
      try {
        await this.helloWorldService.saySomething('hello', '5');
        fail('should have failed');
      } catch(e) {
        expect(e.message).toBe('Only integer values are allowed for number of repetitions');
      }
    });
  });
});
| 1 | Import code of your custom cloud service. As it is declared in index.ts with export default,
the require imports an object {default: HelloWorldCustomCloudService} |
| 2 | Get only a reference to HelloWorldCustomCloudService class |
| 3 | Use jasmine to create a mock object of Stack cloud service with a method push that does nothing |
| 4 | Create an object that has a property logger with a mocked debug method. This object is used
to mock requestContext attribute. |
| 5 | Instantiate the HelloWorldCustomCloudService cloud service with the mocked instance of Stack |
| 6 | Manually inject the mocked requestContext (as the worker would do automatically in ZetaPush context) |
Now our cloud service is ready to be tested. We can run jasmine but as the custom cloud service is written in TypeScript, we need to run jasmine with ts-node:
$ node -r ts-node/register node_modules/jasmine/bin/jasmine|
TypeScript
As your project is initialized for using TypeScript, You can also write your tests directly in TypeScript to benefit from auto-completion and type checking in your test suites too. |
|
Run directly from VSCode
You can configure VSCode to run your tests. In the main menu, click on : 
Add these lines in the Then you can select the |
If you run the tests, you will see that only one test succeeds. This is normal because if you look closely at the tests, you can see that the expected behavior is to have no new line at the end of the string. So the code of the custom cloud service doesn’t match the expected behavior. Let’s fix the code of the cloud function:
  1
2
3
4
5
6
7
8
9
10
11
12
13
14
15
16
17
18
19
20
21
22
23
24
25
26
27
28
29
30
31
32
33
34
35
36
37
38
39
40
41
42
43

  import { Injectable, RequestContextAware, RequestContext } from '@zetapush/core';
import { Stack } from '@zetapush/platform-legacy';

@Injectable()
export default class HelloWorldAsCustomCloudService implements RequestContextAware {
  requestContext!: RequestContext;

  constructor(private stack: Stack) {}

  helloWorld() {
    return 'Hello World';
  }

  async saySomething(message: string, times: number) {
    let parts = [];
    for (let i = 0; i < times; i++) {
      parts.push(`${message}`);
    }
    let fullMessage = parts.join('\n');
    this.requestContext.logger.debug('fullMessage=', fullMessage);
    // store source information (message and times)
    // and generated information (fullMessage)
    const response = await this.stack.push({
      stack: 'messages',
      data: {
        message,
        times,
        fullMessage
      }
    });
    this.requestContext.logger.debug('stack.push response=', response);
    return fullMessage;
  }

  async getStoredMessages() {
    // get all values
    const response = await this.stack.list({
      stack: 'messages'
    });
    // get only useful part (message, times, fullMessage)
    return response.result ? response.result.content.map((item) => item.data) : [];
  }
}
Now if you run again the tests, you can see that 4 tests are succeeding and only 1 left in failure. The test in failure is normal because we expect a particular message if times parameter is not a number. We can fix it by updating the code of the cloud function like this:
  1
2
3
4
5
6
7
8
9
10
11
12
13
14
15
16
17
18
19
20
21
22
23
24
25
26
27
28
29
30
31
32
33
34
35
36
37
38
39
40
41
42
43
44
45
46

  import { Injectable, RequestContextAware, RequestContext } from '@zetapush/core';
import { Stack } from '@zetapush/platform-legacy';

@Injectable()
export default class HelloWorldAsCustomCloudService implements RequestContextAware {
  requestContext!: RequestContext;

  constructor(private stack: Stack) {}

  helloWorld() {
    return 'Hello World';
  }

  async saySomething(message: string, times: number) {
    if (typeof times !== 'number') {
      throw new Error('Only integer values are allowed for number of repetitions');
    }
    let parts = [];
    for (let i = 0; i < times; i++) {
      parts.push(`${message}`);
    }
    let fullMessage = parts.join('\n');
    this.requestContext.logger.debug('fullMessage=', fullMessage);
    // store source information (message and times)
    // and generated information (fullMessage)
    const response = await this.stack.push({
      stack: 'messages',
      data: {
        message,
        times,
        fullMessage
      }
    });
    this.requestContext.logger.debug('stack.push response=', response);
    return fullMessage;
  }

  async getStoredMessages() {
    // get all values
    const response = await this.stack.list({
      stack: 'messages'
    });
    // get only useful part (message, times, fullMessage)
    return response.result ? response.result.content.map((item) => item.data) : [];
  }
}
Now you can run again the tests and everything is ok. You can notice that running unit tests allows to develop faster because you just need to run everything at once instead of entering messages and number of repeats manually in your web browser several times.
|
Provide behavior to mocks
In this sample, we only show how to define objects and methods that do nothing. Obviously mocking systems also allow to define a behavior for calls on mock objects. |
Local integration test
Testing a custom cloud service alone is good but you often need to tests interactions between several cloud services or interaction with built-in cloud services. ZetaPush provides tools to help you write integration tests and to setup a ZetaPush context for your tests.
First, you need to install the @zetapush/testing module:
$ npm install --save-dev @zetapush/testingThen, as done before we will write the skeleton of the tests.
Create a new test file spec/hellp-world-custom-cloud-service/say-something.it.spec.js with the following content:
  1
2
3
4
5
6
7
8
9
10
11
12
13
14
15
16
17
18
19
20
21
22
23
24
25
26

  describe('HelloWorldAsCustomCloudService.', () => {
  beforeEach(async () => {                                                          (1)
  }, 30 * 1000);                                                                    (2)

  /**
   * Nominal case with a message repeated 5 times
   */
  describe("saySomething('hello', 5)", () => {
    it('stores the message, the number of repetitions and the generated message',
      async () => {                                                                 (3)
          // call the method to test
          await helloWorldService.saySomething('hello', 5);                         (4)

          // check that everything works fine
          const storedMessages = await helloWorldService.getStoredMessages();       (5)
          expect(storedMessages.length).toBe(1);                                    (6)
          expect(storedMessages[0]).toEqual({                                       (7)
            message: 'hello',
            times: 5,
            fullMessage: 'hello\nhello\nhello\nhello\nhello'
          });
      },
      5 * 60 * 1000                                                                 (8)
    );
  });
});
| 1 | Empty for now, we will fill it later. Don’t forget the async keyword. |
| 2 | Change the default timeout of jasmine for test preparation (we will see why later) |
| 3 | Run the test using async/await syntax to have a cleaner code |
| 4 | The call to the cloud function to test |
| 5 | Retrieve all previously stored messages |
| 6 | Assertion to ensure there is exactly one entry |
| 7 | Assertion to ensure that the stored value is correct |
| 8 | Change the default timeout of jasmine for this test (we will see why later) |
We have defined what we need to test. Now to make it work, we need to run the test in a ZetaPush worker. As a reminder, using ZetaPush built-in cloud services requires a creation of the services on the ZetaPush cloud. As a reminder too, ZetaPush worker detects needed dependencies and instantiate them. In the context of a test, we also need these mechanisms in order to instantiate the dependencies and to inject them in our test.
ZetaPush testing module provides several utilities to define an execution context and to run the test in that context. Add the following code to your test:
  1
2
3
4
5
6
7
8
9
10
11
12
13
14
15
16
17
18
19
20
21
22
23
24
25
26
27
28
29
30
31
32
33
34
35
36
37
38
39
40
41
42
43
44
45
46
47
48
49
50
51

  const { given, runInWorker } = require('@zetapush/testing');
const customCloudService = require('../../worker/index');
const HelloWorldAsCustomCloudService = customCloudService['default'];
const { Stack } = require('@zetapush/platform-legacy');

describe('HelloWorldAsCustomCloudService.', () => {
  beforeEach(async () => {
    await given()                                                       (1)
      /**/ .credentials()                                               (2)
      /*   */ .fromZetarc()                                             (3)
      /*   */ .and()
      /**/ .worker()                                                    (4)
      /*   */ .testModule(() => ({                                      (5)
        expose: [HelloWorldAsCustomCloudService]
      }))
      /*   */ .dependencies(HelloWorldAsCustomCloudService, Stack)      (6)
      /**/ .and()
      .apply(this);                                                     (7)
  }, 5 * 60 * 1000);

  /**
   * Nominal case with a message repeated 5 times
   */
  describe("saySomething('hello', 5)", () => {
    it('stores the message, the number of repetitions and the generated message',
      async () => {
        await runInWorker(this, async (helloWorldService, stack) => {   (8)
          // clean the stack before adding into it
          await stack.purge({ stack: 'messages' });                     (9)

          // call the method to test
          await helloWorldService.saySomething('hello', 5);

          // check that everything works fine
          const storedMessages = await helloWorldService.getStoredMessages();
          expect(storedMessages.length).toBe(1);
          expect(storedMessages[0]).toEqual({
            message: 'hello',
            times: 5,
            fullMessage: 'hello\nhello\nhello\nhello\nhello'
          });
        });
      },
      5 * 60 * 1000
    );
  });

  afterEach(async () => {                                               (10)
    await autoclean(this);                                              (11)
  });
});
| 1 | given utility is designed to prepare the test context. This is the entry
point to a fluent API |
| 2 | credentials is used to configure the source of the ZetaPush credentials and application information.
This information is required in order to be able to connect to the ZetaPush cloud |
| 3 | fromZetarc indicates that the test must load developerLogin, developerPassword, platformUrl and appName
from your .zetarc file. It means that it automatically loads the credentials you are using
in development |
| 4 | worker is used to configure the ZetaPush worker context for the test |
| 5 | testModule indicates that the worker context must provide a standalone module.
For now, we have only seen a custom cloud service exposed. But in fact, it is an implicit
ZetaPush module. In our test, we define a really simple module that exposes the
custom cloud service. Basically, it means that your test is exactly like your index.ts |
| 6 | Indicate which dependencies will be injected in the test (see parameters of runInWorker). |
| 7 | Now all the preparation of the test context is ready, apply really executes building of test context.
It also stores some information needed by the test in this (the current jasmine test context) |
| 8 | runInWorker as its name says, runs the code in the worker context started for the test.
Note the this as first argument that is used to retrieve information set by given().apply(this).
The callback takes here two parameters. Those parameters correspond to the dependencies declared
in given().worker().dependencies() |
| 9 | As Stack service is the same between the development and every test execution,
the Stack may already contain some items. That’s why we force to empty the stack before executing the real test. |
| 10 | After each test don’t forget to clean everything |
| 11 | ZetaPush provides test utility to automatically remove everything that has been done
by the given() (like stopping properly the worker). |
|
Timeouts
As execution context needs the ZetaPush worker to create built-in cloud services,
the default jasmine timeout is too low: 5 seconds only for both preparation of the test
( In the example, we set to 30 seconds for preparation and 5 minutes for the test. Hopefully, ZetaPush worker doesn’t need 5 minutes to start and execute code. But 5 minutes can be useful to place a debugger in the code and to debug the test execution. |
Now you can run the test using jasmine too:
$ node -r ts-node/register node_modules/jasmine/bin/jasmineYou can see that contrary to unit testing, the worker prepares the test context. You should see something like:
[TRACE] register [ 'queue_0', { port: 2999, type: 'queue_0' } ]
[TRACE] register [ 'ZETAPUSH_HTTP_SERVER', { port: 2999, type: 'queue_0' } ]
[TRACE] confPath [ '/tmp/foobar/' ]
[TRACE] externalConfPath [ undefined ]
[TRACE] env [ LocalServerRegistryZetaPushContext {
config:
{ developerLogin: '*******',
developerPassword: '*******',
platformUrl: 'https://celtia.zetapush.com/zbo/pub/business',
appName: '********' },
registry: LocalServerRegistry { servers: [Object] },
urlProvider: [Function] } ]
[TRACE] analyzed providers [ [ { provide: [Function: TestDeclarationWrapper],
useClass: [Function: TestDeclarationWrapper] },
{ provide: [Function: Environment], useValue: [Object] },
{ provide: [Function: ConfigurationProperties],
useValue: [PriorizedConfigurationProperties] },
{ provide: [Function: ZetaPushContext],
useValue: [LocalServerRegistryZetaPushContext] },
{ provide: [Function: Stack], useValue: [Stack] },
{ provide: [Function: HelloWorldAsCustomCloudService],
useClass: [Function: HelloWorldAsCustomCloudService] },
{ provide: [Function: Wrapper],
useFactory: [Function: useFactory],
deps: [Array] } ] ]
[TRACE] analyzed platformServices [ [ [Function: Stack] ] ]
[TRACE] bootstrap layers [ [ [ [Function: HelloWorldAsCustomCloudService],
[Function: Wrapper],
[Function: TestDeclarationWrapper] ],
[],
[ [Function: HelloWorldAsCustomCloudService],
[Function: Stack] ] ] ]
[LOG] GET [ 'https://celtia.zetapush.com:/zbo/orga/item/list/v79ivn00l',
undefined ]
[LOG] Provisioning [ [Function: Stack] ]
[TRACE] instantiate [ { '0':
HelloWorldAsCustomCloudService {
stack: [Stack],
[Symbol(ZetaPush.CloudServiceInstance)]: true },
ZetaTest:
TestDeclarationWrapper {
wrapper: [Wrapper],
[Symbol(ZetaPush.CloudServiceInstance)]: true },
bootLayers: [ [Array], [], [Array] ] } ]
[TRACE] Worker successfully started|
Verbosity level in tests
The test is by default started with high verbosity in order to let you know what happens in ZetaPush worker. Therefore, if something fails you can have enough information to know where and why it has failed. You can change the verbosity level. |
The following sequence diagram explains how it works:
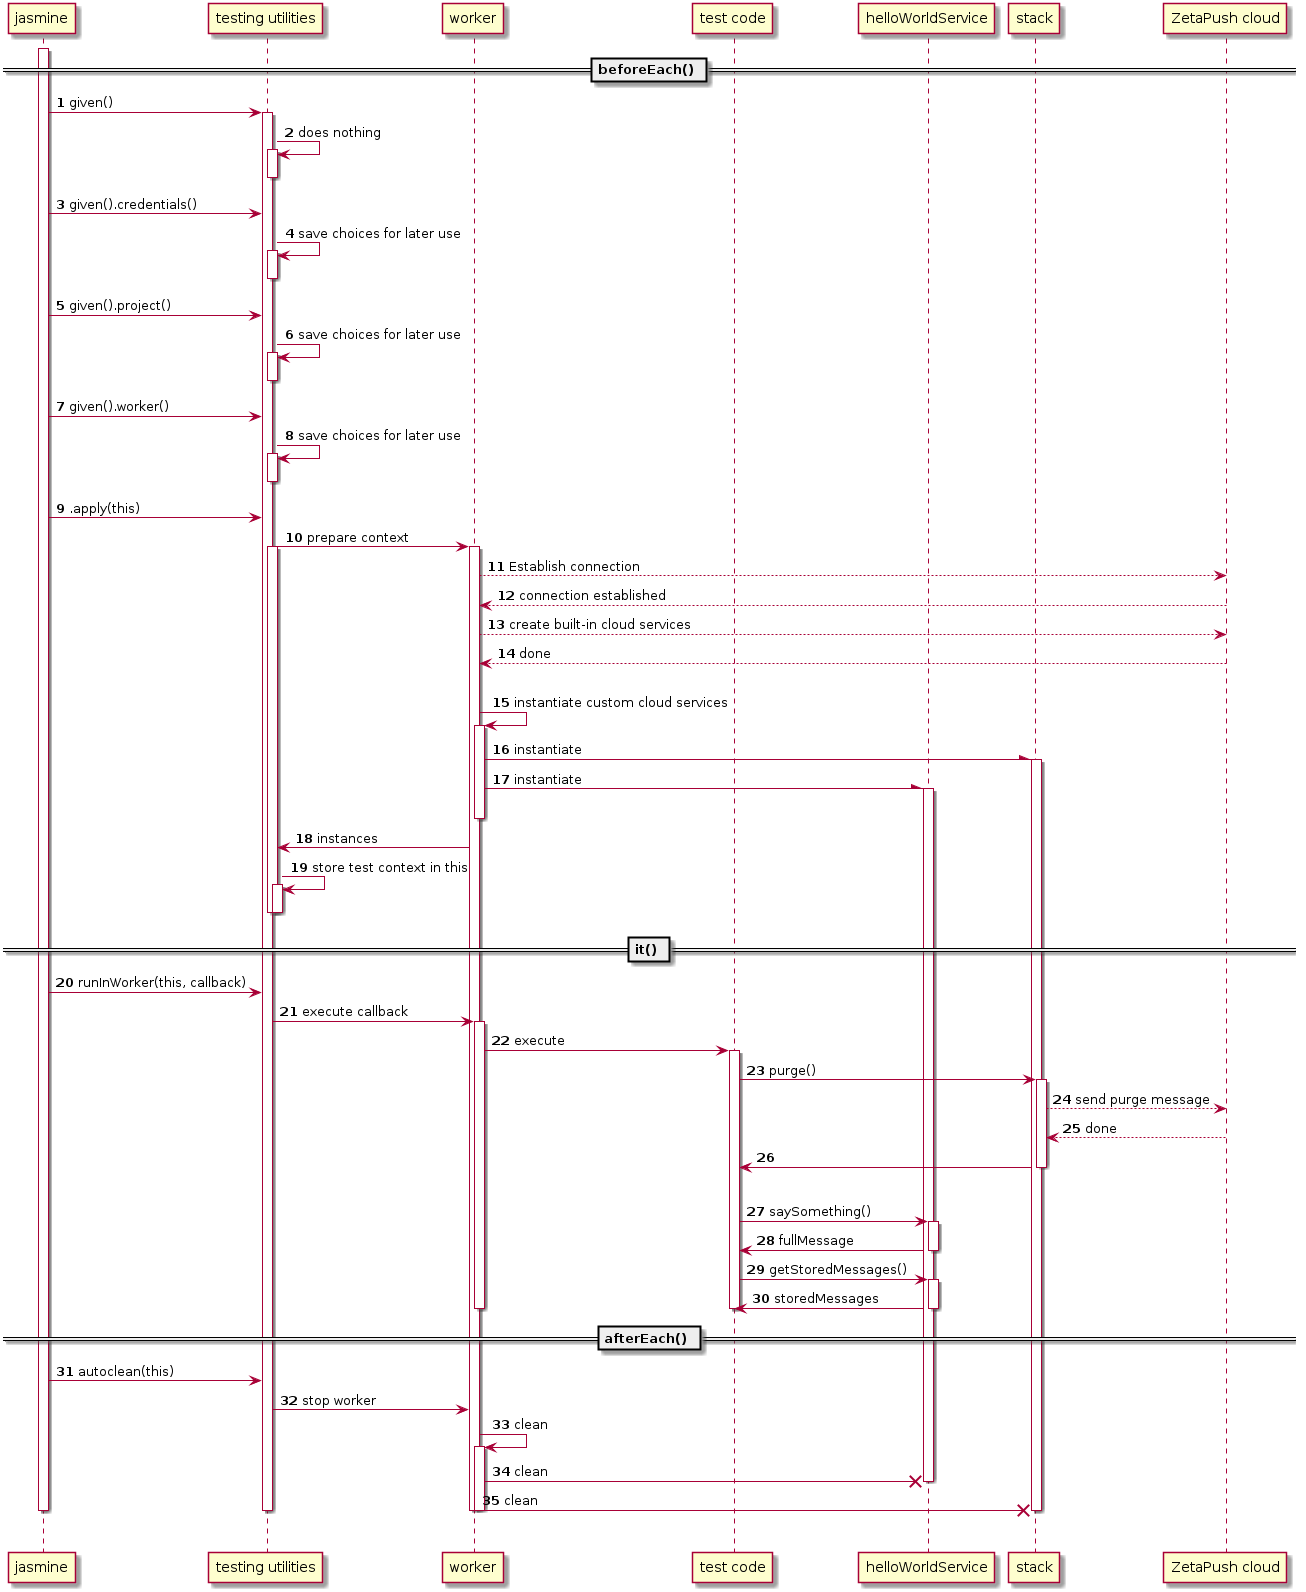
Jasmine executes the code of the test and starts by running code of the beforeEach function.
given() fluent API is called 1 but does nothing. In fact, given() is just the
entry point to the fluent API.
given().credentials(), given().project() and given().worker() only store information
about what you need for your test 3 4
5 6 7 8. Nothing is initialized here. We don’t show
all calls to the fluent API in the sequence diagram because it is the same principle, we just
store information about what you need in your test.
As all needed information is grabbed, you ask the testing utilities to prepare the
context by calling apply(this) 9. The testing utilities prepare the context
by asking to the worker to start your "virtual" module defined with testModule 10.
The worker connects to the ZetaPush cloud using your credentials 11
12.
As a reminder, we used given().credentials().fromZetarc() so it will use
the credentials defined in the .zetarc file directly.
Then the worker resolves all needed dependencies (for dependency injection)
and for each built-in cloud service, it sends a message to the ZetaPush cloud
to create the service 13 14. Once all built-in cloud services are ready, the worker
instantiates all built-in cloud services and custom cloud services needed for
the test (indicated by given().worker().dependencies()) 15
16 17 18.
Once everything is instantiated, your custom cloud service is ready to be called.
At the end of the apply function of the testing utilities, the information
about the execution context (credentials, dependencies, instances, …) are stored
in this 19. this refers to the current test execution context in jasmine.
Now, everything is ready to really start the test. The it function provided by jasmine is
executed. This function calls runInWorker(this, callback) 20. As said above, this refers
to the current test execution context in jasmine. So everything stored in this in
beforeEach is available in this of it. runInWorker starts the worker using
the code written in the callback as source code for a "virtual" cloud function 21.
The "virtual" cloud function (callback) receives parameters. Each parameter
is the instance of a needed dependency (defined with given().worker().dependencies()
in the same order).
As it is like a real cloud function, the code is executed by the worker 22.
Then each line of code is executed. In our test, we first empty the Stack by calling
purge() 23 26. This sends a message to
the ZetaPush cloud 24 25.
The test then calls helloWorldService.saySomething('hello', 5) cloud function
27 28.
helloWorldService.getStoredMessages() cloud function is called to retrieve all
stored messages 29 30.
At the end of the test we use expect function provided by jasmine in order to ensure
that results correspond to what we expect.
The test is now finished (either successfully or with failure). afterEach is called by jasmine
which calls autoclean(this) utility 31. As the worker has been started locally and
it has instantiated dependencies, we need to clean everything. autoclean will
use information stored in this to know exactly what it has to do. In our case,
we just need to stop the worker properly 32
33 34 35.
Notice that local tests allow to test part of your application. You don’t need to develop all your custom cloud services before testing them partially. This is a great advantage for developing fast because you can define a closed and well defined context that doesn’t depend directly on the code you write in your custom cloud services. Maintainability is easier because even if your code change, the context dedicated to the test may be the same.
|
Advanced integration testing
For more advanced usage, you can find information about testing utilities and integration testing |
|
Trial account
If you have a free trial account, you have only one environment shared between local development, published application and tests. The execution of the tests may impact the published application because there are two workers started in the same time on the same environment. So the load-balancer may send request either to the worker running on ZetaPush cloud or to the local worker started in tests. You could also have false positives in your tests due to the load-balancing (because worker running in the ZetaPush cloud could answer in place of the runner in tests). |
|
Remote integration testing
Running tests locally may differ a little compared to running the tests in the cloud. Indeed, the running context is different especially when working with HTTP because URLs, load-balancing and network infrastructure are different. ZetaPush also provides tools to run your tests with a worker running in the ZetaPush cloud. This is totally transparent for you. |
Local end-to-end test
Here the tests are run exclusively in a worker context. ZetaPush also provides a way to write end-to-end (often named e2e) tests. This means that a client really make requests to the cloud service instead of calling directly a method.
You can copy the file .spec/hellp-world-custom-cloud-service/say-something.it.spec.js
into the new file .spec/hellp-world-custom-cloud-service/say-something.e2e.spec.js
and transform code to an e2e test:
  1
2
3
4
5
6
7
8
9
10
11
12
13
14
15
16
17
18
19
20
21
22
23
24
25
26
27
28
29
30
31
32
33
34
35
36
37
38
39
40
41
42
43
44
45
46
47
48

  const { given, frontAction, autoclean } = require('@zetapush/testing');

describe('HelloWorldAsCustomCloudService.', () => {
  beforeEach(async () => {
    await given()
      /**/ .credentials()
      /*   */ .fromZetarc()
      /*   */ .and()
      /**/ .project()                                               (1)
      /*   */ .currentProject()                                     (2)
      /*     */ .and()
      /*   */ .and()
      /**/ .worker()                                                (3)
      /*   */ .up()                                                 (4)
      /*   */ .and()
      .apply(this);
  }, 5 * 60 * 1000);

  /**
   * Nominal case with a message repeated 5 times
   */
  describe("saySomething('hello', 5)", () => {
    it('stores the message, the number of repetitions and the generated message',
      async () => {
        await frontAction(this)                                     (5)
          .name('call saySomething')                                (6)
          .execute(async (api) => {                                 (7)
            // call the method to test
            await api.saySomething('hello', 5);                     (8)

            // check that everything works fine
            const storedMessages = await api.getStoredMessages();   (9)
            expect(storedMessages.length).toBe(1);
            expect(storedMessages[0]).toEqual({
              message: 'hello',
              times: 5,
              fullMessage: 'hello\nhello\nhello\nhello\nhello'
            });
          });
      },
      5 * 60 * 1000
    );
  });

  afterEach(async () => {
    await autoclean(this);
  });
});
| 1 | Instead of defining a module that contains a part of your application to test (using worker().testModule()),
here you need the full application. That’s the purpose of project() fluent API. |
| 2 | Indicate that the source project is your current project. |
| 3 | There is a worker section too… |
| 4 | But this time, we just ask for testing utility to start the worker with
your custom cloud service defined in index.ts and wait until
the worker is really started before executing the test. |
| 5 | Instead of running in the context of the worker, now we run code directly from
a client point of vue. Like runInWorker, frontAction needs the test context (this)
to retrieve information initialized by the given() utility. |
| 6 | Give a name to the action (useful for logs) |
| 7 | Execute code in front context. The function that is executed receives the parameter api.
Under the hood, the test utility creates a client (const client = new ZetaPushClient.WeakClient()) and then
creates the proxy to the API (api = client.createProxyTaskService()). So api parameter is the object you can use
to directly call your cloud functions from a client. |
| 8 | Call the cloud function we want to test. |
| 9 | Retrieve all stored messages and make assertions on the result. |
As always, you run the tests by running jasmine:
$ node -r ts-node/register node_modules/jasmine/bin/jasmineRunning the test may fail and it is normal because the Stack may already contain data.
As said before here we are in the context of a client so we don’t have access to Stack
service to empty it before running the test.
To empty the Stack you have to either add a cloud function that can empty the stack or use
ZetaPush snapshots to restore your application
to a particular state before running your tests.
|
Snapshots
The snapshot feature is already available in ZetaPush but it is not currently exposed for use directly in tests. This feature will be available soon. |
The following sequence diagram explains how it works:
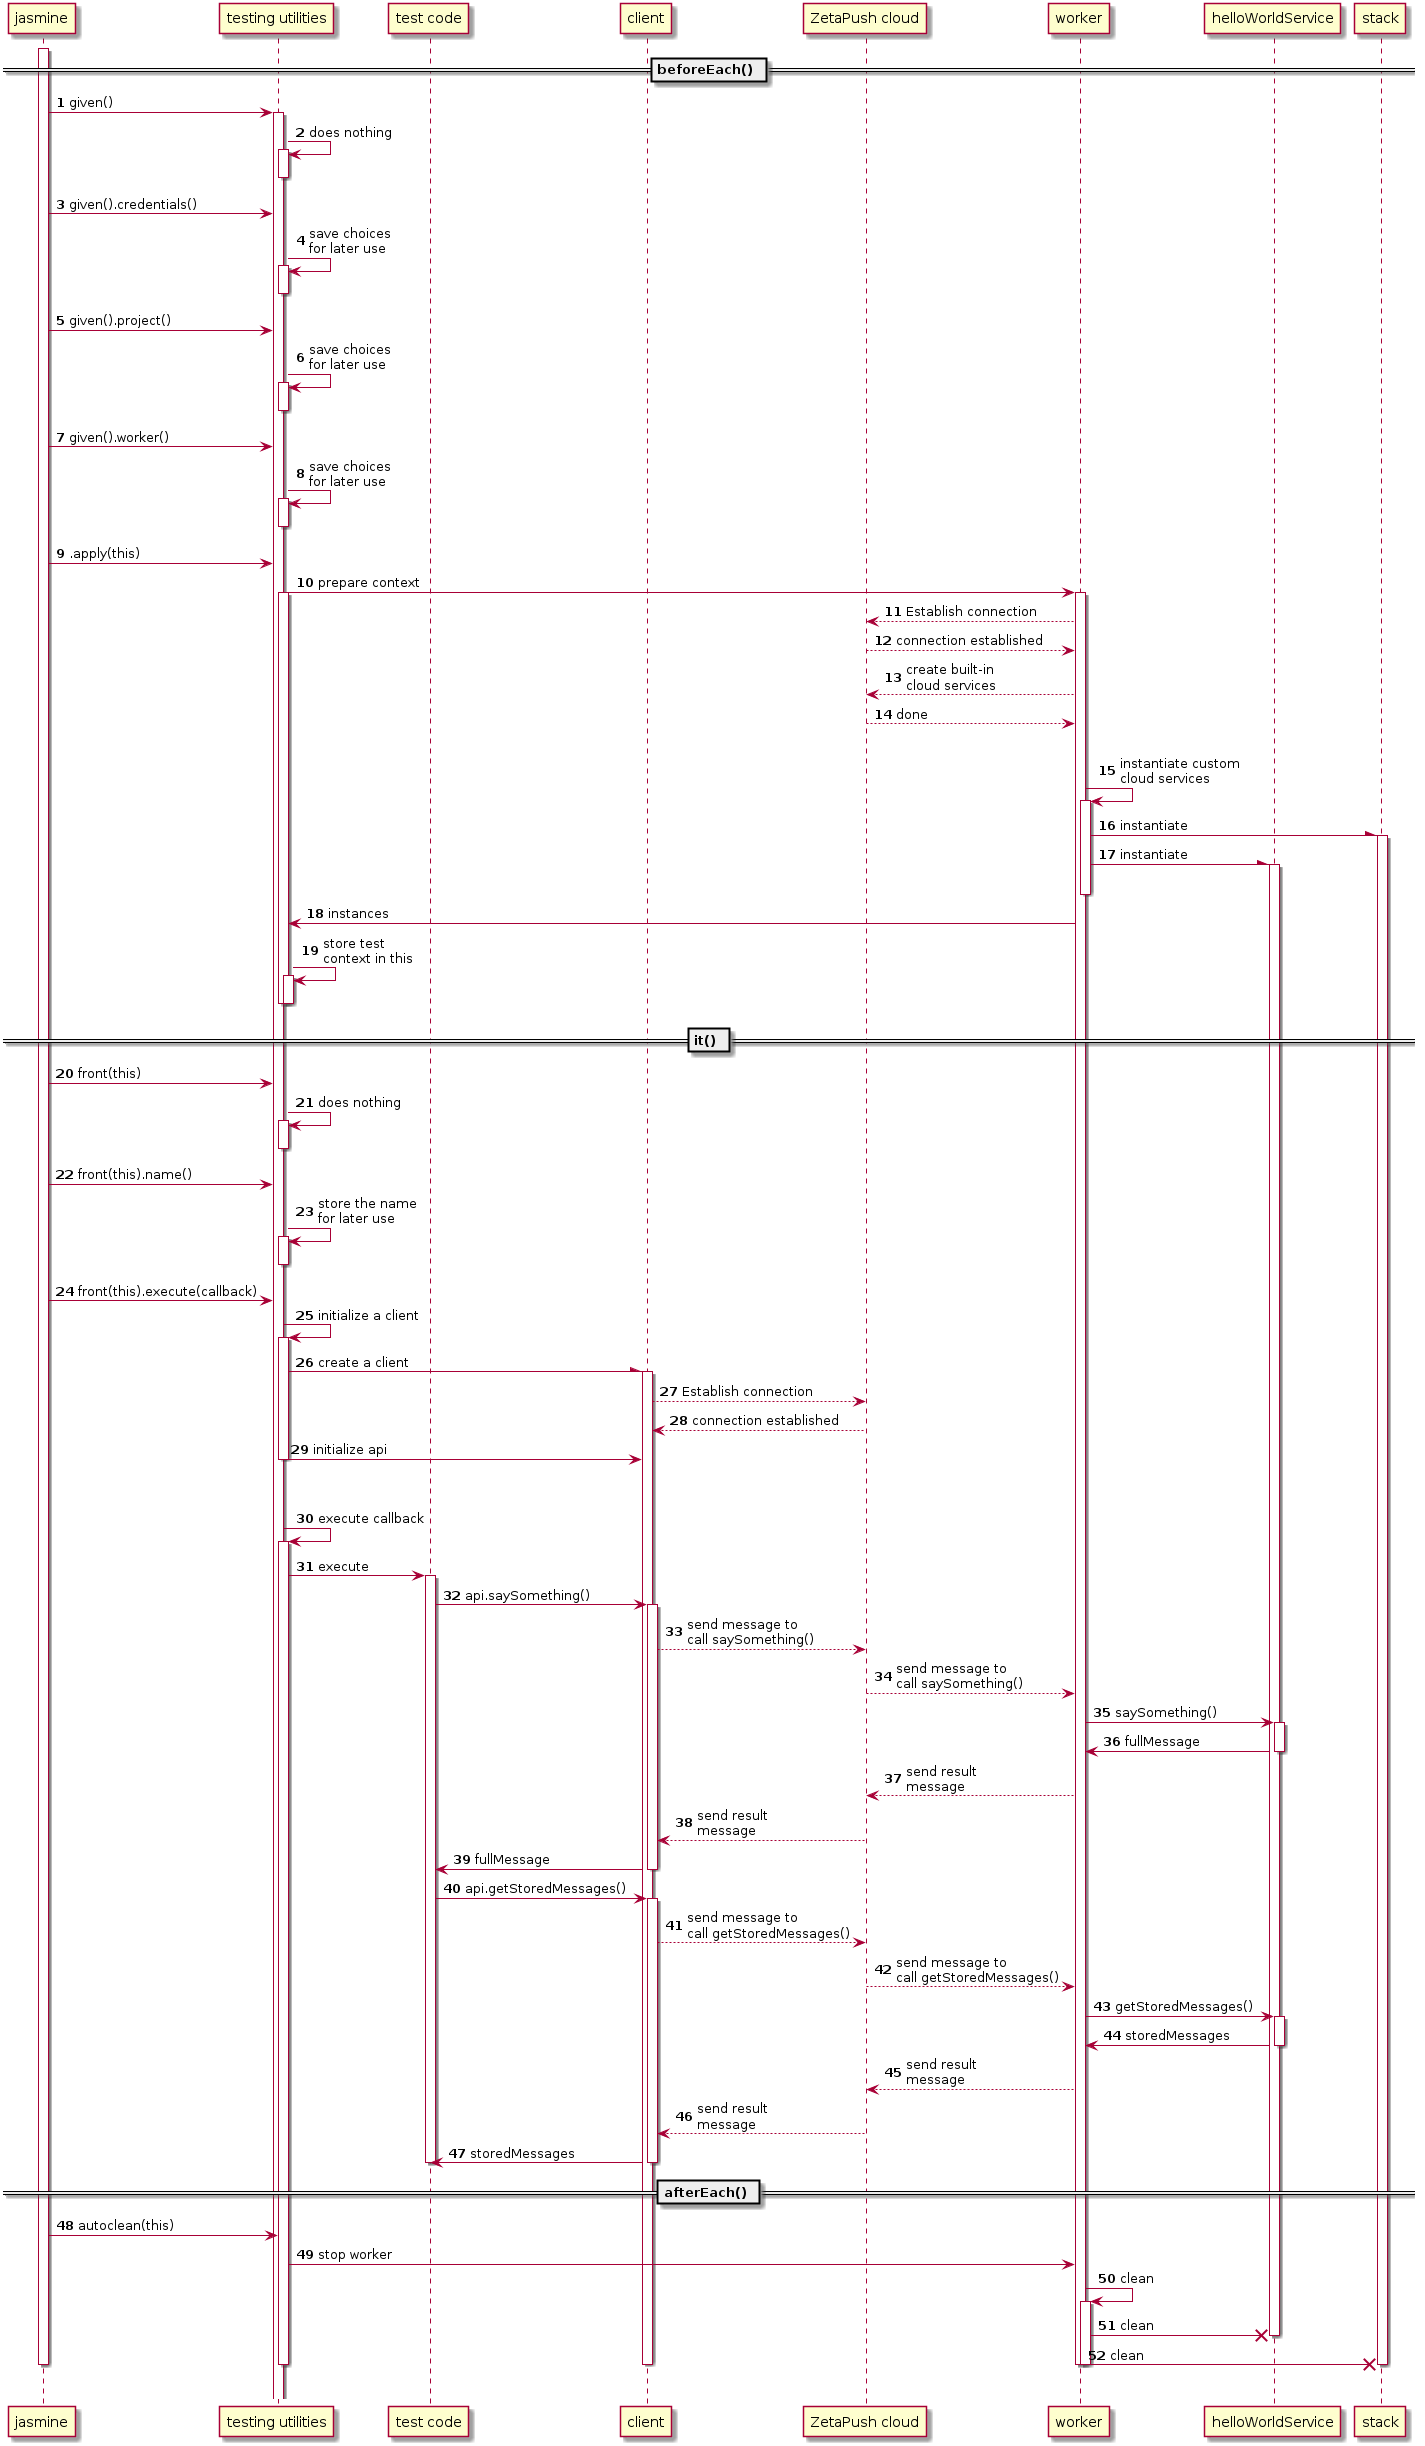
Context initialization done by given() 1 utility has exactly the same behavior as
integration testing. The only difference is that instead of creating a "virtual"
module to define a "virtual" custom cloud service, given().project().currentProject()
2 3
indicates that you want directly the code of your application to be tested.
given().worker().up() 4 5 indicates that you need the worker fully started
before running the test.
it() code now uses front(this) 20 that is a fluent API to
create a client based on what you need. front(this).name() 22 is used to
add an information message in logs during test execution. It is useful if you
want to separate several calls to simulate several end-users for example.
Until now, no client is created.
It is front(this).execute(callback) 24 that uses information
defined before (name and current test context in this case) in order to create
a client instance 26. The testing utilities connect the client
to the ZetaPush cloud 27 28 using information provided in given().credentials().
In addition to a client, this function also creates the client
API (api) 29 by calling client.createProxyTaskService under the hood. As a
reminder, api created with client.createProxyTaskService provides directly
same methods to the client that the cloud functions defined in the custom cloud service
without writing a single line of code (no need to manually define a function saySomething
on the client side). Once the client is ready, the code defined inside the callback
is executed 30 31.
In the test, the cloud function saySomething is called through api 32.
Contrary to integration testing which calls cloud functions directly, calls to
api sends messages through network from the client to the ZetaPush cloud 33.
ZetaPush cloud routes the message to the worker started by testing utilities 34.
The worker receives the request and calls the cloud function 35.
The result is sent by the worker to the ZetaPush cloud 37 which routes the result
to the client 38. The client receives the result and can use it 39.
The same process applies when calling getStoredMessages() 40 41
42 43 44 45
46 47.
The autoclean(this) works exactly the same as in integration tests.
|
Client authentication
In the example, the custom cloud service exposes cloud functions that
don’t need authentication and that don’t have any security restrictions.
So implicitly we can use an anonymous connection using But in a real application you may need to authenticate as a real user in your
tests. Hopefully, you can provide end-user credentials
when using |
|
Advanced e2e testing
For more advanced usage, you can find information about testing utilities and integration testing |
13. Deploy/publish your application
Once you have developed your application and tested it, you may want to deploy it on the ZetaPush cloud. Deploying means that your code is sent to the ZetaPush cloud and your application runs directly on it. The ZetaPush cloud hosts your application and makes it available on the Internet for your end-users.
Usually, you deploy/publish your application when you are ready to promote it in production.
Unlike in standard development of an application, with ZetaPush you don’t need to bother to buy, install, configure and manage the machines anymore. Everything is already provided by the ZetaPush cloud. Moreover, the ZetaPush cloud guarantees that your application is always available. You don’t need to worry about how to handle technical complexities like:
-
Redundancy (duplication of your application to increase reliability)
-
Load-balancing (automatic distribution of tasks accross several workers)
-
High availability (ensure that your application is always up)
-
Scalability (increase the number of worker instances when the application usage increases)
-
Supervision (monitor machines and your application to alert you in case of a performance, machine or availability issue)
|
ZetaPush already monitors the machines and your applications. However, the supervision is currently not direclty available to you. Soon the ZetaPush web console will display monitoring information. |
|
With a free trial account there is no scalability, high availability and load-balancing because the trial plan only allows one worker per application. You can contact us if you want to test those features. |
13.1. What will be deployed ?
When you deploy your application on the ZetaPush cloud, actually your application is split in two parts:
-
The worker that contains your custom cloud services
-
The static files for the front end
13.1.1. Worker
When you deploy the worker (custom cloud services) of your application, we take care of the hosting of your code. In addition we manage the redundancy, the load-balancing, the high availability and the automatic scability of your custom cloud services.
A worker may also provide HTTP endpoints in addition to bidirectionnal connection provided as-is by ZetaPush. If so, once published on the ZetaPush cloud, the HTTP url is displayed in your terminal.
|
URLs to access your worker in HTTP(s) are also available in the ZetaPush web console. |
13.1.2. Front end
For the front end part, the ZetaPush cloud hosts your application. ZetaPush also manages redundancy of the static files in order to ensure the high availability of you front end application.
The URL to access to your application is displayed in your terminal.
|
URLs to access your front end are also available in the ZetaPush web console. |
13.2. Environments
This section will describe how to deploy your application in the ZetaPush cloud for a particular environment.
It will also give you information about configuration properties and property override per environment.
13.3. Deploy application on the ZetaPush Cloud
The deployment is very easy, to do this you only need to launch this command in your application directory:
$ npm run deploy|
Npm script alias
|
The command will read the .zetarc file. If there is no appName, developerLogin and developerPassword properties or if the ZetaPush account is not validated, you will not be able to push your application.
When you deploy your application (Front + Worker), the CLI displays the URLs to use it. Run the command and you should see something like:
> zeta push
[INFO] Using application defined in configuration: v79ivn00l
[INFO] Bundle your application components
[INFO] ▇▇▇▇▇▇▇▇▇▇▇▇▇▇▇▇▇▇▇▇ Upload code (1)
[INFO] ▇▇▇▇▇▇▇▇▇▇░░░░░░░░░░ Prepare environment
[INFO] ░░░░░░░░░░░░░░░░░░░░ Publish web application
[INFO] ░░░░░░░░░░░░░░░░░░░░ Preparing custom cloud services for deployment
[INFO] ░░░░░░░░░░░░░░░░░░░░ Publish custom cloud service on worker instance| 1 | The CLI displays progress bars to indicate all deployment tasks and which tasks are currently being executed |
Once the deployment has succeeded, you should see the URLs where your worker and front are available:
> zeta push
[INFO] Using application defined in configuration: v79ivn00l
[INFO] Bundle your application components
[INFO] ▇▇▇▇▇▇▇▇▇▇▇▇▇▇▇▇▇▇▇▇ Upload code
[INFO] ▇▇▇▇▇▇▇▇▇▇▇▇▇▇▇▇▇▇▇▇ Prepare environment
[INFO] ▇▇▇▇▇▇▇▇▇▇▇▇▇▇▇▇▇▇▇▇ Publish web application
[INFO] ▇▇▇▇▇▇▇▇▇▇▇▇▇▇▇▇▇▇▇▇ Preparing custom cloud services for deployment
[INFO] ▇▇▇▇▇▇▇▇▇▇▇▇▇▇▇▇▇▇▇▇ Publish custom cloud service on worker instance
[INFO] Web application front is available at http://front-v79ivn00l.celtia.zetapush.app:80/ (1)
[INFO] Worker application queue_0 is available at http://queuea0-v79ivn00l.test.zetapush.app (2)
[INFO] Worker applications works only if you listen process.env.HTTP_PORT | 1 | The URL for your front available on the Internet |
| 2 | The URL for the HTTP endpoint of your worker (if you have one) |
You can click (Ctrl+click) in the terminal on the front URL (or open a web browser and enter the front URL). You can see that your application is deployed.
|
Redeploy
Obviously, you can publish your application again anytime you want to update it. |
|
Shared built-in cloud services
You can notice that the data that was stored when you were running your application locally is also available once the application is deployed. This is normal because this is the same application. So the application uses the same built-in cloud services. If you want to separate data between your local development and the deployed application, you need to define several environments. |
|
Partial deployment
It is possible to deploy only one part of your application (only the front or only the worker). This can be useful for example when there is a bug that is fixed by exclusively patching the front part. So you just want to deploy your front but not deploy the same worker code again (and vice versa). |
|
How to have initialization code
A custom cloud service may have initialization code to configure and prepare your application. As said before, once published in the ZetaPush cloud, ZetaPush handles scalability and
high availability. So several worker instances will run in the same time and ZetaPush will
load-balance traffic between worker instances. In order to ensure that only one worker executes
some initialization code, ZetaPush provides |
|
Snapshot and rollback
In future version, every deployment will trigger a snapshot to store the whole application state and data. The aim is to provide you a tool to quickly restore the previous version. |
14. User management in your application
14.1. Presentation
In a software application, we (almost) always need to manage users. The Standard User Workflow helps you to do this, in the most common use case (for business to customer application on the Internet). This cloud service helps you to:
-
Signup a user
-
Log in a user
-
Log out a user
-
Manage a forgotten password
-
Manage permissions of users
-
etc…
|
Authentication
At this moment, the connection and the disconnection of a user is done through the ZetaPush SDK (We will see below how to do this). In the future, the connection and disconnection will be handled by |
For us, the most common use case is when a user can create its own account using a login and a password and needs to confirm his account via a link in an email. Once its account is validated, he can login and use the application.
Sign up:
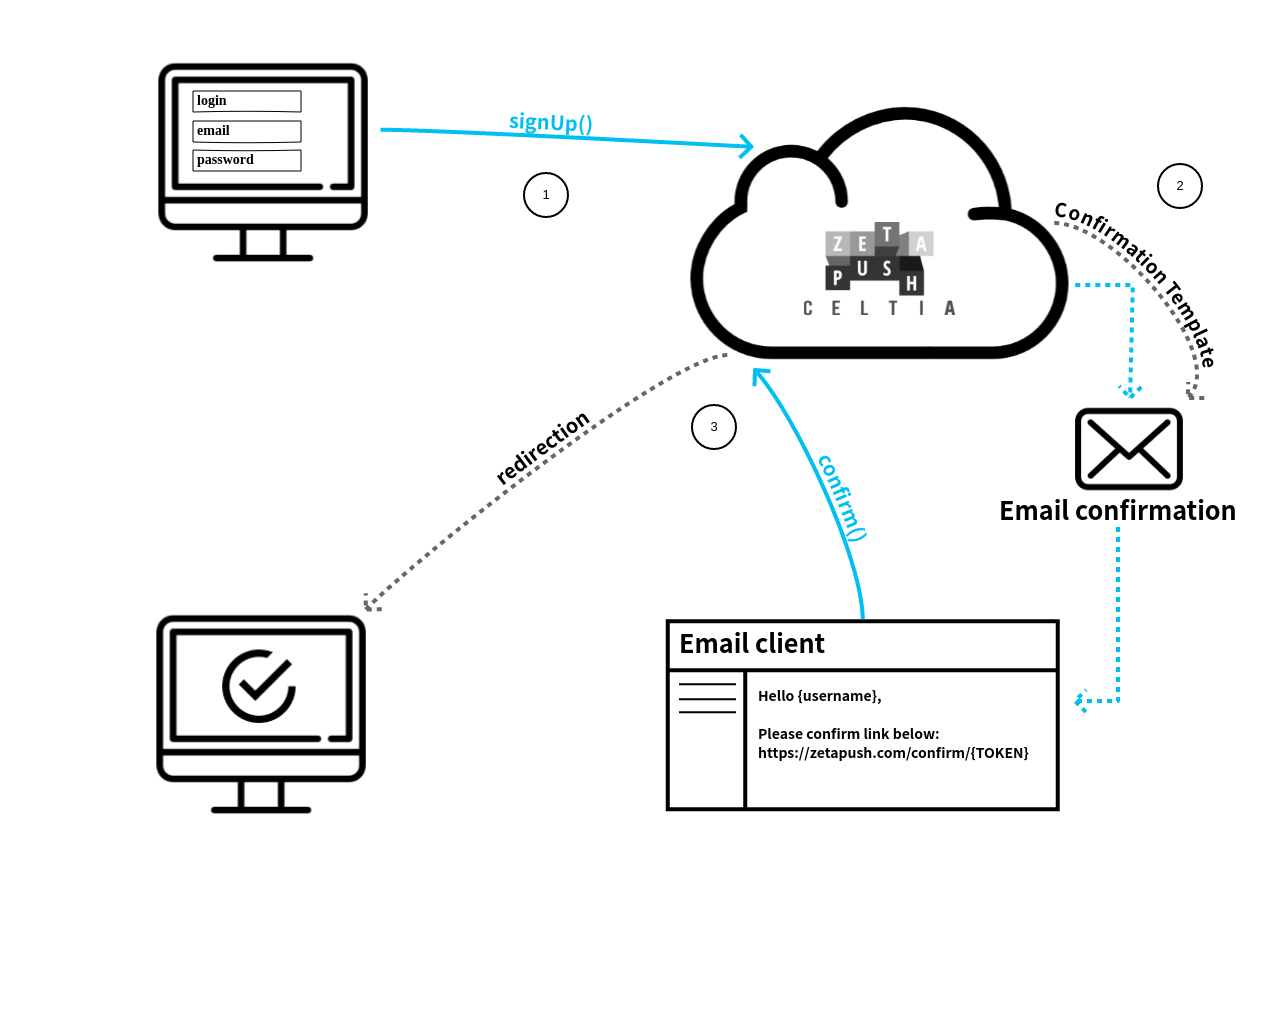
| 1 | The user creates his account using a login, a password and an email. When the user submits the form, the account is created on the ZetaPush platform. In order to ensure that the user is not a bot, the account has to be confirmed before the user is authorized to login. |
| 2 | An email is sent to the user in order to confirm its account. The email contains the confirmation link. He needs to confirm his account before connection. |
| 3 | When the user clicks on the link in the email, he is authorized to login. |
Log in:
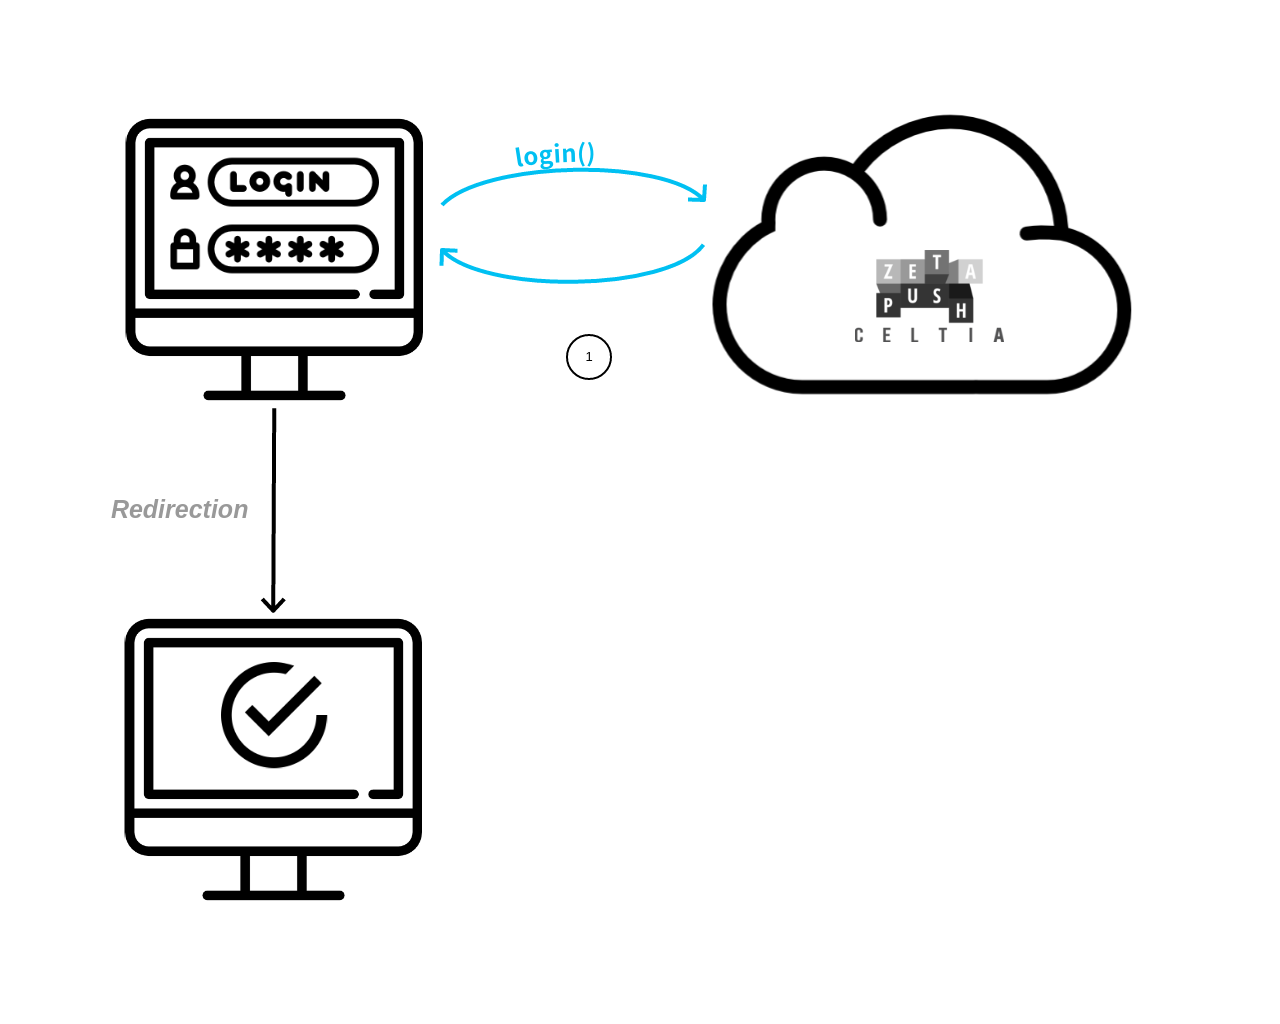
| 1 | When the user account is confirmed, he can log in the application using the his login and his password. |
|
Account not confirmed
If the user tries to log into the application before he confirmed his account, an error will be returned to explain that the account needs to be confirmed via the link in the confirmation email. |
Manage a forgotten password
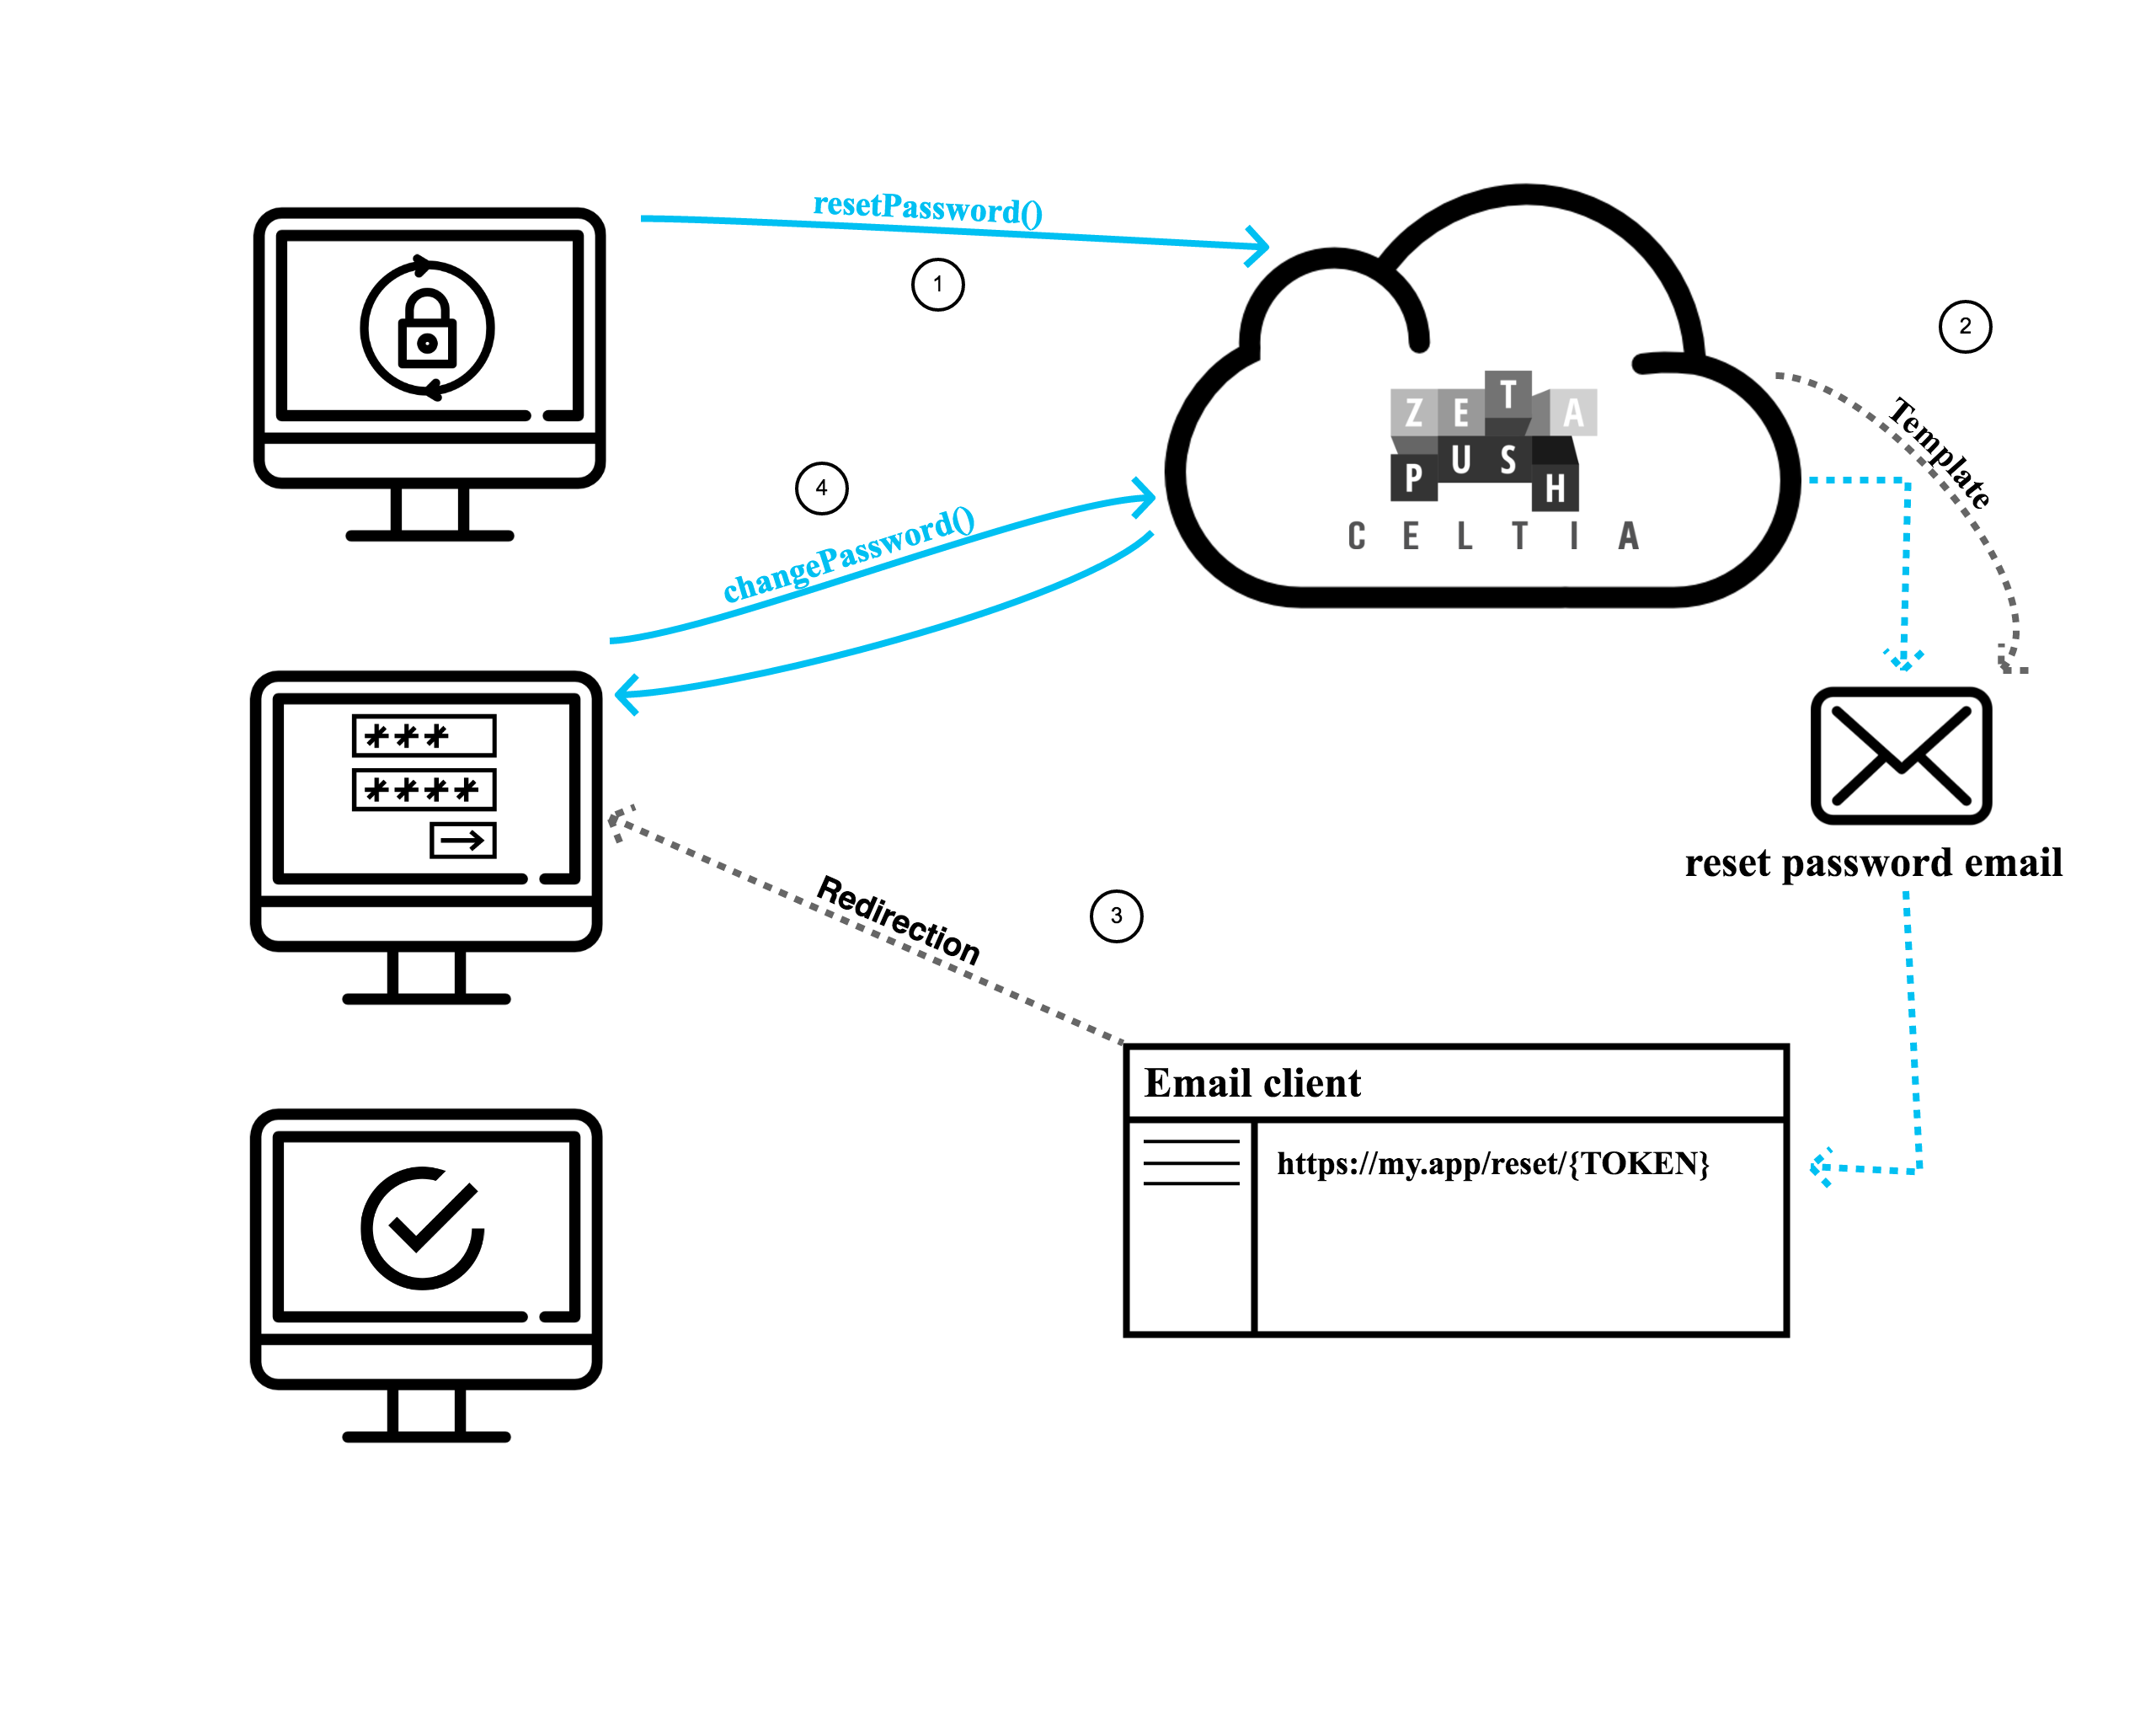
| 1 | The user can ask to reset his password. The login of this user is required. |
| 2 | An email is sent to the user (which ask to reset his password) with an URL to reset his password. The template of this email is configurable by the developer. |
| 3 | The user can click on the link provided in the email. He is redirected to a page (specified by the developer) where he can choose his new password. |
| 4 | Once the user validates his new password, the change is effective. The user can log in with the new credentials. |
14.2. Quick start
In this part we will explain how to use the Standard User Workflow in the default behavior, i.e. using the default implementations of each parts of the workflow.
To use the Standard User Workflow, you just need 4 steps :
-
Create a ZetaPush application as usual
-
Import and use the Standard User Workflow in your worker
-
Configure some properties
-
Develop your front by calling the Standard User Workflow API
14.2.1. Create a ZetaPush application as usual
In this Quickstart, we begin with a generated application using the CLI. So you can run:
$ npm init @zetapush app-with-user-managementWe import the library @zetapush/user-management that provides the Standard User Workflow using NPM:
$ npm install --save @zetapush/user-management14.2.2. Import and use the Standard User Workflow in your worker
Change the code of the custom cloud service defined in worker/index.ts file:
  1
2
3
4
5
6
7
8
9
10
11
12
13
14
15

  import {
  StandardUserWorkflow,                       (1)
  StandardUserManagementModule,               (2)
  ConfirmationUrlHttpHandler                  (3)
} from '@zetapush/user-management';
import { Module } from '@zetapush/core';      (4)

@Module({                                     (5)
  imports: [StandardUserManagementModule],    (6)
  expose: {
    user: StandardUserWorkflow,               (7)
    http: ConfirmationUrlHttpHandler          (8)
  }
})
export default class Api {}                   (9)
| 1 | StandardUserWorkflow is the cloud service we want to use. It is this class
that provides the cloud functions to handle user registration, password reset, login and logout.
Here we just import the TypeScript class. |
| 2 | The StandardUserWorkflow cloud service is encapsulated in the StandardUserManagementModule module.
We also need to import TypeScript class for later use. |
| 3 | The StandardUserManagementModule module also provides ConfirmationUrlHttpHandler in
order to provide an HTTP endpoint to handle the confirmation link that will be clicked in the email. |
| 4 | Import the Module annotation for TypeScript. |
| 5 | The @Module annotation is used here to indicate to the worker
which cloud services you want to use and how you want to use it
in your custom cloud service. |
| 6 | We indicate to the worker that we import the module StandardUserManagementModule.
It means that everything provided by the module is now available to
your custom cloud service. |
| 7 | We indicate that we directly expose StandardUserWorkflow cloud service. It means that
cloud functions defined by StandardUserWorkflow are directly callable from a client. |
| 8 | We indicate that we also expose ConfirmationUrlHttpHandler. It means that
the HTTP endpoint is directly callable by opening the confirmation URL in a web browser. |
| 9 | As usual we export the entry point of your custom cloud services. |
That all for the worker code !
The code above basically declares your custom cloud service as a new ZetaPush module.
In this case, we don’t need to create a module but the @Module is needed to import another module.
Importing a module (using imports option) only indicates that you want to use a module somewhere in your custom cloud service.
It doesn’t automatically expose anything. This is deliberate because you may want to not directly
expose the StandardUserWorkflow cloud functions to the client. You could then define a custom cloud service
that is exposed and delegate user management to the StandardUserWorkflow cloud functions.
The quickest way to benefit from user management is to directly expose StandardUserWorflow to the client.
It means that the cloud functions provided by StandardUserWorkflow are directly callable from a client.
So you don’t need to code anything in your custom cloud service and you can focus on the front side.
To expose the StandardUserWorkflow you simply need to add the expose option on the @Module
annotation. In addition to exposing StandardUserWorkflow to a client that uses the bidirectional
connection to interact with StandardUserWorflow cloud functions, we also expose ConfirmationUrlHttpHandler
in order to start a web server that listens to HTTP requests done on the account confirmation URL.
The aim is to directly provide you the verification of the confirmation of the account when the user clicks
on the confirmation link in the email. You don’t need to bother to check if the confirmation token
is valid and to handle token expiration.
|
Modules
ZetaPush provides modules to encapsulate several cloud services and to be able to reuse them. As seen before, when you have a really simple custom cloud service,
you just expose a class (without |
|
Expose several cloud services
As we expose several classes, we define a map: The keys of the map correspond to namespaces.
ZetaPush provides namespaces in order to be able to expose several
cloud services each isolated by a name. The aim is to be able to have
for example two cloud functions named |
|
Listen to HTTP requests
ZetaPush uses a bidirectional connection to interact between client and cloud services (and vice versa).
But in some cases, the bidirectional connection can’t be used as for the confirmation link.
Indeed the confirmation link is just an URL that opens a web browser when it is clicked by the
end-user. The web browser performs an HTTP You can even provide your own HTTP routes to listen to:
In this example, |
14.2.3. Configure some properties
The code is ready but in order to adapt the workflow to your needs, some configuration properties are required.
To configure those properties, you need to create a file named application.json at the root of your application:
  1
2
3
4
5
6
7
8
9
10
11
12
13
14
15
16
17
18

  {
  "email": {
    "from": "no-reply@your-application-name.com"    (1)
  },
  "smtp": {
    "host": "smtp.mailtrap.io",                     (2)
    "port": 2525,                                   (3)
    "username": "",                                 (4)
    "password": "",                                 (5)
    "ssl": false,                                   (6)
    "starttls": false                               (7)
  },
  "reset-password": {                               (8)
    "ask": {
      "url": "/#${token}"                           (9)
    }
  }
}
| 1 | As an email is sent to the end user for confirming its account, you need to configure the email sender. The email sender address may not be totally what you want and may depend on your email provider. For the example, we use a testing service that allows any email address as email sender (see tip about Mailtrap below). |
| 2 | Configure the domain or the host for the SMTP server |
| 3 | Configure the port of the SMTP server |
| 4 | Configure username used to authenticate on the SMTP server |
| 5 | Configure password used to authenticate on the SMTP server |
| 6 | Set to true if your SMTP server requires SSL |
| 7 | Set to true if your SMTP server requires TLS |
| 8 | Configure the reset pasword feature (optional) |
| 9 | Specify the URL where the user will choose his new password (a token will be passed on the URL) |
In this example, we provide only the minimal required configuration. We only need to configure email sending. All other configuration properties are optional.
|
Test inscription and confirmation using Mailtrap
For the example, we show the usage of mailtrap. This is an online service that provides a SMTP server. There is a free plan to test email sending. If you want to test, just signup to mailtrap and fill If you already have your own SMTP server, you can directly enter your SMTP configuration in |
|
Configuration properties
The You can learn more about You can also learn how to deeply configure the Standard User Workflow. |
14.2.4. Develop your front by calling the Standard User Workflow API
Finally, we just need to call the cloud function to create a user account, log in and log out from the client part.
Front code
index.js
You can replace the front/index.js file by the following content :
  1
2
3
4
5
6
7
8
9
10
11
12
13
14
15
16
17
18
19
20
21
22
23
24
25
26
27
28
29
30
31
32
33
34
35
36
37
38
39
40
41
42
43
44
45
46
47
48
49
50
51
52
53
54
55
56
57
58
59
60
61
62
63
64
65
66
67
68
69
70
71
72
73
74
75
76
77
78
79
80
81
82
83
84
85
86
87
88

  /// Create the ZetaPush API
const client = new ZetaPushClient.SmartClient();                                (1)
const userApi = client.createProxyTaskService({
  namespace: 'user',
});

async function signUpUser(form) {                                               (2)
  const login = form[0].value;
  const password = form[1].value;
  const email = form[2].value;
  // First connection as anonymous user to allow us to create a user
  await client.connect();

  // Creation of the user account
  try {
    await userApi.signup({
      credentials: {
        login,
        password,
      },
      profile: {
        email,
      },
    });
    console.log('User account created');
  } catch (err) {
    console.error('Failed to create user account : ', err);
  }
}

/**
 * Connection of a user
 */
async function loginUser(form) {                                                (3)
  const login = form[0].value;
  const password = form[1].value;

  await client.setCredentials({ login, password });
  client
    .connect()
    .then(() => {
      console.log('User connected');
    })
    .catch(err => {
      console.error('Failed to connect user : ', err);
    });
}

/**
 * Ask reset password
 */
async function askResetPassword(form) {                                         (4)
  await client.connect();
  const login = form[0].value;
  userApi
    .askResetPassword({
      login,
    })
    .then(() => console.log('Ask reset password'))
    .catch(err => console.error('Failed to ask reset password', err));
}

/**
 * Confirm reset password
 */
async function confirmResetPassword(form) {                                     (5)
  const token = form[0].value;
  const firstPassword = form[1].value;
  const secondPassword = form[1].value;

  await client.connect();
  userApi
    .confirmResetPassword({
      token,
      firstPassword,
      secondPassword,
    })
    .then(() => console.log('Confirm reset password'))
    .catch(err => console.error('Failed to confirm reset password', err));
}

/**
 * Disconnection of a user
 */
async function logoutUser() {                                                   (6)
  await client.disconnect();
  console.log('User disconnected');
}
| 1 | We created a ZetaPush client and his API to call our cloud functions.
We use the namespace user to call the StandardUserWorkflow cloud functions.
Remember the expose option on @Module configuration and the user key in the map. |
| 2 | Function to create an account of the ZetaPush platform for this application. |
| 3 | Function to connect a user. |
| 4 | Function to ask to reset the password. |
| 5 | Function to confirm the reset of the password. |
| 6 | Function to disconnect a user. |
index.html
Here is a very basic HTML page with two forms (one to create an account, the other to login):
  1
2
3
4
5
6
7
8
9
10
11
12
13
14
15
16
17
18
19
20
21
22
23
24
25
26
27
28
29
30
31
32
33
34
35
36
37
38
39
40

  <!DOCTYPE html>
<html lang="en">
  <head>
    <meta charset="UTF-8" />
    <meta name="viewport" content="width=device-width, initial-scale=1.0" />
    <title>Standard User Workflow</title>
  </head>

  <body>
    <h1>Signup</h1>                                                               (1)
    <form onsubmit="event.preventDefault(); signUpUser(this);">
      Login: <input type="text" name="login" /> Password:
      <input type="password" name="password" /> Email:
      <input type="email" name="email" /> <button type="submit">Sign up</button>
    </form>

    <h1>Login</h1>                                                                (2)
    <form onsubmit="event.preventDefault(); loginUser(this);">
      Login: <input type="text" name="login" /> Password:
      <input type="password" name="password" />
      <button type="submit">Login</button>
    </form>

    <h1>Ask reset password</h1>                                                   (3)
    <form onsubmit="event.preventDefault(); askResetPassword(this);">
      Login: <input type="text" name="login" />
      <button type="submit">Ask reset password</button>
    </form>

    <h1>Confirm Reset password</h1>                                               (4)
    <form onsubmit="event.preventDefault(); confirmResetPassword(this);">
      Token: <input type="text" name="token" /> Password:
      <input type="password" name="password" />
      <button type="submit">Confirm reset password</button>
    </form>

    <script src="https://unpkg.com/@zetapush/client"></script>
    <script src="./index.js"></script>
  </body>
</html>
| 1 | Form to create a new user |
| 2 | Form to login a user |
| 3 | Form to ask to reset the password |
| 4 | Form to choose a new password |
-
Run the following command to run your application in local and serve the front part :
$ npm run start -- --serve-frontTo test the workflow, just enter a login, a password and an email in the "Signup" part.
Then if you use mailtrap for email sending, you can go
into the inbox provided by mailtrap and check that email has been received.
You can click on the link provided in the email. The account is then confirmed and
you are automatically redirected to something like http://localhost:2999#login.
Now you can login using the same login and password pair (open your web browser console
to see connection messages).
You can also check that if you try to connect with wrong login or password, it doesn’t work as expected. You can also create a new user but do not click on the link in the email. You can check that you are not allowed to login.
If you want to test the reset password feature (optional), you need to type the login of a created user in the askResetPassword form. Then an email will be sent to the email of the user with a link. The link redirect you to your application with a token in the URL. To choose a new password, you need to fill the proper form with the token (provided in the URL) and the new password.
|
Automatic configuration according to execution context
You can notice that you didn’t configure any URL for confirmation link and for
redirection to |
|
Automatic adaptation of the implementations
In the example, we use a SMTP server to send the confirmation email. But you may want to use something else like Mailjet. ZetaPush provides an auto-adaptation system based on configuration. In concrete terms, if you don’t configure In future versions, other providers will be directly integrated. The advantage is to configure the minimum as for Mailjet which you only need to provide your Mailjet credentials. Moreover, you could also choose to change the workflow by replacing email by a SMS or anything else. |
|
Extend and adapt the default workflow
The default behavior is totally adaptable. You can replace default implementations provided by ZetaPush by your own implementations (for exemple, change token generation algorithm, replace email by something else, replace templating system, …). You can learn how to extend this cloud service. |
|
User management samples
For a more real-world sample with a complete UI (signup form and login form) you can go to GitHub ZetaPush Examples. |
15. Store data in your application
ZetaPush provides several technical services to manipulate data. These services have the same complexity as the databases that are used underneath. For example, you can use Elastic Search to index and search but you have to understand how Elastic Search works. This can be time consuming.
ZetaPush wants to provide you the best developer experience in order to focus on the functional and not technical issues. We want to offer a way to quickly store, retrieve, search data. We aim to cover about 80% of usages with our system. For example, you could write something like this in your code:
@Storable()
@Searchable({name: ['firstname', 'lastname']})
class User {
  private firstname: string;
  private lastname: string;
  private birthdate: Date;
  @Searchable()
  @Unique()
  private email: EmailAddress;
  @Searchable()
  @Unique()
  private phoneNumber: PhoneNumber;
}
Then you could save data using:
userRepository.save(user);You could also retrieve users:
// get all users that exactly match the lastname
userRepository.findAll({lastname: 'Doe'});
You could also search users:
// search for users that combination of firstname and lastname
// matches the search terms
userRepository.search('name', 'Jo Do');
// search for users which email that partially matches the search terms
userRepository.search('email', '@yopmail');
This feature is under construction and the API is not fixed for the moment
16. Secure your application
ZetaPush wants to provide you the best developer experience in order to focus on the functional and not technical issues. We want to offer a way to quickly secure your application. We aim to cover about 80% of usages with our system. For example, you could write something like this in your code:
@Injectable()
export default class MyCustomCloudService {
  @CanChangePassword
  changePassword(user) {
    // code for changing a password of a user
  }
}
Instead of using technical annotations or calls, we want to provide you the possibility to define your own security annotations. It makes the code easier to read and to maintain.
Here is an example of the code a custom annotation:
import { isAdmin, isCurrentUser, SecurityException } from '@zetapush/security';

export const CanChangePassword = (user) => {
  // an admin can change password of anyone
  if(isAdmin()) {
    return;
  }
  // a user can change only its own password
  if(isCurrentUser(user)) {
    return;
  }
  // not allowed
  throw new SecurityException(`You are not allowed to change password of ${user.login}`, user);
}
In addition to control who can execute actions, we want to provide a simple way to retrieve filtered data that comes from database. For example, an admin could view everything while a user could only see his friends.
@CanSeeAccount()
@Storable()
@Searchable({name: ['firstname', 'lastname']})
class User {
  private firstname: string;
  private lastname: string;
  private birthdate: Date;
  @Searchable()
  private email: EmailAddress;
  @Searchable()
  @Sensitive()
  private phoneNumber: PhoneNumber;
}
Here is an example of the code a custom annotation:
import { isAdmin, isCurrentUser, currentUser } from '@zetapush/security';

const areFriends = (userFromDatabase, otherUser) => {
  // ... (your code to check if the users are friends)
}

export const CanSeeAccount = (userFromDatabase) => {
  // an admin can see all accounts
  if(isAdmin()) {
    return true;
  }
  // a user can see its account
  if(isCurrentUser(userFromDatabase)) {
    return true;
  }
  // a user can see accounts of his friends
  if(areFriends(currentUser(), userFromDatabase)) {
    return true;
  }
  // not allowed to see
  return false;
}
Moreover, you could filter fields for example to prevent some sensitive
information to be visible to other users. Here we want to make phone
number only visible for an admin and the user that owns the phone number
(look at @Sensitive() annotation that indicates that the data
must not be visible unless we explicitly want it):
import { isAdmin, isCurrentUser, currentUser, accessSensitiveField } from '@zetapush/security';

const areFriends = (userFromDatabase, otherUser) => {
  // ... (your code to check if the users are friends)
}

export const CanSeeAccount = (userFromDatabase) => {
  // an admin can see all accounts
  if(isAdmin()) {
    return accessSensitiveField('phoneNumber');
  }
  // a user can see its account
  if(isCurrentUser(userFromDatabase)) {
    return true;
  }
  // a user can see accounts of his friends
  if(areFriends(currentUser(), userFromDatabase)) {
    return true;
  }
  // not allowed to see
  return false;
}
These features are under construction and the API is not fixed for the moment
Tutorials
In this tutorial, you will create an application with ZetaPush, from the initialization to the deployment. You will learn to:
-
Add business logic with ZetaPush
-
Use cloud services provided by ZetaPush
-
Run your code locally
-
Deploy your application
17. Use case
You will create a realtime chat application, but it will be particular: This will be an Avengers Chat !
At the beginning, the user of the chat can choose an Avenger. Each character has many skills and they can use them on the chat to attack the others Avengers.
| Avenger | Skill |
|---|---|
Captain America |
Shoot of shield / Cure |
Falcon |
Archery / Super vision |
Iron Man |
Flight / Missile launcher |
Hulk |
Punch / Regeneration |
Thor |
Hammer hit / Lightning strike |
Spider Man |
Shoot of cobweb / Jump with cobweb |
Wolverine |
Scratch / Regeneration |
You will create this application in few steps:
| We recommend to use TypeScript so in this tutorial all of your code will be in this language. |
17.1. Initialize your application
In the first step, you need to create your application. To do this you can run:
  1

  npm init @zetapush myApp
This command will ask you your developer login and password.
This command will create you an account on the ZetaPush platform and will create your first application in the myApp directory. An email will be sent to confirm your account.
| To use your application, you need to validate your account. To do this, click on the link in the received email |
In this tutorial, we are focusing on the ZetaPush development. So, to begin, get all resources and add them to your application (css, assets, …):
  1
2
3
4

  $ cd myApp/front/
$ rm -r ./*
$ curl -X GET 'http://github-download-subfolder.zpush.io/?owner=zetapush&repository=zetapush-tutorials&path=avengersChat/front' --output front.zip
$ unzip front.zip && rm front.zip
| If you are using Windows, you can download the file with all resources and unzip it in the front directory. Link: http://github-download-subfolder.zpush.io/?owner=zetapush&repository=zetapush-tutorials&path=avengersChat/front |
So you already have the style and the frontend logic in the folders assets and utils. You can browse these files to understand this code.
In this tutorial, you need to:
-
Create the business logic with a custom cloud service
-
Implement the interaction with the custom cloud service (front side)
-
Deploy your application
17.2. Create your business logic
Now, you will create the business logic of your application. To do this, you will use a custom cloud service.
| A custom cloud service is a class where you develop a business logic. You can create several custom cloud services inside one application. Each custom cloud service can use the cloud services provided by ZetaPush. |
In your existing application you already have a custom cloud service on the file worker/index.ts (The entry point of the service is defined in the package.json with the property main).
To use your custom cloud services you need to export them. To do this, the property main in your package.json define the path of the file where you export all of your custom cloud services.
|
You can delete the content of the file worker/index.ts and fill it with the following content step by step.
17.2.1. Import cloud services and define constants
First, you need to import the cloud services provided by ZetaPush, used in this application:
-
Stack (Save data in a stack)
-
Messaging (Send and receive messages)
-
Groups (Manage group of users)
You also need to import Injectable that is useful for the dependencies injection.
  1
2
3
4
5

  import { Injectable } from '@zetapush/core';
import { Stack, Messaging, Groups } from '@zetapush/platform-legacy';

const CONVERSATION_ID = 'avengersChat';
const CHANNEL_MESSAGING = 'avengersChannel'; (1)
| 1 | Channel on which the users send and listen to the messages |
17.2.2. Create the class with its constructor
A custom cloud service is a class, so you need to create it.
  1
2
3
4
5
6
7
8
9
10
11
12

  @Injectable() (1)
export default class AvengersApi {
  /**
   * Constructor of our API
   */
  constructor(
    private stack: Stack,
    private messaging: Messaging,
    private groups: Groups
  ) {
  }
}
| 1 | We expose our custom cloud service with only one annotation |
The dependencies injection of ZetaPush use injection-js.
|
17.2.3. Create the chat
To create our chat, we use the Groups cloud service provided by ZetaPush. The created group includes all users of the conversation. So we add a method to our class to create this conversation.
  1
2
3
4
5
6
7
8
9
10
11
12
13

  /**
 * Create the conversation of the chat, if doesn't already exists
 */
async createConversation() {
  const { exists } = await this.groups.exists({
    group: CONVERSATION_ID
  });
  if (!exists) {
    await this.groups.createGroup({
      group: CONVERSATION_ID
    });
  }
}
17.2.4. Add user to the conversation
When an user comes to the chat, we need to add it to the conversation. So we create a method in our class to add the current user to the conversation.
  1
2
3
4
5
6
7
8
9

  /**
* Add the current user to the conversation
*/
addMeToConversation(parameters: any, context: any) { (1)
  return this.groups.addUser({
    group: CONVERSATION_ID,
      user: context.owner (2)
  });
}
| 1 | Each custom cloud function takes only one (client-provided) parameter. The second is the context, injected by the SDK |
| 2 | We get the caller (owner) of the cloud function from the context. |
17.2.5. Send a message
No we want to send a message on our chat. To do this, we need to follow 3 steps:
-
Get all users in the conversation
-
Send the message of all users in the conversation
-
Store the message in a stack
  1
2
3
4
5
6
7
8
9
10
11
12
13
14
15
16
17
18
19
20
21
22
23
24
25
26

  /**
* Send a message on the chat
* @param {Object} message
*/
async sendMessage(message = {}) {
  // Get all users inside the conversation
  const group = await this.groups.groupUsers({
    group: CONVERSATION_ID
  });
  const users = group.users || [];

  // Send the message to each user in the conversation
  this.messaging.send({
    target: users,
    channel: CHANNEL_MESSAGING,
    data: { message }
  });

  // Store the message in a stack
  await this.stack.push({
    stack: CONVERSATION_ID,
    data: message
  });

  return group;
}
There is no specific method to launch an attack, to do this, we only send a specific message throught sendMessage.
|
17.2.6. Get all messages
To complete our business logic, we need to have an other method in our class to get all messages (when we enter the chat).
  1
2
3
4
5
6
7
8
9

  /**
* Get all messages in the conversation
*/
async getMessages() {
  const { result } = await this.stack.list({
    stack: CONVERSATION_ID
  });
  return result;
}
Now your custom cloud service is ready with this following content:
  1
2
3
4
5
6
7
8
9
10
11
12
13
14
15
16
17
18
19
20
21
22
23
24
25
26
27
28
29
30
31
32
33
34
35
36
37
38
39
40
41
42
43
44
45
46
47
48
49
50
51
52
53
54
55
56
57
58
59
60
61
62
63
64
65
66
67
68
69
70
71
72
73
74
75
76
77
78

  import { Injectable } from '@zetapush/core';
import { Stack, Messaging, Groups } from "@zetapush/platform-legacy";

const CONVERSATION_ID = "avengersChat";
const CHANNEL_MESSAGING = "avengersChannel";

@Injectable()
export default class AvengersApi {
  /**
   * Constructor of our API
   */
  constructor(
    private stack: Stack,
    private messaging: Messaging,
    private groups: Groups
  ) {}

  /**
   * Create the conversation of the chat, if doesn't already exists
   */
  async createConversation() {
    const { exists } = await this.groups.exists({
      group: CONVERSATION_ID
    });
    if (!exists) {
      await this.groups.createGroup({
        group: CONVERSATION_ID
      });
    }
  }

  /**
   * Add the current user in the conversation
   */
  addMeToConversation(parameters: any, context: any) {
    return this.groups.addUser({
      group: CONVERSATION_ID,
      user: context.owner
    });
  }

  /**
   * Send a message on the chat
   * @param {Object} message
   */
  async sendMessage(message = {}) {
    // Get all users inside the conversation
    const group = await this.groups.groupUsers({
      group: CONVERSATION_ID
    });
    const users = group.users || [];

    // Send the message to each user in the conversation
    this.messaging.send({
      target: users,
      channel: CHANNEL_MESSAGING,
      data: { message }
    });

    // Store the message in a stack
    await this.stack.push({
      stack: CONVERSATION_ID,
      data: message
    });

    return group;
  }

  /**
   * Get all messages in the conversation
   */
  async getMessages() {
    const { result } = await this.stack.list({
      stack: CONVERSATION_ID
    });
    return result;
  }
}
17.3. Use your custom cloud services
Once we have our custom cloud service, we need to create the frontend of our application.
17.3.1. Launch the worker locally
When we work on the frontend part, we often want to test our interaction with the backend logic.
With ZetaPush, you can launch your worker locally to test this interaction.
To do this you need to use the CLI and run: zeta run.
But in this project, the CLI is imported and a script is created with npm, so you just need to launch:
// In the root of the application
$ npm run start -- --serve-front
If you want to install the ZetaPush CLI you can run npm install -g @zetapush/cli.
|
Then you have access to your application on http://localhost:3000.
17.3.2. Interaction with worker
Now you just need to add the interaction with the custom cloud service. To do this, fill the file front/index.js:
  1
2
3
4
5
6
7
8
9
10
11
12
13
14
15
16
17
18
19
20
21
22
23
24
25

  import AvengersController from './utils/controller.js'; (1)

// Create the ZetaPush Client
const client = new ZetaPushClient.WeakClient();
/**
 * Create service to listen incoming messages
 */
const service = client.createService({
  Type: ZetaPushPlatform.Messaging,
  listener: {
    // Listen incoming messages from the channel 'avengersChannel'
    avengersChannel: ({ data }) => controller.onAvengersMessage(data), (2)
  },
});

const controller = new AvengersController(client);

(async function main() {
  // Expose to template
  window.$controller = controller;
  // Connect to ZetaPush
  await client.connect();
  // Notify client connected
  controller.onConnectionEstablished();
})();
| 1 | Import the frontend logic (in the controller) |
| 2 | Cloud service provided by ZetaPush to listen to incoming messages |
17.4. Deploy your application
Your application is working but only locally. To deploy your application you just need to launch zeta push. In this application you already have a npm script so you can run:
$ npm run deployThis command deploys all in once (Front and Worker). It will return you an unique URL to access to your application.
Enjoy ! Your Avengers Chat is working and deployed !
Guides
FAQ
1.1. Do I have to develop custom cloud services ?
No. Developing custom cloud services is not required. You can use cloud services that are already provided by ZetaPush. You may need to develop custom cloud services in different situations: - You have several devices so you want to mutualize your business code - ZetaPush services are not fully compatible with your business needs
1.2. Can I use ZetaPush CLI with and npm version lower than 6 ?
You can either upgrade your npm version or use npx utility.
npm 5-
Upgrade npm
$ npm install -g npm@latest$ npm init @zetapush hello-worldUse npx to launch the script
$ npx @zetapush/create hello-world-
1.3. What is the NodeJS version used to run my worker remotely ?
Your worker run with a NodeJS lts/dubnium version.
1.4. Can I use a NodeJS version lower than 10 ?
We recommend to use the same version of NodeJS in local development as the version that runs your code remotely. For now, it is not possible to choose a different NodeJS version for remote run. This feature will be available in a future version.
Reference
18. ZetaPush management
18.1. Manage ZetaPush account
The ZetaPush account gives you access to the ZetaPush cloud. As a developer, you need an account to be authorized to develop your product. As a manager, you need an account to organize your teams.
18.1.1. Create your account
Currently, the only way to get a ZetaPush account is by contacting us. The aim is to understand your needs and to advise you even if you just want to test it:
Your account will be created soon after the first contact and an application that fits your needs will be available. Then you are ready to start working with ZetaPush.
|
Soon we will open access to everyone for free trial. Account creation will be available through our CLI tool, from the main site and the web console. |
18.1.2. Manage your profile
The management of your ZetaPush account and profile will soon be available on the web console. Now you can contact us if you want us to manage your informations.
18.1.3. Delete your account
If you want to delete your ZetaPush account, you can contact us:
|
Permanent deletion
The removal is irreversible and permanent. All of your applications will be deleted. |
18.2. Manage your organization
An organization is a concept to let you work in team.
The organization commonly groups all ZetaPush accounts of your company. You can have several applications for your organization and you can manage access rights on applications according to members of your team.
|
What is an application
An application is a logical container designed to perform a group of coordinated tasks or activities for the benefit of the user. |
For example, if you are in the company named "MyCompany" which has two applications named "MyApplication1" and "MyApplication2" :
-
One organization is created with the name "MyCompany"
-
Two applications are created and named "MyApplication1" and "MyApplication2"
The ZetaPush administrator account of this organization can access to these two applications. He can also change the access rights by application.
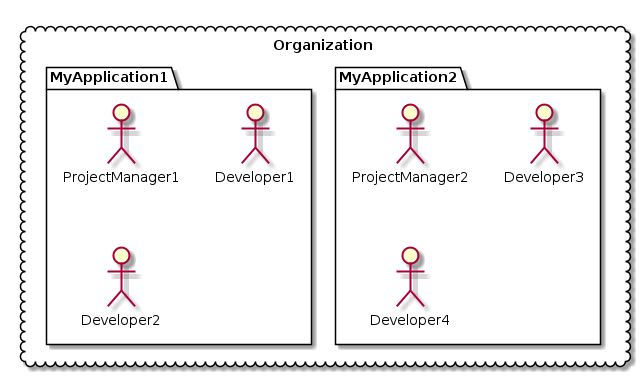
In the above example, we have one organization which contains two separate applications. Each application has 3 users. The users of one application cannot work on the other application.
|
Manage access rights from web console
The access rights are managed by ZetaPush for now in order to fit your needs. Thereafter, you will be able to manage them via the web console. |
18.3. Manage applications
An application is a logical container designed to perform a group of coordinated tasks or activities for the benefit of the user.
18.3.1. Add an application
There are several ways to create a new application :
-
Via the web console (not available yet)
-
Via the CLI (not available yet)
18.3.1.1. Sign up for a free trial
When you ask for a free trial, a ZetaPush account and an application are provided to you.
You can ask for a free trial via our web site.
|
Get free trial
Now, when you asking for a free trial, the ZetaPush account and the application are created by ZetaPush to fit your needs. Soon we will open access to everyone for get a free trial of 30 days. In this case the account and the application will be automatically created. |
18.3.1.2. Create application via web console
|
Create application via web console
For now, the creation of an application via the web console is not available because we want to assist you. |
18.3.1.3. Create application via CLI
|
Create application via CLI
For now, the creation of an application via the CLI is not available because we want to assist you. |
18.3.2. Access control per application
As seen previously, an organization can have several teams or/and several applications. So you may want to control who can work on which application.
18.3.2.1. Grant access rights
|
Contact us to manage access rights
Security per application is not currently available to our clients. Instead we prefer that you contact us to understand your needs and to guide you how to organize your teams and application. |
18.3.2.2. Remove access rights
|
Contact us to remove access rights
Security per application is not currently available to our clients. Instead we prefer that you contact us to understand your needs and to guide you how to organize your teams and application. |
18.4. Manage environments
An application is a logical container designed to perform a group of coordinated tasks or activities for the benefit of the user.
18.4.1. Add an environment
|
Environment support
The environment support is not completely done. It will be soon because it is our next high priority. The management of this environments will be done via the web console. If you want to use environments you can anyway contact us to manage them for you. |
18.4.2. Access control per environment
|
Environment support
The environment support is not completely done. It will be soon because it is our next high priority. The access control of the environments will be done via the web console. If you want to use environments you can anyway contact us to manage them for you. |
19. Architecture
19.1. General architecture
One of the most important thing to understand with ZetaPush is that you can use it in two steps: The run and the push. The run mode is when you develop your application, your worker is running locally and the push mode is when you have pushed your application on the ZetaPush Cloud and that your worker is running on it.
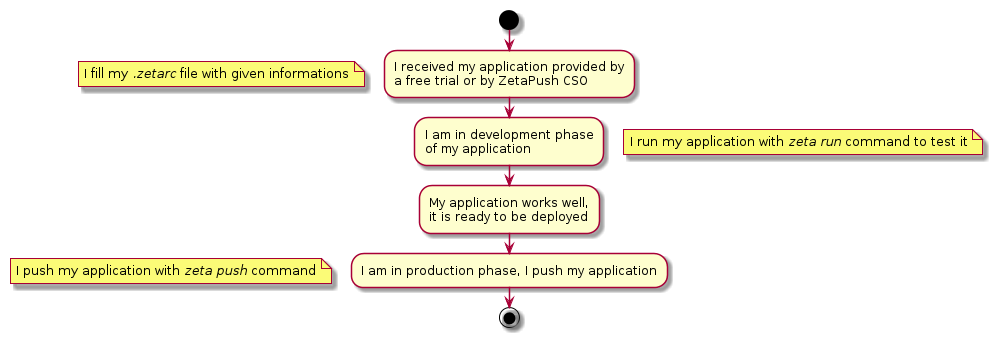
|
Data between the two phases
Whether you run or push your application, you use the same data. For example, if you store data during your development phase (using the |
Both front and worker are running locally. The front interacts with custom cloud services contained in the worker through ZetaPush Cloud. As ZetaPush Cloud provides bidirectional connection, the custom cloud services can also interact with the front through ZetaPush Cloud too.
A custom cloud service can interact with built-in cloud services provided by ZetaPush.
|
When you start using ZetaPush, you only develop locally so from your point of vue, your front seems to directly interact with your custom cloud services. In fact, all messages go through the Internet and ZetaPush Cloud. It means that a published front can interact with a worker that is running locally and vice versa. |
19.2. ZetaPush choices
19.2.1. High availability
ZetaPush ensures a high-availability of your appplications.
Indeed, all systems on the ZetaPush cloud (servers, database, …) are redundant. This will also be the case for workers in next versions.
If a server goes down, another takes over.
19.2.2. Load-balancing
ZetaPush provides Load-balancing feature between workers. Indeed, if an application has many workers (The back part of your application), the ZetaPush cloud will automatically spread incoming requests between each of them.
19.2.2.1. Running local and pushed worker on same application
In the case of you have already deployed your application in the ZetaPush cloud, a worker is running on it. Then, if you run your application locally, a second worker is running on your computer.
In this case, the load-balancing is always effective, the incoming requests will be spread between each worker.
If you want to grab all traffic in your local worker, you need to use the flag --grab-all-trafic of the CLI.
For example:
$ zeta run --grab-all-traficWith this option, all requests will be redirected to your local worker.
|
You do not use this option in production because all of your client’s requests will be redirected on your local worker. |
|
The possibility to grab traffic for a specific user (for debug for example) will be possible in a next version. |
19.2.3. Scalability
ZetaPush provides the scalability of yours workers.
For example, if you have deployed an application on the ZetaPush cloud, it is possible to increase the number of worker to scale the application.
|
For now, to scale your application, you need to contact us. But in the next versions, the scalability will be automatic. Another feature that will be available in the next versions is the possibility to scale up your application on a short period to absorb peak loads without extra cost. |
19.2.4. Supervision
This section will explain why ZetaPush is useful about supervision of your applications. It will soon be ready.
19.2.5. JavaScript vs TypeScript
This section will explain why ZetaPush mainly uses TypeScript. It will soon be ready.
19.3. Application code structure
The purpose of this section is to explain the various elements of a ZetaPush application and the interaction between them.
In the first instance we will see the organization of a ZetaPush application, then we will see the role of each file or folder.
19.3.1. Organization of an application
A ZetaPush application includes several components. You can see this with the following picture that represents the files tree of a basic application:
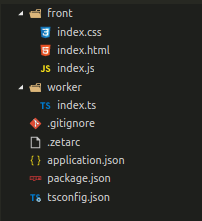
The worker folder contains your business logic. this is the code that is not directly visible to your users. It is often named as backend part. The front folder is the visible part of your application. It contains the code of the web pages displayed to your users. It is often named the frontend part.
The rest of the files are needed for the functioning of the application. Each role of this files is explained below :
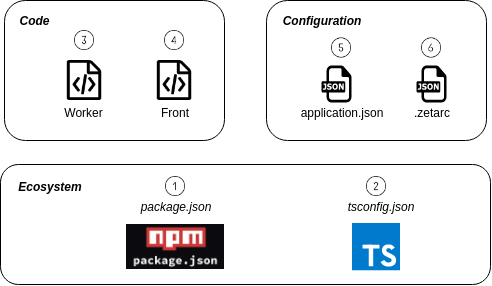
| 1 | A ZetaPush application is mainly based on the JavaScript ecosystem. An application is similar to a JavaSscript module. So at the root of the application, we have a package.json file, more information about his role is below. |
| 2 | In addition of the JavaScript ecosystem, a ZetaPush application uses the TypeScript ecosystem by default. So a tsconfig.json file is necessary at the root folder. You can see more information about his role also see why we use TypeScript. |
| 3 | The worker folder contains your business logic. |
| 4 | The front folder contains the web pages displayed to end users. |
| 5 | The application.json file lets you configure the logic of your application. (Token, API key, Mailjet configuration, etc…). |
| 6 | The .zetarc file contains the application and ZetaPush account information (developer login, developer password, appName, etc…). It should not be commited (it contains login and password) so by default it is added to the .gitignore file. |
19.3.2. Files tree
As seen in the last section, each file has a specific role. We will explain each of them step by step:
19.3.2.1. package.json
A ZetaPush application is based of the JavaScript ecosystem.
So each application has his package.json file.
package.json file
  1
2
3
4
5
6
7
8

  {
  "name": "myApp",
  "main": "worker/index.ts", (1)
  "dependencies": {
    "@zetapush/cli": "^v0.37.1" (2)
    "@zetapush/core": "^v0.37.1", (3)
  }
}
| 1 | Entry point of your worker. In this file you will expose your custom cloud services |
| 2 | Dependency to the CLI (Command Line Interface). Use it to run your worker or deploy your code. |
| 3 | Dependency to the ZetaPush Core to write some custom cloud services |
The main property defines the path of the worker entry point. That means that when you run or push your ZetaPush application, this is from this entry point that your business logic is launched.
|
Location of the entry point
At the present time, the worker code needs to be in the |
19.3.2.2. tsconfig.json
The tsconfig.json file is here because by default ZetaPush uses the TypeScript ecosystem. For example, the cloud services are written in TypeScript and the worker folder contains by default a TypeScript file.
You can see why we use TypeScript.
In the TypeScript ecosystem, the tsconfig.json file is needed to define the root of the application. So in our case, the tsconfig.json file is placed at the root of the ZetaPush application.
If you are not familiar with TypeScript, you can see more informations here.
In addition to define the root of our application, the tsconfig.json file defines how the transpilation from TypeScript to JavaScript is done.
You can define a lot of configurations according to the TypeScript documentation.
For the proper functioning of the ZetaPush application, the tsconfig.json file needs to have some minimal configuration like explained below :
  1
2
3
4
5
6

  {
  "compilerOptions": {
    "experimentalDecorators": true      (1)
    "emitDecoratorMetadata": true       (2)
  }
}
| 1 | experimentalDecorators is needed to activate the ES7 decorators. There are used in most worker code. |
| 2 | emitDecoratorMetadata is needed for the proper functioning of the ES7 decorators. In particular for types. |
In the case you need to customize your tsconfig.json file, for example to use features only declared in ES6 (es2015), you can customize your tsconfig.json like below. Of course, you can customize with any properties provided by TypeScript.
  1
2
3
4
5
6
7
8
9

  {
  "compilerOptions": {
    "lib": [
      "es2015"
    ],
    "experimentalDecorators": true,
    "emitDecoratorMetadata": true
  }
}
19.3.2.3. worker folder
As seen above, the worker folder contains the business logic of your application. It is often named "backend code.
This is in this part that you will create your business logic and interact with the built-in cloud services provided by ZetaPush (User management, file system, database, notifications, etc…).
By default (When the application is generated by the CLI), the worker folder contains only one file, called index.ts.
  1
2
3
4
5

  export default class {
  hello() {
    return `Hello World from Worker at ${Date.now()}`;
  }
}
|
Develop your worker in several ways
In this example we see a worker that is created with only one class. You will see several ways to create a worker in the cloud service development section. |
|
Don’t need to transpile TypeScript
Even if your worker code is in |
19.3.2.4. front folder
The front folder contains your front code.
Like any other website host, you need to have a index.html file in this folder.
19.3.2.5. application.json
This file is optional in a ZetaPush application. For now you just need to use it when you use the StandardUserWorkflow. Of course, you can also define your own properties
|
List of application.json properties
To know which keys are available for the |
19.3.2.6. .zetarc
The .zetarc file is the most important file in your application.
It lets you define your ZetaPush account and which ZetaPush application you want to use.
  1
2
3
4
5

  {
    "developerLogin": "user@gmail.com",
    "developerPassword": "password",
    "appName": "myAppName"
}
In addition to the properties displayed in the example, 2 properties are used:
-
developerSecretToken: The CLI encrypts the
developerPasswordin the.zetarcfile. You don’t need to modify it. If you want to change the ZetaPush account password in the.zetarcfile, you can delete thedeveloperSecretTokenand type again thedeveloperPassword. -
platformUrl: That corresponds to the used ZetaPush Cloud for your ZetaPush application. When using ZetaPush public cloud, you don’t need to configure it. If you need a private ZetaPush cloud, you can contact us to ask for it.
|
Do not commit the .zetarc
The |
20. ZetaPush development concepts
20.1. Npm modules provided by ZetaPush
ZetaPush provides several npm modules for helping you in your development. Each module has a specific role.
| Module | Role |
|---|---|
@zetapush/cli |
Contains the Command Line Interface of ZetaPush.
You can launch |
@zetapush/client |
When you develop the front part of your application, i.e. the web pages displayed to your users, you use a ZetaPush client to interact with your worker and the ZetaPush cloud. |
@zetapush/cometd |
You don’t use this module directly. It is used internally for the communication with the ZetaPush cloud via the CometD protocol. |
@zetapush/common |
This module includes some functions and classes that are used in other modules. |
@zetapush/core |
This is the core of ZetaPush. Notably, it provides the dependency injection |
@zetapush/create |
This module is used when you create a new development project using ZetaPush through the command |
@zetapush/example |
It contains a basic example of a ZetaPush application |
@zetapush/http-server |
ZetaPush uses a HTTP server for some features, for example to confirm an account in the Standard User Workflow. You have information about this module in his dedicated section |
@zetapush/testing |
ZetaPush integrates testing and provides some useful features about it via this module. |
@zetapush/integration |
This package is used internally by ZetaPush. It contains end to end tests to ensure that each new version is well tested and that there is no regression. |
@zetapush/platform-legacy |
ZetaPush contains some Technical Services that are the fundations to build more functional and advanced services. These services will be improved and some may be replaced by a service that matches more your needs. This module contains them and you have more information about their utilization in the dedicated section. |
@zetapush/troubleshooting |
When you have a technical error, it can be hard to understand what really happens. This module diagnoses all errors (errors when worker starts, errors when worker is pushed, errors in connection/network…) and gives you an help to understand the error and to help you fix it. For example, a network error can have several causes:
This module will give you help to understand where the problem is and how to fix it. |
@zetapush/user-management |
In almost every application, you need to provide user management features like user creation, user authentication, profile management… This module provides functional cloud services that directly provides all these features. You don’t need to bother about implementing it again and again. You just consume one of these cloud services like StandardUserWorkflow. |
@zetapush/worker |
This module provides the container that executes the code of your business logic i.e. the worker. It is internally used by the CLI when you launch |
20.2. Dependency injection
Dependency Injection is a technique whereby one component supplies the dependencies of another component. A dependency is a component that can be used. An injection is the passing of a dependency to a dependent component that would use it.
In our case, we the Dependency Injection to provides the cloud services (builtin or not) and other classes. The benefic is that you don’t need to instanciate a dependency. You ask it and you have it.
In the following example we need to have the GDA builtin cloud service (database). We ask the dependency injection to provide one.
  1
2
3
4
5
6
7
8
9
10
11
12
13
14
15

  import { Gda } from '@zetapush/platform-legacy';

@Injectable()                       (1)
export default class MyApi {
  constructor(private gda: Gda) {}  (2)

  putData(name: string) {
    return await this.gda.put({     (3)
      table: 'my-table',
      column: 'my-column',
      key: Date.now().toString(),
      data: name
    });
  }
}
| 1 | Say to the dependency injection that it should provide some dependencies in this class |
| 2 | I just say that I need a GDA instance in my class |
| 3 | I use my dependency. I know that my dependency is automatically instantiated by the Dependency Injection. |
|
Dependencies are singletons by default
By default, when you use the dependency injection, each component that is instanciated is a singleton. |
ZetaPush uses Injection JS library for manage the Dependency Injection. It is an extraction of the Angular’s dependency injection.
You can have more information about the dependency injection in the Angular Dependency Injection Documentation
20.4. Current running context
When you develop your cloud services, you may want to use the current context. The most important thing about this is that it depends of your runtime environment. Indeed, the properties will be not the same when your worker is running locally or when your worker is running on the ZetaPush cloud.
|
Different contexts
The context is not the same between locally and in the ZetaPush cloud because in the first case the context is provided by the CLI and in the second case the context is provided by the ZetaPush platform. |
To handle this, ZetaPush provides some util functions to get the current context. There are 3 classes to manage the context :
20.4.1. Environment
This object is just a wrapper for ConfigurationProperties and ZetaPushContext.
You can use it like this :
  1
2
3
4
5
6
7
8
9
10
11
12
13
14
15

  import { Injectable, Environment } from '@zetapush/core';     (1)

@Injectable()
export default class Api {
  constructor(private env: Environment) {}                    (2)

  getEnvironment() {
    return {
      context: this.env.context,                              (3)
      name: this.env.name,                                    (4)
      properties: this.env.properties,                        (5)
      variables: this.env.variables                           (6)
    };
  }
}
| 1 | The Environment class is in the @zetapush/core package. |
| 2 | The dependency injection provides us a Environment instance. |
| 3 | We get the ZetaPushContext |
| 4 | We get the name of the environment (dev, prod, etc…) |
| 5 | We get the ConfigurationProperties |
| 6 | We get the environment variables |
As the Environment object is a wrapper for ConfigurationProperties and ZetaPushContext, we retrieve the values for these objects via the properties context and properties.
|
Environment feature is not ready in the full chain
The name of the environment is already available in the current context but the Environment management feature is not ready yet. The integration in the CLI is missing and it is our next high priority. |
Because the Environment object also contains the ConfigurationProperties and ZetaPushContext,
you can use the methods of this nested properties. For example to get the application name via
the ZetaPushContext:
  1
2
3
4
5
6
7
8
9
10

  import { Injectable, Environment } from '@zetapush/core';     (1)

@Injectable()
export default class Api {
  constructor(private env: Environment) {}                    (2)

  getAppName() {
    return this.env.context.getAppName();                     (3)
  }
}
| 1 | The Environment class is in the @zetapush/core package. |
| 2 | The dependency injection provides us a Environment instance. |
| 3 | Get the appName via getAppName() method. |
20.4.2. ConfigurationProperties
This object contains the content of your application.json file.
20.4.2.1. Access to application.json properties
To interact with your application.json file, you can use these provided methods:
-
get(): Get a property value via his name, returnsundefinedif doesn’t exists -
getOrThrow(): Get a property value via his name, returnsAPI_ERRORexception if doesn’t exists -
has(): Check if a property exists in theapplication.jsonfile (returns boolean)
In the case of we have the following application.json file:
  1
2
3
4
5
6

  {
  "organization": {
    "name": "ZetaPush"
  },
  "my-name": "MyName",
}
We can get properties like this :
  1
2
3
4
5
6
7
8
9
10
11
12
13

  import { Injectable, ConfigurationProperties } from '@zetapush/core';     (1)

@Injectable()
export default class {
  constructor(private properties: ConfigurationProperties) {}             (2)

  getUserInfo() {
    return {
      name: this.properties.get('my-name'),                               (3)
      orga: this.properties.get('organization.name')                      (4)
    }
  }
}
| 1 | The ConfigurationProperties class is in the @zetapush/core package. |
| 2 | The dependency injection provides us a ConfigurationProperties instance. |
| 3 | We read the application.json property via a getter |
| 4 | We read the application.json nested property via a getter |
20.4.3. ZetaPushContext
This last object contains (amongst others) the URL of your worker and your front (deployed on the ZetaPush cloud or running locally).
20.4.3.1. Use ZetaPushContext
The ZetaPushContext provides you some methods to interact with it:
-
getAppName(): Returns the appName of your application -
getPlatformUrl(): Returns the platformUrl of your application -
getFrontUrl(): Returns the url of the used front part of your application -
getWorkerUrl(): Returns the url of the used worker -
getLocalZetaPushHttpPort(): Returns the port used on HTTP server
|
Role of URL
|
The ZetaPushContext can be used like below:
  1
2
3
4
5
6
7
8
9
10
11
12
13
14
15
16

  import { ZetaPushContext, Injectable } from '@zetapush/core';       (1)

@Injectable()
export default class Api {
  constructor(private context: ZetaPushContext) {}                  (2)

  getContext() {
    return {
      front: this.context.getFrontUrl(),                            (3)
      worker: this.context.getWorkerUrl(),
      zetapushPort: this.context.getLocalZetaPushHttpPort(),
      appName: this.context.getAppName(),
      platformUrl: this.context.getPlatformUrl()
    };
  }
}
| 1 | ZetaPushContext is provided by the @zetapush/core module |
| 2 | We ask the Dependency Injection to provide an instance of ZetaPushContext |
| 3 | We use all methods provided by the ZetaPushContext |
21. Develop with ZetaPush
In the Getting started section you already see how to develop with ZetaPush. So in this section we will see in more details how to develop with ZetaPush and some advanced usages.
21.1. Develop your front only
21.1.1. ZetaPush client
ZetaPush provides a ZetaPush Client to interact with the ZetaPush cloud. Each of the 3 types of Client has a specific purpose:
-
Weak client for an anonymous connection
-
Simple client for a basic authenticated connection
-
Smart client that automatically chooses between Weak or Simple client according to presence or not of credentials
Weak Client
The Weak client lets you create an anonymous connection with the ZetaPush cloud. That means that you are only connected via a token.
|
Token of anonymous user
The token is only used to identify the anonymous user during his session. Indeed, each opened connection has its own session on the ZetaPush cloud so we need to identify each of them. |
How to use the Weak Client :
Connection with Weak Client
index.html
  1
2
3
4
5
6
7
8
9
10
11
12
13
14

  <!DOCTYPE html>
<html lang="en">
  <head>
    <meta charset="UTF-8" />
    <meta name="viewport" content="width=device-width, initial-scale=1.0" />
    <meta http-equiv="X-UA-Compatible" content="ie=edge" />
    <title>Weak client</title>
  </head>
  <body>
    Weak client
  </body>
  <script src="https://unpkg.com/@zetapush/client"></script>
  <script src="./index.js"></script>
</html>
index.js
  1
2
3
4
5
6
7
8
9
10
11
12
13

  // If you use npm you can do :
// import { WeakClient } = from '@zetapush/client';

client = new ZetaPushClient.WeakClient();

// Connection
client
  .connect()
  .then(() => console.log('connected'))
  .catch(() => console.error('connection failed'));

// Disconnection
client.disconnect();
-
Simple Client
The Simple Client is used to have an authenticated connection with the ZetaPush cloud.
|
Simple client authentication
With the Simple Client the authentication is done with a couple login/password of the end user previously created. (It’s not your ZetaPush developer credentials at all) |
How to use the Simple Client :
Connection with Simple Client
index.html
  1
2
3
4
5
6
7
8
9
10
11
12
13
14

  <!DOCTYPE html>
<html lang="en">
  <head>
    <meta charset="UTF-8" />
    <meta name="viewport" content="width=device-width, initial-scale=1.0" />
    <meta http-equiv="X-UA-Compatible" content="ie=edge" />
    <title>Simple client</title>
  </head>
  <body>
    Simple client
  </body>
  <script src="https://unpkg.com/@zetapush/client"></script>
  <script src="./index.js"></script>
</html>
index.js
  1
2
3
4
5
6
7
8
9
10
11
12
13
14
15
16
17
18
19
20

  // If you use npm you can do :
// import { Client } = from '@zetapush/client';

client = new ZetaPushClient.Client({
  authentication() {                                (1)
    return ZetaPushClient.Authentication.simple({
      login: 'my-login',
      password: 'my-password'
    });
  }
});

// Connection
client
  .connect()
  .then(() => console.log('connected'))
  .catch(() => console.error('connection failed'));

// Disconnection
client.disconnect();
| 1 | We define the used authentication (simple in this case) |
-
Smart Client
|
SmartClient is recommended
We advise you to use this ZetaPush Client for convenience. |
The Smart Client is a combinaison of the Weak Client and the Simple Client. If the Client has credentials, a Simple Client is used, otherwise a Weak Client is used.
How to use the Smart Client :
Connection with Smart Client
index.html
  1
2
3
4
5
6
7
8
9
10
11
12
13
14

  <!DOCTYPE html>
<html lang="en">
  <head>
    <meta charset="UTF-8" />
    <meta name="viewport" content="width=device-width, initial-scale=1.0" />
    <meta http-equiv="X-UA-Compatible" content="ie=edge" />
    <title>Smart client</title>
  </head>
  <body>
    Smart client
  </body>
  <script src="https://unpkg.com/@zetapush/client"></script>
  <script src="./index.js"></script>
</html>
index.js
  1
2
3
4
5
6
7
8
9
10
11
12
13
14
15
16

  // If you use npm you can do :
// import { SmartClient } = from '@zetapush/client';

client = new ZetaPushClient.SmartClient();

// Set credentials (optional)
client.setCredentials({ login: 'my-login', password: 'my-password'});

// Connection
client
  .connect()
  .then(() => console.log('connected'))
  .catch(() => console.error('connection failed'));

// Disconnection
client.disconnect();
-
Call your API
Once you are connected to the ZetaPush cloud, you can call your API declared in the worker part of your application.
The best way is to use the method createProxyTaskService(). This will use proxy object.
|
Use proxy for API
Using proxy avoids you to have to create a definition class of your API. |
Call API through proxy :
Call API through proxy
index.ts (worker)
  1
2
3
4
5

  export default class {
  hello() {
    return `Hello World from Worker at ${Date.now()}`;
  }
}
index.html
  1
2
3
4
5
6
7
8
9
10
11
12
13
14

  <!DOCTYPE html>
<html lang="en">
  <head>
    <meta charset="UTF-8" />
    <meta name="viewport" content="width=device-width, initial-scale=1.0" />
    <meta http-equiv="X-UA-Compatible" content="ie=edge" />
    <title>Weak client</title>
  </head>
  <body>
    <button class="js-Hello">call hello()</button>
  </body>
  <script src="https://unpkg.com/@zetapush/client"></script>
  <script src="./index.js"></script>
</html>
index.js (front)
  1
2
3
4
5
6
7
8
9
10
11
12
13
14
15

  // If you use npm you can do :
// import { WeakClient } = from '@zetapush/client';
client = new ZetaPushClient.WeakClient();
api = client.createProxyTaskService();

// Handle the click
document.querySelector('.js-Hello').addEventListener('click', async () => {
  console.log(await api.hello());           (1)
});

// Connection
client
  .connect()
  .then(() => console.log('connected'))
  .catch(() => console.error('connection failed'));
| 1 | Call hello() method of the worker |
-
Call API without proxy
In the case of the Proxy is not available on your platform, you can use the createAsyncTaskService() method.
For this, you need to create a definition class:
|
Definition class
A definition class is used to define which methods are available in your worker. It has always the same format. |
Call API without proxy
index.ts (worker)
  1
2
3
4
5

  export default class {
  hello(name: string) {
    return `Hello ${name} from Worker at ${Date.now()}`;
  }
}
index.html
  1
2
3
4
5
6
7
8
9
10
11
12
13
14
15

  <!DOCTYPE html>
<html lang="en">
  <head>
    <meta charset="UTF-8" />
    <meta name="viewport" content="width=device-width, initial-scale=1.0" />
    <meta http-equiv="X-UA-Compatible" content="ie=edge" />
    <title>Weak client</title>
  </head>
  <body>
    <button class="js-Hello">call hello()</button>
  </body>
  <script src="https://unpkg.com/@zetapush/client"></script>
  <script src="https://unpkg.com/@zetapush/platform-legacy"></script>
  <script src="./index.js"></script>
</html>
index.js (front)
  1
2
3
4
5
6
7
8
9
10
11
12
13
14
15
16
17
18
19
20
21
22
23
24
25
26
27

  // If you use npm you can do :
// import { WeakClient } = from '@zetapush/client';
// import { Queue } = from '@zetapush/platform-legacy';
client = new ZetaPushClient.WeakClient();

// Handle the click
document.querySelector('.js-Hello').addEventListener('click', async () => {
  console.log(await api.hello('test'));                   (1)
});

// Our definition API
class MyApi extends ZetaPushPlatPlatformLegacy.Queue {    (2)
  hello(name) {                                           (3)
    return this.$publish('hello', name);                  (4)
  }
}

// create our AsyncTaskService
const api = client.createAsyncTaskService({
  Type: MyApi
});

// Connection
client
  .connect()
  .then(() => console.log('connected'))
  .catch(() => console.error('connection failed'));
| 1 | Call hello() method of the worker |
| 2 | We extends the Queue Technical Service that allows us to communicate with ZetaPush Cloud |
| 3 | Each method returns a Promise |
| 4 | The definition API is always the same format : return this.$publish('name-cloud-function', param1, paramN); |
-
Injection of your application’s information
The creation of a ZetaPush Client needs to have some information for commucating with the right application.
For this, there are the appName and optionally the platformUrl.
  1
2
3
4

  client = new ZetaPushClient.WeakClient({
  appName: 'my-app-name',           (1)
  platformUrl: 'my-platform-url'    (2)
});
| 1 | Your application name |
| 2 | The optional URL of your used platform (by default you don’t need to use this variable) |
If you develop the front part of your application in the folder defined by convention (i.e. the front/ folder of your application) the information (appName and platformUrl) will be automatically injected by the ZetaPush CLI.
|
When define
appName or platformUrl ?You only need to define |
Storage of credentials
ZetaPush client is able to automatically store some information in order to reconnect the end users without requiring to enter credentials again. As said before there are two different clients:
-
The token for the Weak Client
-
The credentials for the Simple Client (and the Smart Client if credentials are used)
In the two cases, a cookie is created to save the user session. It is related to the appName to avoid conflicts.
The token has different expiration duration according to the client type:
-
Weak clienthas no expiration meaning that once the client connection is established the first time, the cookie is set. The next connections reuse the same token. It is useful to know that the connection is for the same anonymous user as a previous session. -
Simple clientstores the cookie for 30 days meaning that if a user authenticates the first time on your application and then leaves it, when he comes back he can directly use your application without authenticating again.
Obviously, token storage can be disabled and expiration duration can be configured. This section will later describe how to enable/disable token storage, how to change storage implementation (local storage, session storage, …) and how to change expiration duration.
Multiple API
When you expose several cloud services in your worker, some cloud functions may have the same name. So you need a way to indicate which cloud service is targeted. Therefore in your worker you can use namespaces to name each cloud service. Then you also need to indicate which cloud service to call in your front too.
21.1.3. Mobile development
The mobile development with ZetaPush is already possible but the documentation is not ready. Two SDKs are available (Android and iOS). If you need to use them, please contact us.
21.2. Generate SDKs from custom cloud service code
When you develop your business logic, you may want to create a SDKs to expose your methods. This feature will soon be ready.
21.3. Develop custom cloud services
21.3.1. What is a custom cloud service
A custom cloud service combines many cloud functions like the cloud services exposed by ZetaPush. The only difference is that you create the cloud functions. Generally, you will want to put the business logic of your application in the custom cloud services.
Architecture
You develop cloud services that are contained in a concept named worker. In your code it is
materialized by a folder named worker. The worker is the ZetaPush handler that starts your code (your custom cloud services).
Your application is composed of a logic part (the worker) and a UI part (the front).
There are two ways of running an application (worker and front):
-
You develop on your machine and iterate to provide features. Your application runs locally and interacts with ZetaPush Cloud.
-
Once you are ready to make the developed features available to your end-users, you publish your application. Your application runs directly in ZetaPush Cloud.
Both front and worker are running locally. The front interacts with custom cloud services contained in the worker through ZetaPush Cloud. As ZetaPush Cloud provides bidirectional connection, the custom cloud services can also interact with the front through ZetaPush Cloud too.
A custom cloud service can interact with built-in cloud services provided by ZetaPush.
|
When you start using ZetaPush, you only develop locally so from your point of vue, your front seems to directly interact with your custom cloud services. In fact, all messages go through the Internet and ZetaPush Cloud. It means that a published front can interact with a worker that is running locally and vice versa. |
Once published, everything runs in the ZetaPush Cloud. However the behavior is the same. Every interaction between the front and custom cloud services goes through the ZetaPush Cloud.
The only main difference is that ZetaPush Cloud manages the hosting, the scalability and the high availability for you.
21.3.2. Develop a custom cloud services
Define a custom cloud service
As a reminder worker is the ZetaPush container that will handle your code that defines custom cloud services.
By convention, the code of your custom cloud services is placed in files under worker directory:
hello-world
├── .zetarc
├── .gitignore
├── front
│   ├── ...
│   └── ...
├── worker
│   ├── file1.ts
│   ├── file2.ts
│   ├── ...
│   ├── fileN.ts
│   └── index.ts
├── package.json
├── README.md
└── tsconfig.json|
Change directory structure
See more information about directory structure convention and how to adapt the structure. |
Translated into code, a custom cloud service is just a class and its methods are the cloud functions.
The code is written in any ts file defined in worker directory. For small application like a "hello world",
write your code directly in index.ts file.
So the most basic example of a custom cloud service is below:
  1
2
3
4
5
6
7
8

  class HelloWorldAsCustomCloudService {     (1)

    constructor() {}                       (2)

    helloWorld() {                         (3)
        return "Hello World";
    }
}
| 1 | A custom cloud service is encapsulated in a JavaScript/TypeScript class. HelloWorldAsCustomCloudService is your first custom cloud service. |
| 2 | A class can define a constructor. We will see later why it is important |
| 3 | helloWorld is your first custom cloud function |
| A cloud function is always asynchronous (with the async keyword or not) |
|
Change entry point
By default, the code above is directly written in You can write code of your custom cloud services in any other file named as you want. You will see in the reference part how to indicate to ZetaPush worker how to find your files if you don’t want to follow convention. |
Each cloud function in a custom cloud service is a standard JavaScript/TypeScript method. For example, if you want a cloud function that receives two parameters you write:
  1
2
3
4
5
6
7
8
9
10
11
12
13
14
15

  class HelloWorldAsCustomCloudService {                            (1)
    constructor() {}

    helloWorld() {
        return "Hello World";
    }

    saySomething(message: string, times: number) {                (2)
        let fullMessage = '';
        for(let i=0 ; i<times ; i++) {                            (3)
            fullMessage += `${message}\n`
        }
        return fullMessage                                        (4)
    }
}
| 1 | The custom cloud service definition as seen before |
| 2 | Declaration of a cloud function named saySomething. This cloud function accepts
two parameters. As TypeScript is the recommended way, each parameter is typed. |
| 3 | Just for an example, the business logic consists in looping a number of times and concatenating the message. You can obviously write any code you want here. |
| 4 | The custom cloud function simply returns the contactenated string. |
|
Why typing ?
Typing is optional but recommended to have a well defined API. Thanks to typing, ZetaPush is able to generate more accurate documentation based on your code and also generate mobile/web/IoT SDKs from your code with the right types so it makes developing your clients easier (for example, auto-completion can be used). |
|
Tips about cloud functions
A custom cloud service can have as many custom cloud functions as you want. A custom cloud function can have as many parameters as you want. Parameters can be anything: A custom cloud function can return anything including a Promise. You can also write your code using async/await syntax. |
|
Define several custom cloud services
Obviously when your application grows, you need to split your custom cloud service into several classes in order to make your API more understandable and more maintainable. You can learn how to define several custom cloud services. |
You have now a custom cloud service that provides two cloud functions. But until it is exposed, it can’t be called from outside of the worker.
The next section describes how you can expose your custom cloud service.
Expose a custom cloud service
When you define a custom cloud service that you want to expose to the client, you need to declare it. There are 2 cases:
-
Only one custom cloud service exposed
-
Many custom cloud services exposed
In this section we only address one custom cloud service exposed.
|
How to expose several custom cloud services
You can also learn how to expose several custom cloud services in the advanced sections. |
We follow npm conventions to indicate the entry point of your worker. Indeed, the package.json defines a property named main.
We use this property to indicate which file is the main file that declares the exposed custom cloud service.
By default, the main file is named index.ts and this file is placed in worker directory. So the main
property is by default worker/index.ts.
Now that your custom cloud service is marked as the entry point, it can be exposed by ZetaPush. However you still have a little change to make on your code:
  1
2
3
4
5
6
7
8
9
10
11
12
13
14
15

  export default class HelloWorldAsCustomCloudService {                    (1) (2)
    constructor() {}

    helloWorld() {
        return "Hello World";
    }

    saySomething(message: string, times: number) {
        let fullMessage = '';
        for(let i=0 ; i<times ; i++) {
            fullMessage += `${message}\n`
        }
        return fullMessage
    }
}
| 1 | export: this is required by TypeScript.
In fact, declaring a class in a file makes it private.
It means that if you have another .ts file and you want to import HelloWorldAsCustomCloudService declaration,
it won’t be possible without export keyword. This is for code encapsulation. |
| 2 | default: TypeScript provides this keyword.
When exposing only one custom cloud service, default tells the worker that there is only one class (only one
custom cloud service defined in the index.ts). So the worker can directly analyze it and instantiate it. |
|
How to expose several custom cloud services
As seen above, you can also learn how to expose several custom cloud services in the advanced sections. |
Now your custom cloud service can be loaded by the ZetaPush worker and your custom cloud service is automatically exposed. It means that now a client can call the cloud functions defined in your custom cloud service.
The next section shows how to call a cloud function from a web page using pure JavaScript.
Use a custom cloud service in your front
In this chapter we will see how to consume our cloud functions from a web page.
At the end of this example, we will have one button to call helloWorld cloud function and
one section with a message, a number of repetitions and a button to call saySomething cloud function.
|
Mobile applications
Here we show how to create a web page that consumes our custom cloud service. You can also create a mobile application for Android, iOS and Windows Phone as well as code for a device. You can use any language you want for the client part. By default we target web because it is currently the most used technology (even to build some mobile applications using hybrid technologies). |
As a reminder, here is the code of custom cloud service named HelloWorldAsCustomCloudService:
  1
2
3
4
5
6
7
8
9
10
11
12
13
14
15

  export default class HelloWorldAsCustomCloudService {
    constructor() {}

    helloWorld() {
        return "Hello World";
    }

    saySomething(message: string, times: number) {
        let fullMessage = '';
        for(let i=0 ; i<times ; i++) {
            fullMessage += `${message}\n`
        }
        return fullMessage
    }
}
By convention the directory structure of a ZetaPush application is defined below. You place
the code of your web page in the front directory:
hello-world
├── .zetarc
├── .gitignore
├── front
│   ├── ...
│   ├── index.js
│   └── index.html
├── worker
│   ├── ...
│   ├── ...
│   └── index.ts
├── package.json
├── README.md
└── tsconfig.json|
Other front files
For this example, we only need an HTML page and a JavaScript file. Needless to say that you can have CSS files, images and anything you want too. See more information about directory structure convention and how to adapt the structure. Moreover, you are not limited to write pure JavaScript code. You can also use any framework you want: |
For the example, we create an HTML page with a button to display the HelloWorld message in the page each time the button is clicked:
  1
2
3
4
5
6
7
8
9
10
11
12
13
14
15
16
17
18

  <!DOCTYPE html>
<html lang="en">

<head>
    <meta charset="UTF-8" />
    <meta name="viewport" content="width=device-width, initial-scale=1.0" />
    <title>Celtia</title>
</head>

<body>
    <button onclick="hello()">hello</button>                    (1)
    <ul id="result-container"></ul>                             (2)

    <script src="https://unpkg.com/@zetapush/client"></script>  (2)
    <script src="./index.js"></script>                          (3)
</body>

</html>
| 1 | We call hello() function that is defined later in index.js |
| 2 | Define a node that will display received messages |
| 3 | We include the client module provided by ZetaPush |
| 4 | We include a JavaScript file to distinguish HTML code from JavaScript code. All could be written in the HTML |
Then, in order to interact with ZetaPush cloud, we need to create a client instance and to connect to the cloud:
  1
2
3
4
5
6
7
8
9

  // Create new ZetaPush Client
const client = new ZetaPushClient.WeakClient();     (1)
// Create a proxy to invoked worker methods
const api = client.createProxyTaskService();        (2)
// Handle connection
client.connect()                                    (3)
  .then(() => {                                     (4)
    console.debug('onConnectionEstablished');
  });
| 1 | Use ZetaPushClient factory to instantiate a client. In this example, we ask for an anonymous connection (it means that actions are not bound to a particular user of your application) |
| 2 | Custom cloud service provides some functions that can be called from a client. For example, the custom cloud service exposes helloWorld and saySomething cloud functions.
Instead of having to write the signature of these functions in the client too, we simply use a JavaScript Proxy.
Therefore, you can directly interact with your custom cloud service without writing any pass-through code on the client side. |
| 3 | The client is ready, now connects it to the ZetaPush cloud. |
| 4 | Once the connection is established, the Promise is resolved and you can write some code in then callback. |
|
Available client types
|
hello cloud functionOur client is ready and now we want to call cloud function named helloWorld, we add the following code:
  1
2
3
4
5
6
7
8
9
10
11
12
13
14

  // Create new ZetaPush Client
const client = new ZetaPushClient.WeakClient();
// Create a proxy to invoked worker methods
const api = client.createProxyTaskService();
// Handle connection
client.connect()
  .then(() => {
    console.debug('onConnectionEstablished');
  });
// Handle DOM events
async function hello() {                                                                          (1)
  const messageFromCloudFunction = await api.helloWorld();                                        (2)
  document.getElementById('result-container').innerHTML += `<li>${messageFromCloudFunction}</li>` (3)
}
| 1 | Each time a user clicks on the button defined in the HTML, this method is called. |
| 2 | Calls the helloWorld cloud function and store the result in a variable. |
| 3 | Add a new list item in the HTML page |
Before running this sample, we improve our front in order to also understand how to call a cloud function that has parameters.
saySomething cloud functionWe add two inputs to be able to send values to the saySomething cloud function.
The first input is a text to repeat. The second input is the number of times to repeat the message.
Here is the updated code:
  1
2
3
4
5
6
7
8
9
10
11
12
13
14
15
16
17
18
19
20
21
22
23

  <!DOCTYPE html>
<html lang="en">

<head>
    <meta charset="UTF-8" />
    <meta name="viewport" content="width=device-width, initial-scale=1.0" />
    <title>Celtia</title>
</head>

<body>
    <button onclick="hello()">hello</button>
    <div style="border: 1px solid #ccc">
      Message: <input type="text" id="message-input" />             (1)
      Repeat: <input type="text" value="1" id="repeat-input" />     (2)
      <button onclick="saySeveralTimes()">say something</button>    (3)
    </div>
    <ul id="result-container"></ul>

    <script src="https://unpkg.com/@zetapush/client"></script>
    <script src="./index.js"></script>
</body>

</html>
| 1 | The first input to enter a message |
| 2 | The second input to enter the number of times to repeat the message |
| 3 | A new button to call saySeveralTimes() function defined in index.js |
  1
2
3
4
5
6
7
8
9
10
11
12
13
14
15
16
17
18
19
20

  // Create new ZetaPush Client
const client = new ZetaPushClient.WeakClient();
// Create a proxy to invoked worker methods
const api = client.createProxyTaskService();
// Handle connection
client.connect()
  .then(() => {
    console.debug('onConnectionEstablished');
  });
// Handle DOM events
async function hello() {
  const messageFromCloudFunction = await api.helloWorld();
  document.getElementById('result-container').innerHTML += `<li>${messageFromCloudFunction}</li>`
}
async function saySeveralTimes() {                                                (1)
  const message = document.getElementById('message-input').value;                 (2)
  const repeat = document.getElementById('repeat-input').value;                   (3)
  const messages = await api.saySomething(message, parseInt(repeat));             (4)
  document.getElementById('result-container').innerHTML += `<li>${messages}</li>` (5)
}
| 1 | Each time a user clicks on the button 'say something' defined in the HTML, this method is called. |
| 2 | Reads the value of the input for getting the message. |
| 3 | Reads the value of the input for getting the number of times to display the message. |
| 4 | Calls saySomething cloud function with parameters. Note that as second parameter is a number, we have to convert the string from
the input to a number using parseInt. |
| 5 | Add a new list item in the HTML page containing the repeated messages |
Now everything is ready to run our application.
| When you call a cloud function from the client, the result is always a Promise even if the custom cloud function is synchronous because everything goes through the network. |
Run application
You have now defined a custom cloud service with one or several cloud function(s). You have also exposed your custom cloud service. So it is ready to be called from a client. Your client is also ready to call the custom cloud service.
The next step is to start the project (both front and worker) using the ZetaPush CLI on your computer.
|
Npm script aliases
Npm provides a handy feature to run scripts provided by dependencies without needing to change your computer settings or install the tool. ZetaPush defines npm script aliases to run the ZetaPush CLI through npm. |
To start your worker and you front using the ZetaPush CLI through npm, you simply run:
$ npm run start -- --serve-front|
|
|
Run only the worker
It is also possible to run only your worker. |
|
Automatic injection of ZetaPush information in your front
If you look closely to the code we have written, there is no information about your application at all in this sample code (the The ZetaPush CLI automatically injects the When you run your project locally, the local HTTP server that exposes the HTML page is lightly modified to include the When your project is run in the cloud, the same principle is applied. This way, you just use |
Now when we click the "hello" button, "Hello World" is displayed on the page.
When you start your project locally, the first thing that happens is that your worker connects himself automatically to the ZetaPush cloud 1 2.
Then when you open your web browser, the connection from the client is established between the web page and the ZetaPush cloud 3 4.
When you click on the button, a message is sent through the opened connection in order to tell ZetaPush cloud to execute some
remote code 5. ZetaPush cloud routes the message to your worker 6 (that is running on your machine here). The worker receives the message
and calls the hello cloud function 7.
The cloud function generates a result 8. The worker picks this result and transform it to a message 9. This message is then sent to the ZetaPush cloud 10. The ZetaPush cloud routes the response message to the calling client 11. The client receives the message and the response is parsed 12 and available in your JavaScript.
You can also try to enter a message and a number of repetitions and hit the "say something" button.
The behavior is exactly the same. This time a message is sent to call the cloud function with also the parameters.
|
Serialization/deserailization between client and custom cloud service
When you call a cloud function from the client, under the hood, the values are serialized in JSON. This is understandable because everything goes through the network. On the worker side, everything is deserialized by the worker and your custom cloud service receives the values as they were written in the front side. |
Compose cloud services
You can compose cloud services either by using built-in cloud services provided by ZetaPush or by using another of your custom cloud services.
Dependency injection is a powerful software technique that is totally managed by the worker.
You don’t need to manage the creation of neither built-in cloud services nor your custom cloud services. You just indicate in your code that you need a dependency and ZetaPush instantiates it for you. The instantiated dependency is then injected everywhere the dependency is needed.
| The dependency injection of ZetaPush uses Angular injection-js library. |
To mark a custom cloud service injectable (meaning that can be automatically created by ZetaPush
and then injected everywhere the dependency is aksed),
you need to import the package @zetapush/core in order to use Injectable decorator.
  1

  $ npm install --save @zetapush/core
Once the npm package is installed, you can import Injectable decorator and place it on your custom cloud service:
  1
2
3
4
5
6
7
8
9
10
11
12
13
14
15
16
17
18

  import { Injectable } from '@zetapush/core';            (1)

@Injectable()                                           (2)
export default class HelloWorldAsCustomCloudService {
  constructor() {}

  helloWorld() {
      return "Hello World";
  }

  saySomething(message: string, times: number) {
      let fullMessage = '';
      for(let i=0 ; i<times ; i++) {
          fullMessage += `${message}\n`
      }
      return fullMessage
  }
}
| 1 | Import the ZetaPush module that contains core features for custom cloud services such as injectable |
| 2 | Mark you custom cloud service candidate for dependency injection |
Here we just indicate that this custom cloud service can have dependencies that will be automatically injected and also that this custom cloud service can be injected anywhere it is needed.
In the next sections, we will see in concrete terms how to use it to reuse either a built-in cloud service or one of your custom cloud services.
ZetaPush built-in cloud services are available in @zetapush/platform-legacy module.
Add this module to your package.json by running the following command:
  1

  $ npm install --save @zetapush/platform-legacy
|
List of cloud services provided by ZetaPush
As a reminder, here is the list of built-in cloud services |
In the following example, we will use the Stack cloud service provided by ZetaPush.
In our use-case, we want to put some data associated with the current timestamp and be able to list all stored data.
To do this, the Stack service already provides some methods:
-
push({ stack: string, data: object }); -
list({ stack: string });
  1
2
3
4
5
6
7
8
9
10
11
12
13
14
15
16
17
18
19
20
21
22
23
24
25
26
27
28
29
30
31

  import { Injectable } from '@zetapush/core';
import { Stack } from '@zetapush/platform-legacy';  (1)

@Injectable()
export default class MyStorageService {
  private stackName = 'stack-example';

  constructor(private stack: Stack) {}              (2)

  /**
   *  Store data with associated timestamp
   */
  storeWithTimestamp(value: any) {
    return this.stack.push({                        (3)
      stack: this.stackName,
      data: {
        value,
        timestamp: Date.now()
      }
    });
  }

  /**
   * List all stored data
   */
  getAllData() {
    return this.stack.list({                        (4)
      stack: this.stackName
    });
  }
}
| 1 | We import the Stack service so that TypeScript knows it |
| 2 | We ask ZetaPush to inject a dependency of type Stack (stack is an instance of Stack).
Here we use the shorthand syntax for declaring a constructor parameter as well as a property.
So the property this.stack is defined and is initialized with stack parameter. |
| 3 | Calls the Stack service to store data (method push) |
| 4 | Calls the Stack service to list data (method list) |
The example defines a custom cloud service named MyStorageService that provides two cloud functions:
-
storeWithTimestampthat receives a value from a client and calls theStackservice to store received value (valueparameter) as well as the current timestamp (usingDate.now()) -
getAllDatathat has no parameters and callsStackservice to get all previsouly stored pairs of<value, timestamp>.
The most important part to understand is in the constructor. As described before,
the example uses dependency injection. You simply tell ZetaPush that you need a dependency of type Stack.
You don’t create it in your custom cloud service because it is not the responsibility of
your custom cloud service to create the Stack service. Instead, you let ZetaPush
handle the creation. Thanks to @Injectable decorator, ZetaPush detects that you have
a custom cloud services with needed dependencies. ZetaPush understands that you need a Stack
instance so it instantiates it before instantiating your custom cloud service. Then
ZetaPush instantiates your custom cloud service by providing, as the first argument of your
constructor here, the instance of Stack.
This behavior avoids you to have complex code to instantiate built-in cloud services. Moreover,
if you have several custom cloud services that are using the Stack service, thanks to
dependency injection, there will be only one instance shared between your custom cloud services.
In this example, we will have 2 custom cloud services:
-
Calendar: Utils function to return the current date -
HelloWorldService: Basic example usingCalendarcloud function
The first custom cloud service (Calendar) is defined in the file worker/calendar.js.
  1
2
3
4
5

  export class Calendar {
  getNow() { (1)
    return new Date().toLocalDateString('fr-FR');
  }
}
| 1 | The only cloud function of the Calendar service |
Then, we have the HelloWorldWithDateService that use our Calendar service. It is defined in the file worker/index.ts.
  1
2
3
4
5
6
7
8
9
10
11
12
13
14
15

  import { Injectable } from '@zetapush/core';
import { Calendar } from './calendar';        (1)

@Injectable()
export default class HelloWorldWithDateService {
  constructor(                                (2)
    private calendar: Calendar
  ) {}
  /**
   * Return 'Hello World' with current date
   */
  helloWorldWithDate() {
    return `Hello world at ${this.calendar.getNow()}`;
 }
}
| 1 | We import the Calendar service from the worker/calendar.ts file |
| 2 | calendar is an instance of Calendar and this.calendar is initialized with calendar value |
As for built-in cloud services, dependency injection works for your custom cloud services. Here it was an example
|
Private custom cloud service
In this example, we still have only one custom cloud service exposed. One Sometimes you may want to expose several custom cloud services. |
|
Shared module of custom cloud services
As you can see, a custom cloud service is no more than just a standard class with methods written
in TypeScript. If you want to develop reusable custom cloud services that could be
used in different applications, you can do it easily by following standards.
Actually, you can just create a npm module and import it like we do with You can also import any existing library that is available in the community. |
Add initialization code
ZetaPush manages scalability and redundancy of your workers. So there may have several workers that start at the same time. And if you initialize some data or configure some cloud services at the same time, it may have conflicts or duplicated data. To avoid that ZetaPush provides a way to initialize code that will ensure that is executed by only one worker.
For this, ZetaPush provides the bootstrap feature. To use it you need to implement the method onApplicationBootstrap() in your custom cloud service.
|
Bad practice for initialization code
You may want to put your initialization code in the constructor but this is a bad practice.
Indeed, even if in the most cases, a custom cloud service is a singleton, it may have several instances of your custom cloud service and your initialization code will be called many times. An other drawback is that the constructor is synchronous and the |
In the following example we will create a worker to store data in a database. The initialization code let you create a table in our database. Then we will create methods to add and list our data.
  1
2
3
4
5
6
7
8
9
10
11
12
13
14
15
16
17
18
19
20
21
22
23
24
25
26
27
28
29
30
31
32
33
34
35

  import { Injectable, Bootstrappable } from '@zetapush/core';
import { GdaConfigurer, Gda, GdaDataType } from '@zetapush/platform-legacy';

const NAME_TABLE = 'table';
const NAME_COLUMN = 'column';

@Injectable()
export default class implements Bootstrappable {                              (1)
  constructor(private gdaConfigurer: GdaConfigurer, private gda: Gda) {}

  async onApplicationBootstrap() {                                            (2)
    this.gdaConfigurer.createTable({                                          (3)
      name: NAME_TABLE,
      columns: [{
        name: NAME_COLUMN,
        type: GdaDataType.STRING
      }]
    });
  }

  async addData(data: string) {
    return await this.gda.put({
      table: NAME_TABLE,
      column: NAME_COLUMN,
      data,
      key: Date.now().toString()
    });
  }

  async getData() {
    return await this.gda.list({
      table: NAME_TABLE
    });
  }
}
| 1 | We implement the Bootstrappable interface. This is optional (see below) |
| 2 | The onApplicationBootstrap() method is always asynchronous, the async keyword is optional |
| 3 | In our initialization code we create a table in our database |
|
Bootstrappable interface
The implementation of the |
You can implement the onApplicationBootstrap() method in several custom cloud services.
A dependency tree will be created to execute all onApplicationBootstrap() methods in the proper order (regarding of the needed dependencies).
For example in the following scheme, we have 2 exposed API named Dashboard and Mobile. For the case of the Dashboard API, it uses another service named Admin, that uses User Management and Stock Management services and so on.
So the services are initialized in a specific order :
-
Utils
-
User Data / Stock Data
-
User Management / Stock Management / Stock Market
-
Admin / Client API / Guest Access
-
Dashboard / Mobile
21.4. Advanced usage of cloud services
21.4.1. Several custom cloud services
21.4.1.1. Develop a cloud service that is not exposed
During the development of your custom cloud services you may want to not expose some of them. In this case, the affected custom cloud services are not reachable by the client.
  1
2
3
4
5
6
7
8
9
10
11
12
13
14
15
16
17
18
19
20
21
22

  import { Injectable } from '@zetapush/core';

/**
 * This is a private cloud service
 */
class MyTimeManager {                                                     (1)
  /**
   * This is a private cloud function
   */
  getCurrentTime() {                                                      (2)
    return Date.now();
  }
}

@Injectable()                                                             (3)
export default class {
  constructor(private timeManager: MyTimeManager) {}                      (4)

  hello() {                                                               (5)
    return `Hello from Worker at ${this.timeManager.getCurrentTime()}`;
  }
}
| 1 | Our private custom cloud service (no export keyword) |
| 2 | getCurrentTime() is not reachable by the client (front part of your application) |
| 3 | We specify that we want to use the dependency injection in our class |
| 4 | We ask the dependency injection to have an instance of MyTimeManager |
| 5 | hello() is the only method reachable by the client (front part of your application) |
21.4.1.2. Expose several cloud services
ZetaPush provides the possibility to expose several custom cloud services if you want. For example, you may have two custom cloud services that have same cloud function names. To differentiate them we provide namespaces
Namespaces
With the namespaces you can separate several custom cloud services. The result is that if a ZetaPush API created by a ZetaPush Client is configured to reach one namespace, the cloud functions exposed in the others namespaces will not be reachable with this API.
If we take the previous example, we may want to expose our two custom cloud services in two namespaces named time and default.
Example of several custom cloud services exposed
index.ts (worker)
  1
2
3
4
5
6
7
8
9
10
11
12
13
14
15
16
17
18
19
20
21
22
23
24
25
26
27
28

  import { Injectable, Module } from '@zetapush/core';

class MyTimeManager {                                                         (1)
  getCurrentTime() {
    return Date.now();
  }

  hello() {
    return `Hello from MyTimeManager at ${this.getCurrentTime()}`;
  }
}

@Injectable()
class MyDefaultApi {                                                          (2)
  constructor(private timeManager: MyTimeManager) {}

  hello() {
    return `Hello from Worker at ${this.timeManager.getCurrentTime()}`;
  }
}

@Module({                                                                     (3)
  expose: {
    timer: MyTimeManager,
    default: MyDefaultApi
  }
})
export default class {}
| 1 | A custom cloud service definition that defines hello cloud function |
| 2 | Another custom cloud service definition that also defines hello cloud function |
| 3 | We expose a class that is defined as a Module.
In the property expose we define in which namespace we expose each of our custom cloud services. By explicitly associating MyTimeManager to timer key, MyTimeManager cloud service is exposed through timer namespace. Same applies to MyDefaultApi that is exposed through default namespace |
index.html
  1
2
3
4
5
6
7
8
9
10
11
12
13
14
15
16

  <!DOCTYPE html>
<html lang="en">
  <head>
    <meta charset="UTF-8" />
    <meta name="viewport" content="width=device-width, initial-scale=1.0" />
    <meta http-equiv="X-UA-Compatible" content="ie=edge" />
    <title>Several Custom Cloud Services</title>
  </head>
  <body>
    <button class="js-Hello">call hello() in default namespace</button>
    <button class="js-Timer">call hello() in timer namespace</button>
  </body>
  <script src="https://unpkg.com/@zetapush/client"></script>
  <script src="https://unpkg.com/@zetapush/platform-legacy"></script>
  <script src="./index.js"></script>
</html>
index.js (front)
  1
2
3
4
5
6
7
8
9
10
11
12
13
14
15
16
17
18
19
20
21
22
23
24
25
26
27
28

  // If you use npm you can do :
// import { WeakClient } = from '@zetapush/client';
// import { Service } = from '@zetapush/platform-legacy';
client = new ZetaPushClient.WeakClient();

// First api to reach 'default' namespace
const defaultApi = client.createProxyTaskService({                                (1)
  namespace: 'default'
});

// Second API to reach 'timer' namespace
const timerApi = client.createProxyTaskService({                                  (2)
  namespace: 'timer'
});

// Handle the clicks
document.querySelector('.js-Hello').addEventListener('click', async () => {
  console.log(await defaultApi.hello());
});
document.querySelector('.js-Timer').addEventListener('click', async () => {
  console.log(await timerApi.hello());
});

// Connection
client
  .connect()
  .then(() => console.log('connected'))
  .catch(() => console.error('connection failed'));
-
<1> We create an API that reach only the default namespace
<2> We create an API that reach only the timer namespace
22. Available cloud services
22.1. Standard User Workflow
Some information will soon be added about utilization of Standard User Workflow. For now, you can follow the dedicated developer manual section.
22.2. Technical cloud services
22.2.1. User Management
22.2.1.1. Simple
End-user API for the simple local authentication
These API verbs allow end-users to manage their account(s).
createUser
Creates a new account in this 'simple' authentication realm. Returns a map of account fields, including a field named <i>zetapushKey</i> containing the global user key of the user (value of the <b>__userKey</b> pseudo-constant when this new account will be used)
  1

  const response = await this.simple.createUser(parameters);
credentials
Returns the list of account credentials in this service for the asking user. Might return an empty list.
  1

  const response = await this.simple.credentials(parameters);
updateKey
Updates an existing account primary key (login, NOT <b>__userKey</b>) in this 'simple' authentication realm. The updated account MUST belong to the user making the call. The configured login field MUST be given, as a user (identified by his zetapush userKey) might possess several accounts. Returns a map of account fields
  1

  const response = await this.simple.updateKey(parameters);
updateUser
Updates an existing account in this 'simple' authentication realm. The updated account MUST belong to the user making the call. The configured login field MUST be given, as a user (identified by his zetapush userKey) might possess several accounts. Returns a map of account fields
  1

  const response = await this.simple.updateUser(parameters);
deleteUser
Deletes an existing account in this 'simple' authentication realm.
  1

  const response = await this.simple.deleteUser(parameters);
checkUser
Checks whether the given account already exists in this 'simple' authentication realm. This verb returns all the information about the user, including non public fields.
  1

  const response = await this.simple.checkUser(parameters);
requestReset
Requests a password reset for the given unique account key. The account key must exist and must be given, as it cannot obviously be deduced from the currently logged in user. The returned token needs to be sent to the intended recipient only. The typical use case is to define a macro that requests a reset, generates a email template and emails the user. The macro can then be safely called by a weakly authenticated user. Requesting a reset does not invalidate the password. Requesting a reset again invalidates previous reset requests (only the last token is usable)
  1

  const response = await this.simple.requestReset(parameters);
changePassword
Changes a user password for this authentication realm. The user can be either explicit, implicit (one of the current user’s accounts) or deduced from the token. You should provide at least one of 'key' and 'token'. If you do not, the server will try and find any key for the current user. The change is effective immediately. However, already logged in users might stay connected. The password and token fields are always null in the output.
  1

  const response = await this.simple.changePassword(parameters);
checkPassword
  1

  const response = await this.simple.checkPassword(parameters);
How to use it ?
  1
2
3
4
5
6
7
8
9
10
11
12
13

  import { Injectable } from '@zetapush/core';
import { Simple, BasicAuthenticatedUser } from '@zetapush/platform-legacy'; (1)

@Injectable()
export default class Api {
  constructor(
    private simple: Simple (2)
  ) {}
  async doStuff(parameters: BasicAuthenticatedUser) {
    const response = await this.simple.createUser(parameters); (3)
    return response;
  }
}
| 1 | Import Simple from platform |
| 2 | Declare injected service |
| 3 | Call injected service |
22.2.1.2. Weak
User API for weak devices control
User API for control and release of weakly authenticated user sessions.
control
Takes control of a weak user session, identified by the given public token. The public token has been previously made available by the controlled device, for example by displaying a QRCode. Upon control notification, the client SDK of the controlled session is expected to re-handshake.
  1

  const response = await this.weak.control(parameters);
release
Releases control of a weak user session, identified by the given public token. The weak user session must have been previously controlled by a call to 'control'.
  1

  const response = await this.weak.release(parameters);
provision
Provisions an arbitrary number of accounts. The maximum number of accounts that you can create in one single call is configured per server.
  1

  const response = await this.weak.provision(parameters);
getToken
Returns your current session’s private token. The token field may be null, if you did not log in with this authentication. The token can be used to log in as the same weak user another time.
How to use it ?
  1
2
3
4
5
6
7
8
9
10
11
12
13

  import { Injectable } from '@zetapush/core';
import { Weak, UserControlRequest } from '@zetapush/platform-legacy'; (1)

@Injectable()
export default class Api {
  constructor(
    private weak: Weak (2)
  ) {}
  async doStuff(parameters: UserControlRequest) {
    const response = await this.weak.control(parameters); (3)
    return response;
  }
}
| 1 | Import Weak from platform |
| 2 | Declare injected service |
| 3 | Call injected service |
22.2.1.3. Userdir
User API for user information
userInfo
  1

  const response = await this.userdir.userInfo(parameters);
search
  1

  const response = await this.userdir.search(parameters);
How to use it ?
  1
2
3
4
5
6
7
8
9
10
11
12
13

  import { Injectable } from '@zetapush/core';
import { Userdir, UserInfoRequest } from '@zetapush/platform-legacy'; (1)

@Injectable()
export default class Api {
  constructor(
    private userdir: Userdir (2)
  ) {}
  async doStuff(parameters: UserInfoRequest) {
    const response = await this.userdir.userInfo(parameters); (3)
    return response;
  }
}
| 1 | Import Userdir from platform |
| 2 | Declare injected service |
| 3 | Call injected service |
22.2.1.4. Groups
User API for groups and rights.
Groups are stored per user. This means that two users can own a group with the same identifier. A couple (owner, group) is needed to uniquely identify a group inside a group management service. The triplet (deploymentId, owner, group) is actually needed to fully qualify a group outside of the scope of this service.
grant
The granting API does not do any check when storing permissions. In particular when granting rights on a verb and resource of another API, the existence of said verb and resource is not checked.
createGroup
Creates a group owned by the current user. Group creation may fail if the group already exists.
listOwnedGroups
Returns the whole list of groups owned by the current user
  1

  const response = await this.groups.listOwnedGroups(parameters);
listDetailedOwnedGroups
Returns the whole list of groups owned by the current user, with their members
  1

  const response = await this.groups.listDetailedOwnedGroups(parameters);
myGroups
Returns the whole list of groups the current user is part of. Groups may be owned by anyone, including the current user.
  1

  const response = await this.groups.myGroups(parameters);
listJoinedGroups
Returns the whole list of groups the current user is part of. Groups may be owned by anyone, including the current user.
  1

  const response = await this.groups.listJoinedGroups(parameters);
delGroup
Removes the given group owned by the current user or the given owner. Also removes all grants to that group.
  1

  const response = await this.groups.delGroup(parameters);
addMe
Adds me (the caller) to a group. This verb exists so that group owners may grant the right to join their groups without granting the right to add other users to those groups. The 'user' field is implicitly set to the current user’s key.
memberOf
Tests whether I (the caller) am a member of the given group. This verb exists so that users can determine if they are part of a group without being granted particular rights. The 'user' field is implicitly set to the current user’s key.
  1

  const response = await this.groups.memberOf(parameters);
addUsers
Users are processed in the given order In case of failure in the middle of a user list, this verb may have succeeded to add the first users, but will not continue processing the end of the list.
  1

  const response = await this.groups.addUsers(parameters);
delUsers
  1

  const response = await this.groups.delUsers(parameters);
mgrant
Grant several rights at once.
listGrants
This API lists explicitly configured rights. Effective rights include configured rights, implicit rights and inherited rights.
  1

  const response = await this.groups.listGrants(parameters);
listGroupGrants
This API lists explicitly configured rights. Effective rights include configured rights, implicit rights and inherited rights.
  1

  const response = await this.groups.listGroupGrants(parameters);
listPresences
Returns the list of members of the given groups, along with their actual and current presence on the zetapush server. The current implementation does not include information about the particular devices users are connected with. If a user is connected twice with two different devices, two identical entries will be returned.
  1

  const response = await this.groups.listPresences(parameters);
listGroupPresences
Returns the list of members of the given groups, along with their actual and current presence on the zetapush server. The current implementation does not include information about the particular devices users are connected with. If a user is connected twice with two different devices, two identical entries will be returned.
  1

  const response = await this.groups.listGroupPresences(parameters);
addUser
Adds the given user to the given group. Addition may fail if the given group does not already exist.
groupUsers
Returns the whole list of users configured inside the given group.
  1

  const response = await this.groups.groupUsers(parameters);
allGroups
Returns the whole list of groups owned by the current user, with their members
  1

  const response = await this.groups.allGroups(parameters);
groups
Returns the whole list of groups owned by the current user
  1

  const response = await this.groups.groups(parameters);
check
This API checks if the given user has the proper authorizations to perform the given action on the owner’s resource. If you give the same value for 'user' and 'owner', the check always passes.
  1

  const response = await this.groups.check(parameters);
exists
Returns whether a group exists or not.
  1

  const response = await this.groups.exists(parameters);
How to use it ?
  1
2
3
4
5
6
7
8
9
10
11
12
13

  import { Injectable } from '@zetapush/core';
import { Groups, Grant } from '@zetapush/platform-legacy'; (1)

@Injectable()
export default class Api {
  constructor(
    private groups: Groups (2)
  ) {}
  async doStuff(parameters: Grant) {
    const response = await this.groups.grant(parameters); (3)
    return response;
  }
}
| 1 | Import Groups from platform |
| 2 | Declare injected service |
| 3 | Call injected service |
22.2.2. Data Management
22.2.2.1. Gda
GDA User API
User API for Generic Data Access. The data are stored on a per-user basis. Users can put, get, list their data.
puts
Creates or replaces the (maybe partial) contents of a collection of rows. This method only creates or replaces cells for non-null input values.
  1

  const response = await this.gda.puts(parameters);
inc
Increments a cell 64-bit signed integer value and returns the result in the data field. The increment is atomic : if you concurrently increment 10 times a value by 1, the final result will be the initial value plus 10. The actual individual resulting values seen by the 10 concurrent callers may vary discontinuously, with duplicates : at least one of them will see the final (+10) result.
removeRow
Removes all columns of the given row from the given table.
  1

  const response = await this.gda.removeRow(parameters);
removeColumn
Removes all cells of the given column of the given row from the given table.
  1

  const response = await this.gda.removeColumn(parameters);
removeCell
Removes only one cell of the given column of the given row from the given table.
  1

  const response = await this.gda.removeCell(parameters);
mget
Returns full data rows, in the order they were asked.
  1

  const response = await this.gda.mget(parameters);
getCells
Returns a precise list of cells from a column in a data row.
  1

  const response = await this.gda.getCells(parameters);
get
Returns a full data row.
  1

  const response = await this.gda.get(parameters);
put
Creates or replaces the contents of a particular cell.
list
Returns a paginated list of rows from the given table.
  1

  const response = await this.gda.list(parameters);
removeRange
Removes the specified columns of the given range of rows from the given table.
  1

  const response = await this.gda.removeRange(parameters);
filter
Similar to range, but rows can be filtered out according to a developer-supplied predicate. A range consists of consecutive rows from the start key (inclusive) to the stop key (exclusive). You can specify partial keys for the start and stop fields.
  1

  const response = await this.gda.filter(parameters);
range
Returns a paginated range of rows from the given table. A range consists of consecutive rows from the start key (inclusive) to the stop key (exclusive). You can specify partial keys for the start and stop fields.
  1

  const response = await this.gda.range(parameters);
reduce
Returns a computed single reduced result from a range of rows from the given table. A range consists of consecutive rows from the start key (inclusive) to the stop key (exclusive). You can specify partial keys for the start and stop fields.
  1

  const response = await this.gda.reduce(parameters);
How to use it ?
  1
2
3
4
5
6
7
8
9
10
11
12
13

  import { Injectable } from '@zetapush/core';
import { Gda, GdaPuts } from '@zetapush/platform-legacy'; (1)

@Injectable()
export default class Api {
  constructor(
    private gda: Gda (2)
  ) {}
  async doStuff(parameters: GdaPuts) {
    const response = await this.gda.puts(parameters); (3)
    return response;
  }
}
| 1 | Import Gda from platform |
| 2 | Declare injected service |
| 3 | Call injected service |
22.2.2.2. Stack
Data stack user API
Data is stored on a per user basis. However, notifications can be sent to a configurable set of listeners. Stack names are arbitrary and do not need to be explicitly initialized.
purge
Removes all items from the given stack.
  1

  const response = await this.stack.purge(parameters);
getListeners
Returns the whole list of listeners for the given stack.
  1

  const response = await this.stack.getListeners(parameters);
setListeners
Sets the listeners for the given stack.
  1

  const response = await this.stack.setListeners(parameters);
remove
Removes the item with the given guid from the given stack.
  1

  const response = await this.stack.remove(parameters);
update
Updates an existing item of the given stack. The item MUST exist prior to the call.
  1

  const response = await this.stack.update(parameters);
push
Pushes an item onto the given stack. The stack does not need to be created.
  1

  const response = await this.stack.push(parameters);
list
Returns a paginated list of contents for the given stack. Content is sorted according to the statically configured order.
  1

  const response = await this.stack.list(parameters);
How to use it ?
  1
2
3
4
5
6
7
8
9
10
11
12
13

  import { Injectable } from '@zetapush/core';
import { Stack, StackRequest } from '@zetapush/platform-legacy'; (1)

@Injectable()
export default class Api {
  constructor(
    private stack: Stack (2)
  ) {}
  async doStuff(parameters: StackRequest) {
    const response = await this.stack.purge(parameters); (3)
    return response;
  }
}
| 1 | Import Stack from platform |
| 2 | Declare injected service |
| 3 | Call injected service |
22.2.2.3. Search
ElasticSearch Service
This API is a very thin wrapper around ElasticSearch’s API.
index
Inserts or updates a document into the elasticsearch engine.
  1

  const response = await this.search.index(parameters);
get
Retrieves a document from the elasticsearch engine by id.
  1

  const response = await this.search.get(parameters);
delete
Deletes a document from the elasticsearch engine by id.
  1

  const response = await this.search.delete(parameters);
search
  1

  const response = await this.search.search(parameters);
How to use it ?
  1
2
3
4
5
6
7
8
9
10
11
12
13

  import { Injectable } from '@zetapush/core';
import { Search, SearchData } from '@zetapush/platform-legacy'; (1)

@Injectable()
export default class Api {
  constructor(
    private search: Search (2)
  ) {}
  async doStuff(parameters: SearchData) {
    const response = await this.search.index(parameters); (3)
    return response;
  }
}
| 1 | Import Search from platform |
| 2 | Declare injected service |
| 3 | Call injected service |
22.2.3. File Management
22.2.3.1. Zpfs_hdfs
User API for local file management
User API for file content manipulation User API for virtual file management and http file upload This API contains all the verbs needed to browse, upload and remove files. Files are stored on a per-user basis: each user has his or her own whole virtual filesystem. Uploading a file is a 3-step process : request an upload URL, upload via HTTP, notify this service of completion.
readToken
Requests a token. This token can be used to retrieve a compressed folder via HTTP.
  1

  const response = await this.zpfs_hdfs.readToken(parameters);
create
Creates a file, writes content and closes the file as a single operation. Calling this verb is functionnally equivalent to successively calling 'newUploadUrl', posting the content and calling 'newFile'
  1

  const response = await this.zpfs_hdfs.create(parameters);
open
Opens a file for reading.
  1

  const response = await this.zpfs_hdfs.open(parameters);
link
Links a file or folder to another location. May fail if the target location is not empty.
  1

  const response = await this.zpfs_hdfs.link(parameters);
stat
Returns information about a single file. The entry field will be null if the path does not exist
  1

  const response = await this.zpfs_hdfs.stat(parameters);
cp
Copies a file or folder (recursively) to a new location. May fail if the target location is not empty.
  1

  const response = await this.zpfs_hdfs.cp(parameters);
ls
Returns a paginated list of the folder’s content.
1
const response = await this.zpfs_hdfs.ls(parameters);
mv
Moves a file or folder (recursively) to a new location. May fail if the target location is not empty.
1
const response = await this.zpfs_hdfs.mv(parameters);
snapshot
Creates a new folder and then copies the given files inside
1
const response = await this.zpfs_hdfs.snapshot(parameters);
du
Returns an recursively aggregated number of used bytes, starting at the given path.
1
const response = await this.zpfs_hdfs.du(parameters);
rm
Removes a file or folder (recursively).
1
const response = await this.zpfs_hdfs.rm(parameters);
freeUploadUrl
1
const response = await this.zpfs_hdfs.freeUploadUrl(parameters);
newUploadUrl
Requests an HTTP upload URL. The URL contains temporary credentials (typically valid for a few minutes) and is meant for immediate use.
1
const response = await this.zpfs_hdfs.newUploadUrl(parameters);
updateMeta
1
const response = await this.zpfs_hdfs.updateMeta(parameters);
newFile
The client application calls this verb to notify that it’s done uploading to the cloud. Calling that verb MAY trigger additional events such as thumbnail/metadata creation.
1
const response = await this.zpfs_hdfs.newFile(parameters);
mkdir
Creates a new folder. May fail if the target location is not empty.
1
const response = await this.zpfs_hdfs.mkdir(parameters);
How to use it ?
1
2
3
4
5
6
7
8
9
10
11
12
13
import { Injectable } from '@zetapush/core';
import { Zpfs_hdfs, ZpfsRequest } from '@zetapush/platform-legacy'; (1)
@Injectable()
export default class Api {
constructor(
private zpfs_hdfs: Zpfs_hdfs (2)
) {}
async doStuff(parameters: ZpfsRequest) {
const response = await this.zpfs_hdfs.readToken(parameters); (3)
return response;
}
}
| 1 | Import Zpfs_hdfs from platform |
| 2 | Declare injected service |
| 3 | Call injected service |
22.2.3.2. Template
User API for templates
Users use this API to evaluate pre-configured templates.
evaluate
Evaluates the given template and returns the result as a string. Templates are parsed the first time they are evaluated. Evaluation may fail early due to a parsing error.
1
const response = await this.template.evaluate(parameters);
How to use it ?
1
2
3
4
5
6
7
8
9
10
11
12
13
import { Injectable } from '@zetapush/core';
import { Template, TemplateRequest } from '@zetapush/platform-legacy'; (1)
@Injectable()
export default class Api {
constructor(
private template: Template (2)
) {}
async doStuff(parameters: TemplateRequest) {
const response = await this.template.evaluate(parameters); (3)
return response;
}
}
| 1 | Import Template from platform |
| 2 | Declare injected service |
| 3 | Call injected service |
22.2.4. Communication
22.2.4.1. Messaging
Messaging service
Simple and flexible user-to-user or user-to-group messaging service.
send
Sends the given message to the specified target on the given (optional) channel. The administratively given default channel name is used when none is provided in the message itself.
How to use it ?
1
2
3
4
5
6
7
8
9
10
11
12
13
import { Injectable } from '@zetapush/core';
import { Messaging, Message } from '@zetapush/platform-legacy'; (1)
@Injectable()
export default class Api {
constructor(
private messaging: Messaging (2)
) {}
async doStuff(parameters: Message) {
const response = await this.messaging.send(parameters); (3)
return response;
}
}
| 1 | Import Messaging from platform |
| 2 | Declare injected service |
| 3 | Call injected service |
22.2.4.2. Notif
Notification User API
User API for notifications. For notifications to work properly, it is imperative that the resource name of a device remain constant over time.
send
Sends a native push notification to the target.
1
const response = await this.notif.send(parameters);
unregister
Unregisters the device for the current user and resource. This verb does not need any parameters.
register
Registers the device for the current user and resource. This service maintains a mapping of userkey/resource to device registration IDs. You MUST NOT re-use the same resource name from one device to another if you want to target specific devices with 'send'. Only one registration can be active for a given userKey/resource pair in a notification service. Device registration can be <b>neither impersonated nor called indirectly</b> (from a scheduled job).
1
const response = await this.notif.register(parameters);
How to use it ?
1
2
3
4
5
6
7
8
9
10
11
12
13
import { Injectable } from '@zetapush/core';
import { Notif, NotificationMessage } from '@zetapush/platform-legacy'; (1)
@Injectable()
export default class Api {
constructor(
private notif: Notif (2)
) {}
async doStuff(parameters: NotificationMessage) {
const response = await this.notif.send(parameters); (3)
return response;
}
}
| 1 | Import Notif from platform |
| 2 | Declare injected service |
| 3 | Call injected service |
22.2.4.3. Sendmail
Mail service user API
This service is statically configured with an outgoing SMTP server. Users call the API here to actually send emails.
send
Sends an email with the given body to the intended recipients.
How to use it ?
1
2
3
4
5
6
7
8
9
10
11
12
13
import { Injectable } from '@zetapush/core';
import { Sendmail, Email } from '@zetapush/platform-legacy'; (1)
@Injectable()
export default class Api {
constructor(
private sendmail: Sendmail (2)
) {}
async doStuff(parameters: Email) {
const response = await this.sendmail.send(parameters); (3)
return response;
}
}
| 1 | Import Sendmail from platform |
| 2 | Declare injected service |
| 3 | Call injected service |
22.2.4.4. Sms_ovh
SMS service
User API for SMS.
send
Sends the given message to the given recipients.
1
const response = await this.sms_ovh.send(parameters);
How to use it ?
1
2
3
4
5
6
7
8
9
10
11
12
13
import { Injectable } from '@zetapush/core';
import { Sms_ovh, SmsMessage } from '@zetapush/platform-legacy'; (1)
@Injectable()
export default class Api {
constructor(
private sms_ovh: Sms_ovh (2)
) {}
async doStuff(parameters: SmsMessage) {
const response = await this.sms_ovh.send(parameters); (3)
return response;
}
}
| 1 | Import Sms_ovh from platform |
| 2 | Declare injected service |
| 3 | Call injected service |
22.2.5. Utilities Management
22.2.5.1. Cron
User API for the Scheduler
User endpoints for scheduling : users can schedule, list and delete tasks. Tasks are stored on a per-user basis: a task will run with the priviledges of the user who stored it. Tasks are run on the server and thus can call api verbs marked as server-only.
schedule
Schedules a task for later execution. Tasks are executed asynchronously with the identity of the calling user. Tasks will be executed at a fixed moment in time in the future, or repeatedly, with minute precision. If a task already exists with the same cronName (a cronName is unique for a given user), this new task completely replaces it. A task can be scheduled with a cron-like syntax for repetitive or one-shot execution. Wildcards are not allowed for minutes and hours. When scheduling for one-shot execution, the time must be at least two minutes into the future.
1
const response = await this.cron.schedule(parameters);
setTimeout
Schedules a task for later execution. Tasks are executed asynchronously with the identity of the calling user. Tasks will be executed with second precision in the near future (120 seconds delay max).
1
const response = await this.cron.setTimeout(parameters);
unschedule
Removes a previously scheduled task. Does absolutely nothing if asked to remove a non-existent task.
1
const response = await this.cron.unschedule(parameters);
list
Returns a paginated list of the asking user’s tasks.
1
const response = await this.cron.list(parameters);
How to use it ?
1
2
3
4
5
6
7
8
9
10
11
12
13
import { Injectable } from '@zetapush/core';
import { Cron, CronTaskRequest } from '@zetapush/platform-legacy'; (1)
@Injectable()
export default class Api {
constructor(
private cron: Cron (2)
) {}
async doStuff(parameters: CronTaskRequest) {
const response = await this.cron.schedule(parameters); (3)
return response;
}
}
| 1 | Import Cron from platform |
| 2 | Declare injected service |
| 3 | Call injected service |
22.2.5.2. Logs
Log API
User API for logging.
log
Adds some server generated data and stores the entry into the sink defined by configuration.
1
const response = await this.logs.log(parameters);
How to use it ?
1
2
3
4
5
6
7
8
9
10
11
12
13
import { Injectable } from '@zetapush/core';
import { Logs, LogRequest } from '@zetapush/platform-legacy'; (1)
@Injectable()
export default class Api {
constructor(
private logs: Logs (2)
) {}
async doStuff(parameters: LogRequest) {
const response = await this.logs.log(parameters); (3)
return response;
}
}
| 1 | Import Logs from platform |
| 2 | Declare injected service |
| 3 | Call injected service |
22.2.5.3. Trigger
Trigger service
Register listeners and trigger events.
trigger
Triggers an event. All listeners previously registered for that event will be called, in no particular order.
1
const response = await this.trigger.trigger(parameters);
How to use it ?
1
2
3
4
5
6
7
8
9
10
11
12
13
import { Injectable } from '@zetapush/core';
import { Trigger, EventTrigger } from '@zetapush/platform-legacy'; (1)
@Injectable()
export default class Api {
constructor(
private trigger: Trigger (2)
) {}
async doStuff(parameters: EventTrigger) {
const response = await this.trigger.trigger(parameters); (3)
return response;
}
}
| 1 | Import Trigger from platform |
| 2 | Declare injected service |
| 3 | Call injected service |
23. Command Line Interface
Some details about the command line interface will soon be added.
For now, you can use the zeta -h command to get some information.
24. Configuration
ZetaPush prefers convention over configuration. However, conventions can be overriden.
24.1. Account configuration
To use ZetaPush, you need to have a ZetaPush account and a ZetaPush application.
If you don’t have any of them, you can signup for a free trial or contact us for more suitable account.
Then, you can set your account configuration in the .zetarc file.
This file is present at the root of your application folder.
Here is the list of properties that can be used. For each of them, you also have the associated cli flag and environment variable.
| Name of the property | Definition | environment variable | Name in the .zetarc | CLI parameter |
|---|---|---|---|---|
Developer login |
This login is the email used by the developer when logging in to the ZetaPush console. It does not concern the applications developed by the developer. It is only used to identify the developer account. |
ZP_DEVELOPER_LOGIN |
developerLogin |
--developer-login <login> |
Developer password |
Like the property |
ZP_DEVELOPER_PASSWORD |
developerLogin |
--developer-password <password> |
Application name |
A developer can develop many applications. Hence he needs to identify each of them. The |
ZP_APP_NAME |
appName |
--app-name <name> |
Platform URL |
By default, the developer uses the public ZetaPush cloud to develop and deploy its applications. In most cases, the developer doesn’t need to set this property. This property if useful when another (on premise, or dedicated) ZetaPush cloud is to be used. |
ZP_PLATFORM_URL |
platformUrl |
--platform-url <platform> |
24.2. Code structure configuration
It is possible to configure the structure of your application. In this part, we list the different possibilities.
24.2.1. Entry point for worker
By default, the entry point of your worker code is the file ./worker/index.ts.
You can configure the entry point of the worker setting the main property of the package.json file.
For example if you want to use the file ./worker/main.ts as entry point you need to have the following package.json content :
1
2
3
4
5
6
{
"name": "myApp",
"version": "0.1.0",
"main": "worker/main.ts", (1)
// Other properties...
}
| 1 | Path of the file used as entry point |
|
Detail about path of entry point
For now, the entry point of your worker need to be in the |
24.2.2. Custom directory structure
This section will be useful if you want to change the structure of your application. The most common case is when you want to use framework (Angular, React, VueJS for example). This documentation will soon be ready.
24.2.3. Script alias
Npm provides a handy feature to run scripts provided by dependencies without needing to change your computer settings or install the tool. ZetaPush defines npm script aliases to run the ZetaPush CLI through npm.
24.3. Configuration properties
ZetaPush provides the application.json file to let you configure the behavior of your application.
For now, the application.json file is mainly used for the Standard User Workflow but you can also configure your own properties for your application.
The list of available properties for the Standard User Workflow are listed in this section.
|
New properties will added
New Cloud Services will be developed (to handle data, security, etc…). With them, some properties may be added and configurable through the application.json file. |
|
Future features
New features about
|
You will soon can add your own configuration property source. For example download properties from an external service or from a Git repository. (You will also be able to configure the priority of the source).
24.4. Configuration override
You can put many properties in several locations (environment variables, CLI…). ZetaPush includes and overrides this properties in a specific order:
24.4.1. Account properties
-
Environment variables
-
.zetarc file
-
CLI parameters
So if you use the same property in several locations, the environment variable is overwritten by the .zetarc value and this last value is overwritten by the CLI parameter.
24.4.2. Application properties
-
Default values (if exists)
-
application.jsonfile -
CLI parameters
So if you use the same property in several locations, the default value is overwritten by the application.json property and this last value is overwritten by the CLI parameter.
24.5. Customize cloud services
24.5.1. User Management
Some properties are available in the application.json file to configure the Standard User Workflow. We will list all of them in this section:
24.5.1.1. Organization
Name of your organization. It is used in the default email sender (noreply@${organizationName}.com).
{
"organization": {
"name": "ZetaPush"
}
}|
Optional property
This property is optional. If it is not configured, you need to configure an email sender. |
24.5.1.2. Email
Let you configure the sender of the different emails used in your application. For example for account registration.
|
Default email sender
The default email sender is |
This property support the standard notation for email (name <email@domain.com>):
{
"email": {
"sender": "Sender Name <sender@my-domain.com>" (1)
}
}| 1 | You can also only type the email (ex: "sender@my-domain.com") |
24.5.1.3. Account registration
Account confirmation
During the account creation workflow of the StandardUserWorkflow, an email is sent to ask the end-user to confirm his email. You can configure many properties about this.
You can set the email subject of the confirmation account creation like below:
{
"registration": {
"confirmation": {
"email": {
"subject": "Please confirm your account registration"
}
}
}
}|
Mandatory property
For now, this is a mandatory property. In a future version, the subject could be extracted from the email template. This allows you to define a single source of information about the sent email and moreover, it simplifies internationalization of your email. |
When an end-user validates his account, he is redirected to a specific URL of your application. There are 2 cases, if the confirmation is OK or if it failed:
{
"registration": {
"confirmation": {
"success-url": "https://my-app-url/#login", (1)
"failure-url": "https://my-app-url/#confirmation-failed" (2)
}
}
}| 1 | The end-user is redirected to this URL when the confirmation is OK |
| 2 | The end-user is redirected to this URL when the confirmation failed |
You can also only set the path of your urls. The base url will be automatically provided by ZetaPush:
{
"registration": {
"confirmation": {
"success-url": "#login",
"failure-url": "#confirmation-failed"
}
}
}|
Mandatory property
This property is mandatory. |
24.5.1.4. Reset password workflow
It is possible to configure the path of your application where the end-user will be able to choose his new password.
{
"reset-password": {
"ask": {
"url": "http://localhost:3000/reset-password#${token}", (1)
}
}
}| 1 | The token is sent through the URL. To use it you need to put ${token} in your URL. |
You can also only set the path of your url. The base url will be automatically provided by ZetaPush:
{
"reset-password": {
"ask": {
"url": "/reset-password#${token}", (1)
}
}
}|
Mandatory property
This property is mandatory. |
You can configure the subject of the sent email to reset the password:
{
"reset-password": {
"ask": {
"email": {
"subject": "Please choose a new password"
}
}
}
}|
Mandatory property
For now, this is a mandatory property. In a future version, the subject could be extracted from the email template. This allows you to define a single source of information about the sent email and moreover, it simplifies internationalization of your email. |
24.5.1.5. Email provider configuration
To use the StandardUserWorkflow you need to configure an email provider. Today, you can use two possibilities: Mailjet or SMTP.
|
Future implementations
In future versions, other implementatins will be provided as-is. Moreover, you will be able to replace email sending by SMS or anything else. |
|
Mandatory property
You need to set at least one email provider configuration and you need to have only one email provider configuration enabled. |
Mailjet configuration
To use the Mailjet configuration you need to configure the application.json file like this:
{
"mailjet": {
"apikey-public": "my-mailjet-apikey-public", (1)
"apikey-private": "my-mailjet-apikey-private",
"enable": "true", (2)
"url": "https://api.mailjet.com/v3.1/send" (3)
}
}| 1 | The apikey-public and apikey-private are provided by Mailjet and you can find them in your Mailjet account information. |
| 2 | Optional property to define that we use this email provider configuration. (The default value is true if you have configured apikey-public and apikey-private) |
| 3 | Optional property to define the URL to use for your Mailjet email provider. By default the used URL is https://api.mailjet.com/v3.1/send. |
SMTP configuration
To use the SMTP configuration you need to configure the application.json file like this:
{
"smtp": {
"host": "my-smtp-host",
"port": "465", (1)
"username": "my-smtp-username",
"password": "my-smtp-password",
"ssl": true, (2)
"starttls": true, (2)
"enable": true (3)
}
}| 1 | Optional, deducted from SSL and starttls |
| 2 | Optional, default to true |
| 3 | Optional property to define that we use this email provider configuration. (The default value is true if you have configured at least host and port) |
24.5.1.6. Auto implementation about properties
The implementation of the StandardUserWorkflow can change about the presence or not of particular properties.
For example, if you configure an email sender, the default email sender using the organization name will be overriden.
A most common case is for email provider configuration. If you change your STMP configuration to a Mailjet configuration (for example), the implementation will be automatically changed.
25. Logs
To configure the log level of your application you use the CLI or from the web console (Not ready yet).
To do this via the CLI, you need to launch the zeta config command (See more details in this section).
$ zeta config --getToday, there are only two available log levels:
-
verbose
-
default
If you want leaner log level, you can contact us.
$ zeta config --logs verbose
$ zeta config --logs default|
Default verbose level
The default verbose level traces only errors. |
25.1. Console.log
It will soon be possible to see your console.log() in the web console.
25.2. Utility methods provided by @zetapush/common
The utility methods from @zetapush/common for Logs will soon be documented.
25.3. Built-in log cloud service
ZetaPush provides a Log service. For now, you can use the requestContext object for more convenience.
25.4. Logs using requestContext
The requestContext object is an abstraction of the logs service.
The dedicated section explains what is the requestContext and how to use it. So in this section we will see a practical utilization of requestContext.
|
Set correct log level
To be sure to see all logs, you can put the log level to |
1
2
3
4
5
6
7
8
9
10
11
12
13
14
15
16
17
18
19
20
21
22
23
24
25
26
27
28
29
30
31
32
33
34
35
36
37
38
39
40
41
42
43
44
45
46
47
48
49
50
51
52
53
54
55
56
57
58
59
import {
Injectable,
RequestContext,
RequestContextAware,
Bootstrappable
} from "@zetapush/core";
import { Gda, GdaConfigurer, GdaDataType } from "@zetapush/platform-legacy";
@Injectable()
export default class Api implements RequestContextAware, Bootstrappable { (1)
requestContext!: RequestContext; (2)
constructor(private gda: Gda, private gdaConfigurer: GdaConfigurer) {}
async onApplicationBootstrap() { (3)
await this.gdaConfigurer.createTable({
name: "table",
columns: [
{
name: "column",
type: GdaDataType.STRING
}
]
});
}
async addToDatabase(data: string) {
this.requestContext.logger.info(`[addToDatabase] - Add ${data} info`); (4)
return await this.gda.put({
key: Date.now().toString(),
table: "table",
column: "column",
data
});
}
async getAllData() {
this.requestContext.logger.info(`[getAllData] - Get all data`); (5)
try {
const { result: resultFromDataBase } = await this.gda.list({
table: "table"
});
if (resultFromDataBase && resultFromDataBase.content) {
this.requestContext.logger.info( (6)
`[getAllData] - content : ${resultFromDataBase.content}`
);
return resultFromDataBase.content;
} else {
this.requestContext.logger.warn( (7)
"[getAllData] - No content in database"
);
}
} catch (err) {
this.requestContext.logger.error( (8)
"[getAllData] - Failed to access to database"
);
}
}
}
| 1 | Optional implementation of RequestContextAware |
| 2 | Injected property of requestContext |
| 3 | Creation of table for database |
| 4 | Log in info when we add info in database |
| 5 | Log in info when we try to get data |
| 6 | Log in info if content exists |
| 7 | Log in warn if no content in database |
| 8 | Log in error if it failed to access to database |
The result in the database if the following:
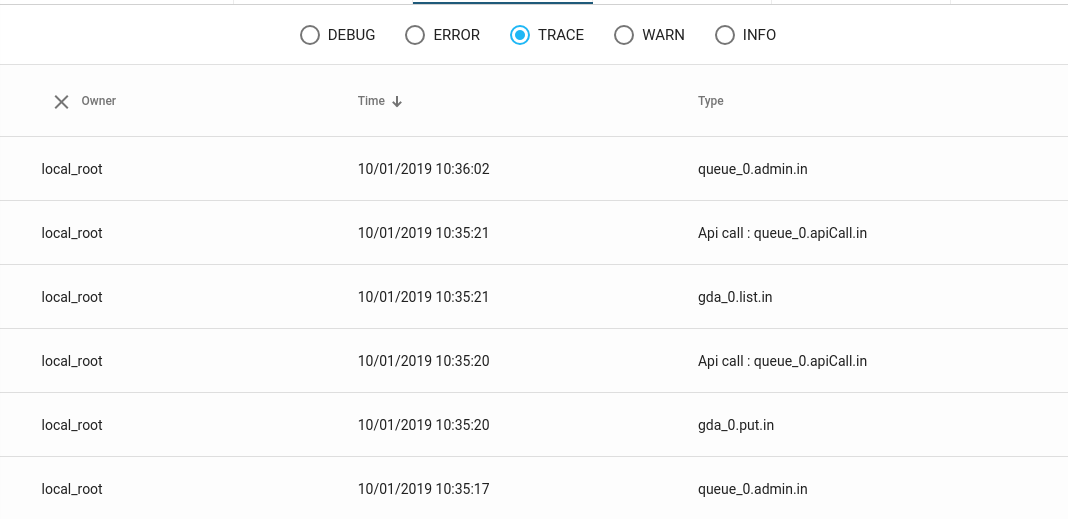
|
More Log levels
If you need to have more log levels, you can contact us. |
25.5. Use another logging library
It will soon possible to use another logging library.
25.6. View logs in web console
The utilization of logs in the web console will soon be documented.
25.7. Persist logs
The persistence of logs will soon be documented.
25.8. External log visualization
It will soon possible to use external log visualization
26. Tests
For now, you can use any testing library in your ZetaPush application. More documentation will soon be added.
27. Advanced run of your application
Documentation about advanced run of your application will soon be available.
28. Advanced deployment of your application
Documentation about advanced deployment of your application will soon be available.
29. HTTP server
ZetaPush provides you the possibility to add a HTTP server in your application to handle HTTP requests. A HTTP server is already used in one Cloud Service, the Standard User Workflow (To handle confirmation account registration for example).
You have two possibilities:
29.2. Custom HTTP server
ZetaPush provides you the possibility to create your own HTTP server.
Here is an example using the express library:
1
2
3
4
5
6
7
8
9
10
11
12
13
14
15
16
17
import express from 'express'; (1)
export default class {
onApplicationBootstrap() { (2)
const app = express();
const port = process.env.HTTP_PORT || 3001; (3)
app.get('/', (req: any, res: any) => { (4)
res.send(`Hello World from ${port}`);
});
app.listen(port, () => { (5)
console.log(`HTTP server is listening on ${port}`);
});
}
}
| 1 | In this case we use the express library |
| 2 | To initialize our application we use the onApplicationBootstrap() method |
| 3 | The HTTP_PORT environment variable is provided to use a custom HTTP server when the application is running on the ZetaPush cloud. Locally we use the port 3001 (in this case, you can use any port). |
| 4 | We handle the request |
| 5 | We launch the HTTP server |
|
HTTP_PORT environment variable
The |
When your application is running on the ZetaPush cloud, you can access to HTTP server via the URL given at the end of the deployment:
[INFO] Bundle your application components
[INFO] ▇▇▇▇▇▇▇▇▇▇▇▇▇▇▇▇▇▇▇▇ Upload code
[INFO] ▇▇▇▇▇▇▇▇▇▇▇▇▇▇▇▇▇▇▇▇ Prepare environment
[INFO] ▇▇▇▇▇▇▇▇▇▇▇▇▇▇▇▇▇▇▇▇ Publish web application
[INFO] ▇▇▇▇▇▇▇▇▇▇▇▇▇▇▇▇▇▇▇▇ Preparing custom cloud services for deployment
[INFO] ▇▇▇▇▇▇▇▇▇▇▇▇▇▇▇▇▇▇▇▇ Publish custom cloud service on worker instance
[INFO] Web application front is available at http://front-1ceugbp7ci.celtia.zetapush.app:80/
[INFO] Worker application queue_0 is available at http://queuea0-1ceugbp7ci.test.zetapush.app (1)
[INFO] Worker applications works only if you listen process.env.HTTP_PORT | 1 | URL of your HTTP server |
You can use your http server library like you would do without ZetaPush.
30. Extend a cloud service
Documentation about extention of any Cloud service will soon be added.