System requirements
To create a ZetaPush application you only need the Node.js ecosystem:
|
Install Node.js and npm
Go to Node.js Downloads and follow the installation instructions.
You also need to install additional tools for Node.js:
Additional tools
Windows
You must install development tools on Windows (Visual Studio Build Tools and Python). Fortunately, there is a npm tool that helps you to install all required dependencies. You must run this command line using PowerShell as Administrator:
npm install --global --production windows-build-toolsBe patient! It may take a while.
Debian/Ubuntu
Install build tools:
sudo apt-get install -y build-essentialEnterprise Linux and Fedora
Install build tools:
sudo yum install gcc-c++ make
# or: sudo yum groupinstall 'Development Tools'
-
Create your first application
From the command line
$ npm init @zetapush hello-world (1)| 1 | hello-world is the name of the folder that will be created with all the generated files |
You will be prompted for a developer login and a developer password in order to communicate with the platform.
The developer login and the developer password will be stored in the .zetarc file.
By default, the .gitignore file is configured to not deploy this file.
|
|
Manage account and applications
See ZetaPush account management to learn how to manage your account and your applications. |
Generated application
|
Using web frameworks
The project |
What it does ?
The generated project is really simple. It is just a web page that uses some JavaScript to call a cloud function named hello when button is clicked.
The cloud function is a custom cloud function that simply returns a message with the current date.
The result is retrieved by the JavaScript code and displayed in the browser console (using console.log).
Structure of generated project
The files of the generated project are structured as followed:
hello-world
├── .zetarc
├── .gitignore
├── front
│   ├── index.css
│   ├── index.html
│   ├── index.js
│   └── logo.png
├── worker
│   └── index.ts
├── package.json
├── README.md
└── tsconfig.json| File / Folder | Definition |
|---|---|
|
Contains the developer’s credentials. Useful to deploy or run your code. The content is auto generated if the file is empty. |
|
Standard file used by Git to prevent commiting some files. It is preconfigured to prevent publication of your developer credentials (on GitHub for example). |
|
Standard file for NPM to handle a module. It contains the dependencies, the name of your application, the entry point of your custom cloud services ( |
|
Gives you some information about how to use your application. |
|
By convention, the front end code of your application is in this folder. You can change it by editing |
|
By convention, the back end code of your application is in this folder. You can change it by editing |
Run locally your first application
What is run ?
Run is used in development phase. You run your code locally on your development machine. You can then iterate on your code to provide new features quickly or even debug your code.
From your terminal
Go into the generated folder (hello-world):
$ cd hello-worldThen run the following command:
$ npm run start -- --serve-front|
|
This command launches both a local web server on localhost:3000 and the custom cloud services.
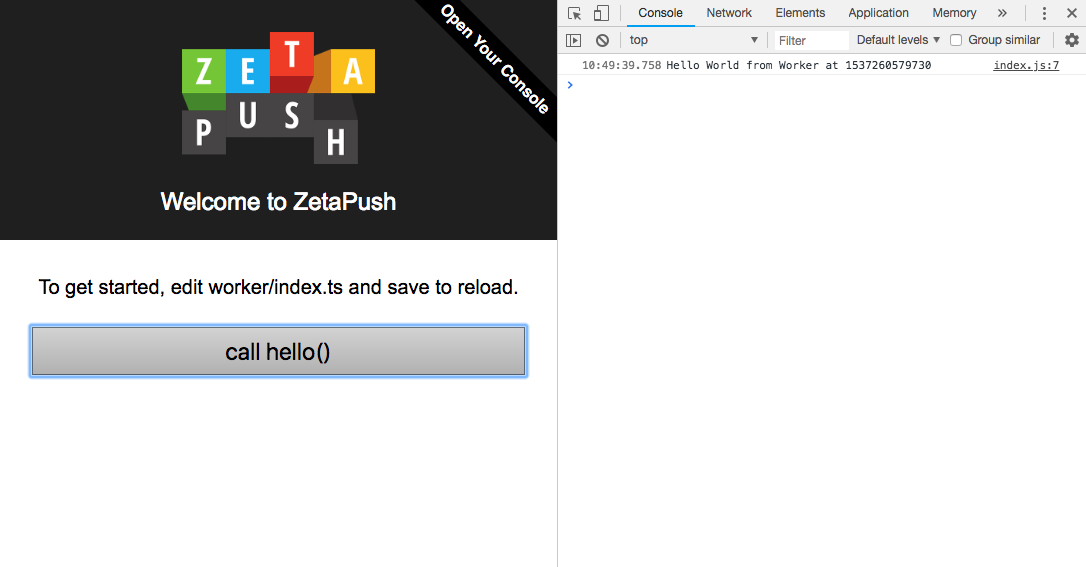
You can open a web browser on localhost:3000 and open the browser console.
You can click on the button and see the result of the custom cloud service call in the browser console.
How it works
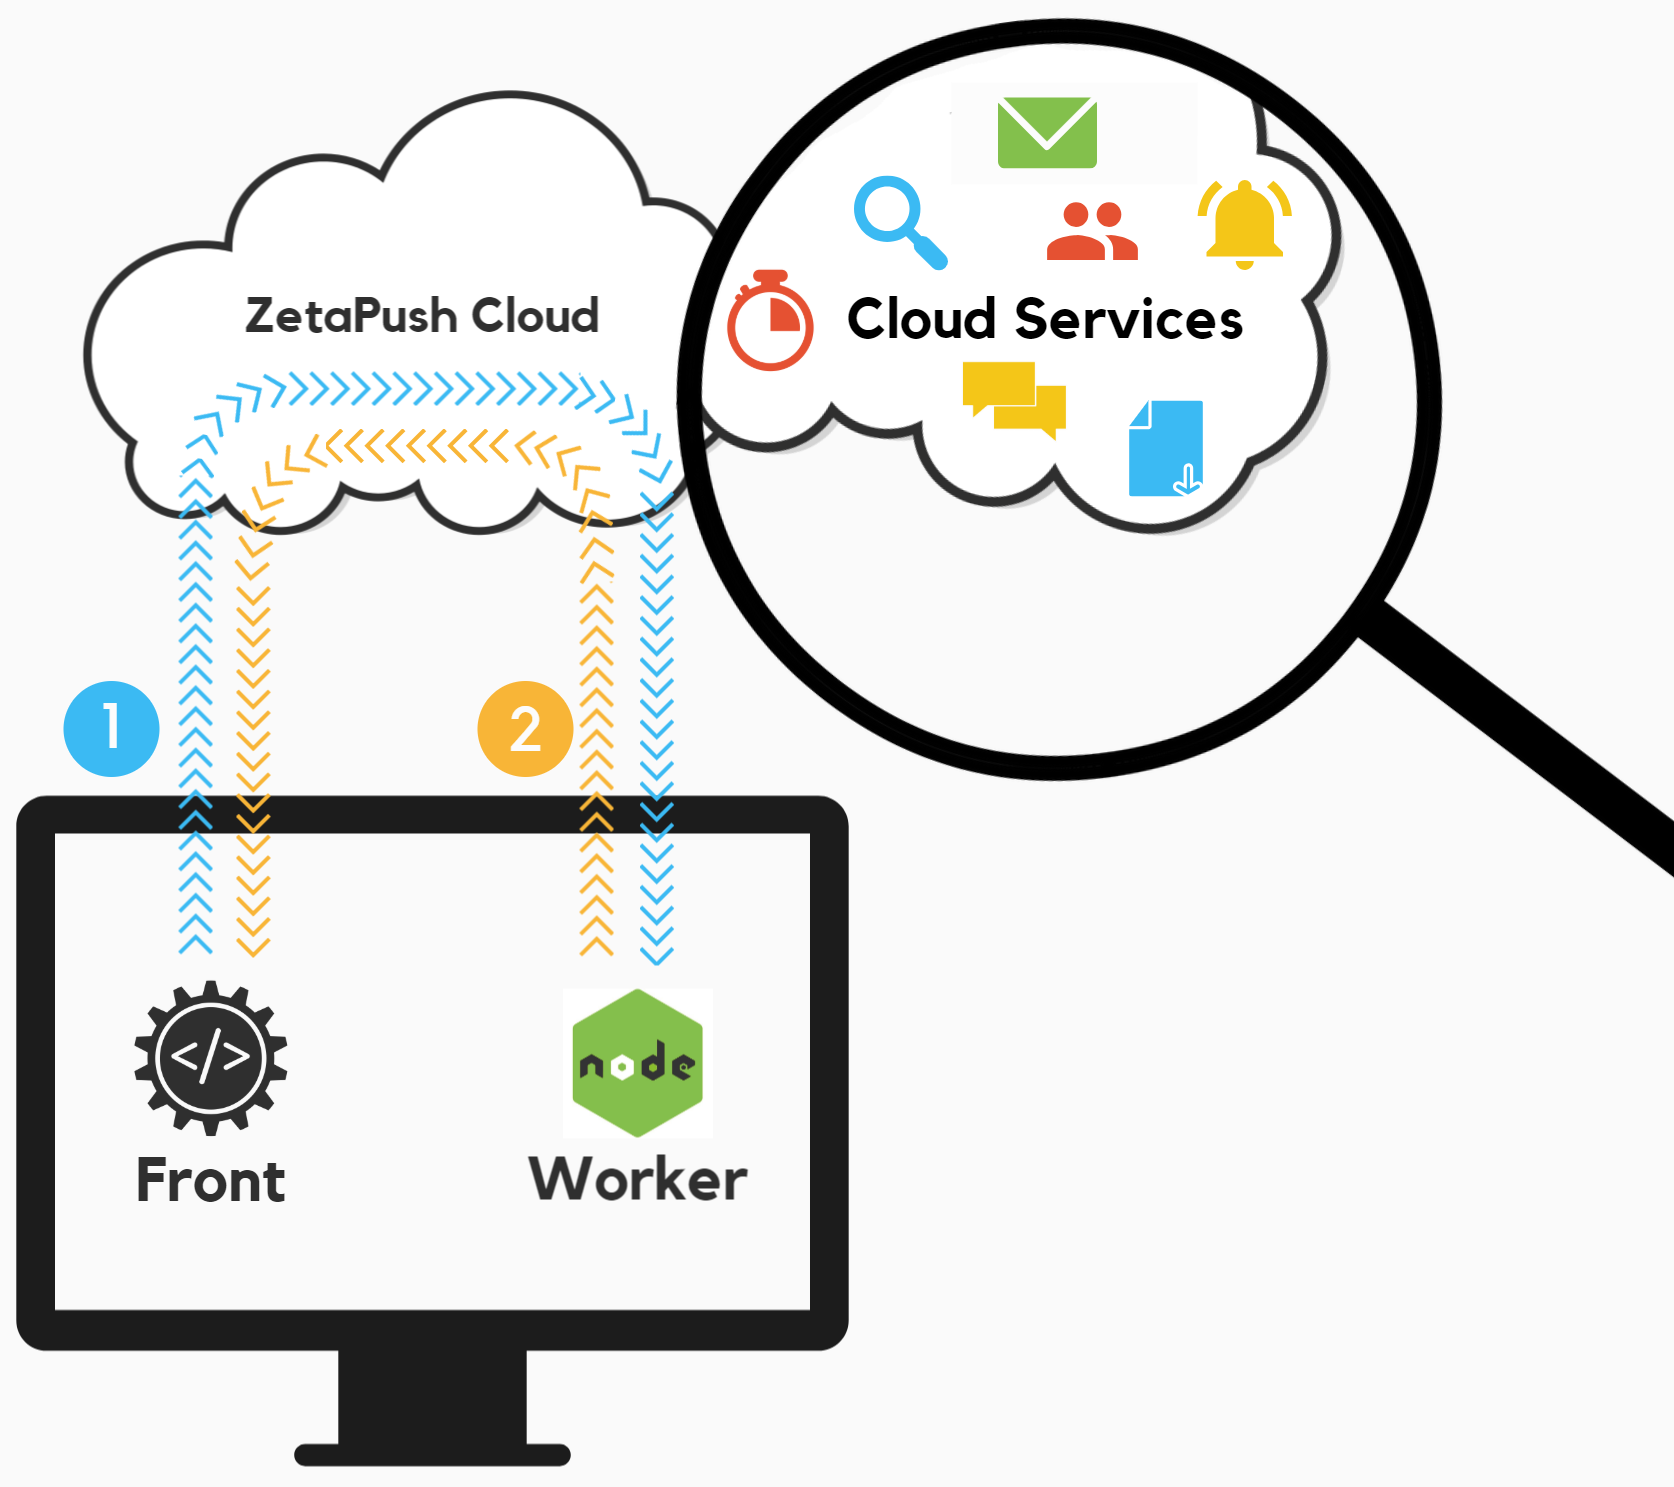
➊ Clicking on the button triggers a call to the ZetaPush cloud. ZetaPush routes the call to the local Node.js (the Node.js has been registered automatically by the CLI)
➋ The custom cloud service does its job and provides a response. ZetaPush routes the response to the connected web page
There are 3 parts that are working together:
-
The web page that initiates a connection to the ZetaPush cloud
-
The ZetaPush cloud
-
The worker that provides the custom cloud function implementation
Firstly, the web page is loaded in the browser and a JavaScript code automatically connects the ZetaPush client to the ZetaPush cloud.
|
Client connection
The connection is requested with |
|
Bidirectional connection
The connection between ZetaPush client and the ZetaPush cloud is established and is bi-directional. Any message sent by ZetaPush client will go through this opened connection. The ZetaPush cloud can also send messages to the ZetaPush client through this opened connection. |
Then, when the user clicks on the button, a message is sent to the ZetaPush cloud in order to execute some code. The ZetaPush cloud routes the message to the worker to call the custom cloud function.
|
Code to handle clicks on the button
The button is defined in The action of the button is done in |
The custom cloud function is simply a JavaScript or TypeScript function. This function is called and it generates a result that is returned to ZetaPush cloud. ZetaPush cloud routes the response message to the ZetaPush client to send the result.
|
Code of the cloud function
The code of the cloud function is available in |
Finally, the ZetaPush client receives the result and the JavaScript code of the web page displays it in the browser console (using console.log).
|
Code to handle the result
The result is handled in |
|
Everything goes through the Internet
Even if you run locally, the cloud functions defined by your worker are available on the Internet through ZetaPush cloud. |
Push your first application in the Cloud
What is push ?
Push is used to make your code "public". It will publish your web page(s) and also upload the code of your worker on ZetaPush cloud. You can push when you think that your code is ready to be used by your end-users.
From your terminal
$ npm run deploy|
|
This command uploads your code (front and worker) to the ZetaPush cloud. ZetaPush then handles the deployment by publishing your front and your custom cloud services.
The CLI displays the URL to access the published web page.
How it works
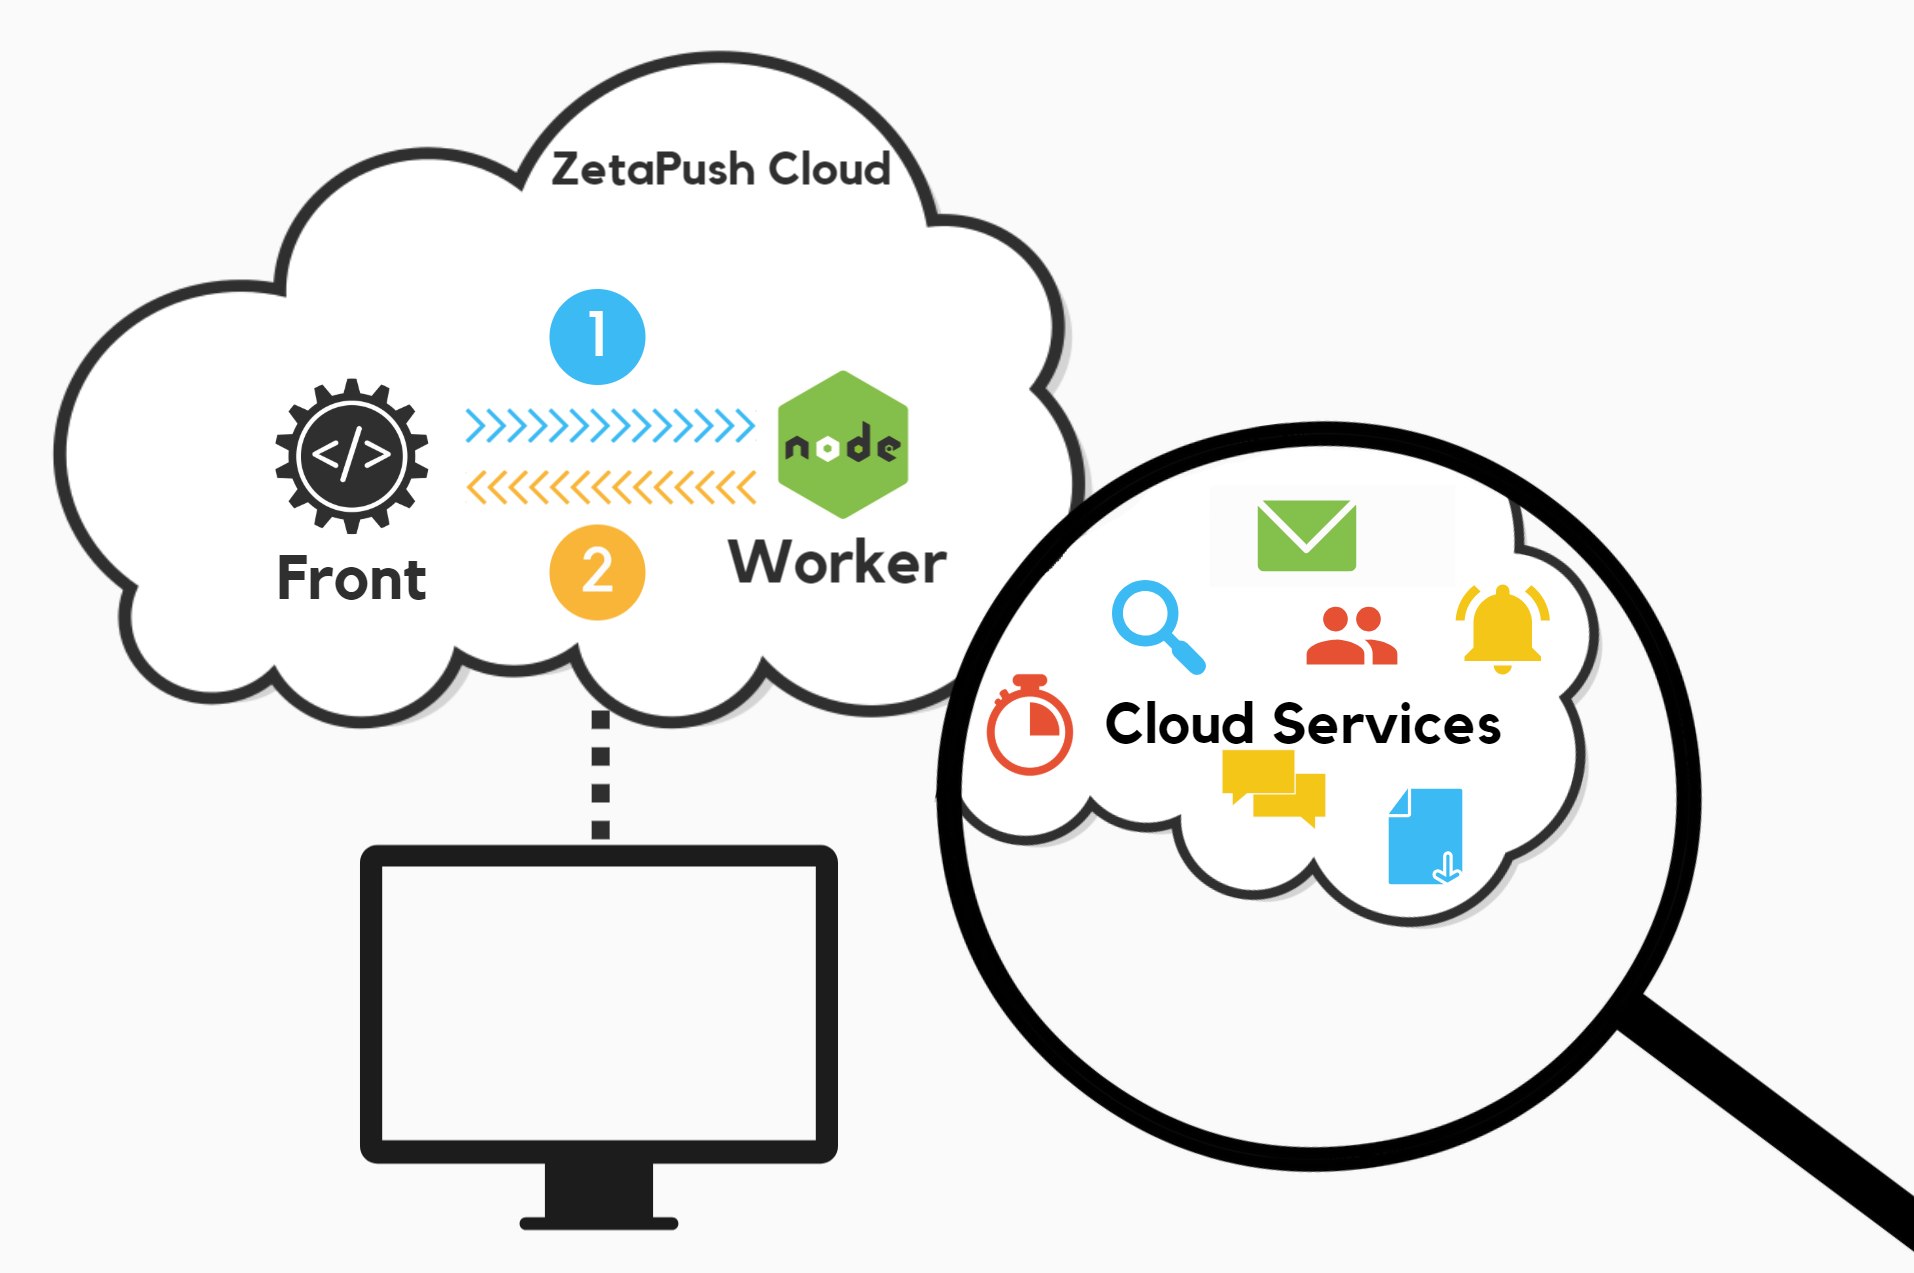
➊ Clicking on the button triggers a call to the ZetaPush cloud which in turn routes directly the call to the hosted Node.js
➋ The custom cloud service does its job and provides a response that ZetaPush routes back to the hosted web page
Now, the web page (front) and the custom cloud functions (defined in a worker) are hosted directly on ZetaPush cloud. The behavior remains the same as when code is executed local machine:
-
There are still the same 3 parts working together (web page, ZetaPush cloud and custom cloud function)
-
There is still a connection established by the client from the web page
-
There is still a message sent by the client to ZetaPush cloud that is routed to call the custom cloud function
-
There is still a message sent by the ZetaPush cloud that is routed to the client with the result of the custom cloud function